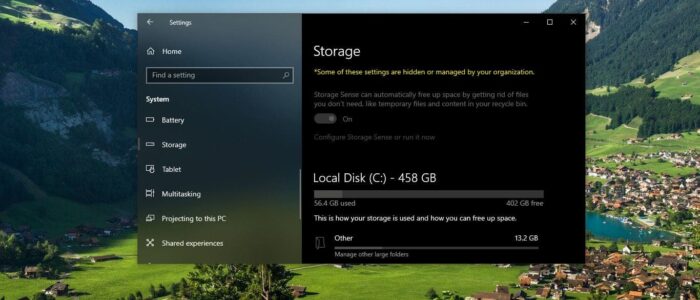
Storage sense is the Advance version of the Disk Utility Tool to monitor Disk space and Free up disk space on your device either manually or automatically. Storage sense is an optional feature, it’ll proactively delete temporary files, like those created by apps. It’ll delete files that have been in the recycle bin for more than 30 days, as well as files in the Downloads folder that haven’t changed in 30 days. If you’re running low on space, Storage Sense even includes an option to delete the previous version of Windows 10. If you are upgraded from Windows 10 Older version to a newer version you may notice windows.old folder on C Drive. You can delete that folder manually but using storage Sense it is very easy to remove. And it makes a lot of space on your drive. Configuring and using storage sense is easy, but few users reported that the storage sense service takes lot of Disk and CPU utilization. This article will guide you to Disable Storage Sense in Windows 10.
Disable Storage Sense:
By default the Storage Sense is Turned off , if you want to disable the Storage Sense permanently, then follow the below mentioned recommended methods
Using Registry Editor:
Note: Modifying the Registry is risky, and it causes irreversible damage to your OS Installation Follow the steps correctly. Friendly advice Before Modifying Registry Creating Restore Point is recommended.
Open the Run command by pressing Windows + R and type Regedit and hit enter. This command will open the Registry Editor console.
Now Navigate to the following path.
HKEY_LOCAL_MACHINE\SOFTWARE\Policies\Microsoft\Windows
From the left-hand side right-click on the Windows registry key and choose New > Key and name it as StorageSense.
Next click on the Storagesense Registry key and from the right-hand side right-click on an empty area and choose New > DWORD (32-bit) Value and name it as AllowStorageSenseGlobal.
Now Double click on the AllowStorageSenseGlobal DWORD and modify the Value to 1, and click on Ok.

Now Close the registry editor and open Windows settings > System > Storage, you can see the Storage Sense option is greyed out.
If you want to enable it back, then navigate to the following path and delete the StorageSense Registry key.
Using Group Policy Editor:
You can disable Storage Sense using Group Policy Editor also, if you are using Windows Home then use the Registry editor method. If you are using Windows 10 Pro or Enterprise editions then you can use the Group Policy method.
Open Run command by pressing Windows + R and type gpedit.msc and hit enter. This command will open the Group Policy Editor.
Now Navigate to the following path.
Computer Configuration > Administrative Templates > System > Storage Sense
From the left-hand side click on the Storage Sense and from the right-hand side double click on the Policy named Allow Storage Sense and open the Policy Settings.

Under Policy Settings, click on Disabled, then click on Apply and OK. If you want to enable it back then click on Enable or Not configured option to enable the Storage Sense windows feature.