Have ever tried to boot win10 in safe mode by pressing F8. As a Tech engineer, I tried many times but it won’t work. In this article, I explained why safe mode is not working by pressing F8, and how to enable safe Mode.
What is safe mode in windows?
Safe mode is a diagnostic mode of a computer operating system (OS). It can also refer to a mode of operation by application software. In Windows, safe mode only allows essential system programs and services to start up at boot. Safe mode is intended to help fix most, if not all problems within an operating system. In safe mode, an operating system has reduced functionality, but the task of isolating problems is easier since many non-core components are disabled, such as sound, network drivers, graphics driver etc. It varies by the operating system. From Windows NT to Windows 7 you can access the safe mode by pressing F8. But this traditional F8 for safe mode option was canceled by Microsoft. This traditional method was changed in Windows 8,8.1 and 10 to reduce the boot time process. Either Shift-F8 or a special GUI-based workaround is necessary to access safe mode.
Reason:
Reason for this. Microsoft has reduced the time periods for F2 and F8 keys to almost near-nil intervals less than 200 milliseconds if you want to know as a result of which the chances of it detecting the F8 interrupt is extremely low and users do not get time to press F8 for invoke the boot menu.
There are two ways to Resolve this issue.
1.You can either add the safe mode option to Boot Menu. 2.Enable F8 key to safe Mode option.
1. How to enable safe Mode to Boot Menu in Windows 10 or 8?
Open Command Prompt in elevated mode by pressing the Windows key + X and then select “Command Prompt (Admin)“.
Enter the following command in command prompt
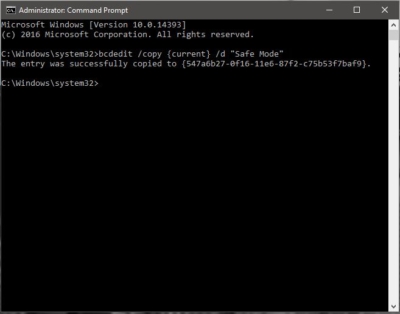
bcdedit /copy {current} /d “Safe Mode” What this does, command clones the current OS boot settings to a new boot entry named “Safe Mode”.
Close the Command Prompt after the command above is executed. Then press the Windows key + R to bring up the Run box.
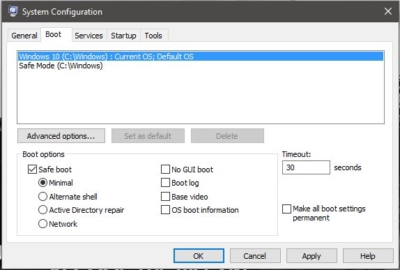
Type MSConfig and press OK. In the System Configuration window, click on the Boot tab, select the newly-created boot entry “Safe Mode” from the list. Check the box labeled Safe boot (under Boot options), and set the Timeout to 30 seconds. The boot screen menu will automatically disappear after 30 seconds to boot into Windows. Note that, when you select the Safe Mode option, your PC will reboot once again and bring you to Safe Mode automatically.
2. Enable F8 key to safe Mode option.
Press the Windows key + X to open the Quick Access menu. Select “Command Prompt (Admin)“.
Copy the following command and paste it into the Command Prompt:
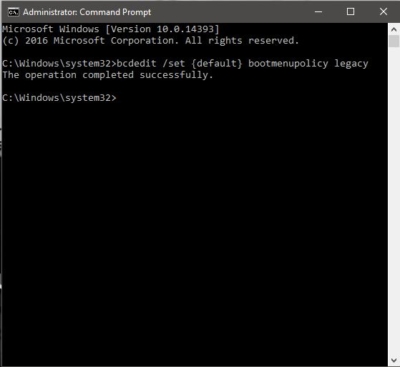
bcdedit /set {default} bootmenupolicy legacy Once you’ve executed the command, restart your computer. Repeatedly press the F8 key on your keyboard as soon as your computer is powering on, you can then see the Advanced Boot Options. From there you can select the Safe Mode. this is the best way to enable safe Mode If you want to disable the F8 Safe Mode Boot Menu again in future, you can open the elevated Command Prompt, then type this command: bcdedit /set {default} bootmenupolicy standard
Read Also:
How to Disable Safe Mode in Windows 11?


