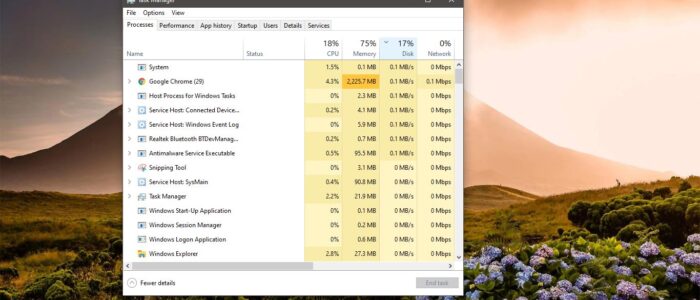
CDPSvc or Connected Devices Platform Service is a service that is introduced in recent builds of Windows 10 versions. Microsoft hasn’t Published much information about this service. But based on the quick research on the internet this service comes to action while connecting peripherals and external devices. It is associated with Printers & Scanners, Storage devices, Mobile Phones, Cameras, Bluetooth, and many other types of Connected devices. This service builds connections and sends messages between devices and PCs. Sometimes this service might cause high Disk Usage, this article will guide you to Fix CDPSvc High Disk Usage in Windows 10.
Fix CDPSvc High Disk Usage:
If you are facing high Disk Usage because of this service, then you can run the SFC scan once. If it doesn’t give fix then you can disable this service. Disabling this service won’t cause any issue, If you are using Xbox or any other Bluetooth device, disabling this service is not recommended. Find the service details below.
Service details:
File Display Name – Connected Devices Platform Service
Path – C:\WINDOWS\system32\svchost.exe -k LocalService -p

You can disable this service using the following methods.
Disable CDPSvc service using Windows Service Manager:
Open Run command by pressing Windows + R and type services.msc and hit enter. This command will open the Windows Services Manager console.
Now look for Connected Device Platform Service. Right-click on the Connected Device Platform Service and choose Properties.
Under Startup type, choose Disabled.

Click on Apply and OK to save the settings.
Disable CDPSvc service using Command Prompt:
Open Command Prompt in elevated mode. Now Type the following command.
sc config CDP user SVC type=own

After the execution of the command, restart the system once.
Disable Using Registry Editor:
Note: Modifying the Registry is risky, and it causes irreversible damage to your OS Installation Follow the steps correctly. Friendly advice Before Modifying Registry Creating Restore Point is recommended.
Open the Run command by pressing Windows + R and type Regedit and hit enter to open the Registry editor console.
Now Navigate to the following path:
Computer\HKEY_LOCAL_MACHINE\SYSTEM\CurrentControlSet\Services\CDPUserSvc
From the left-hand side click on the CDPSvc registry key and from the Right-hand side right-click on the Start DWORD and choose Modify.
Change the value from 2 to 4.

Click on Ok to save settings and restart the system once.


so if you are using bluetooth and running the sfc scan doesnt work what should i do?