In Windows 10 Lock Option is used to Lock your computer to Protect your work. Locking your computer keeps your files safe while you are away from your computer. Locking your computer is always a good habit to follow a locked computer hides and protects programs and documents, and will allow only the person who locked the computer to unlock it again.
To lock a windows computer you have to press and hold the Windows Logo key on your keyboard and press the L key. This key combination will lock your computer. Windows + L, Another way to Lock your computer is from the start menu you can click on the start menu and click on the Profile Picture, there you can see the Lock option. But few users reported that they are not able to find the Lock option in the power menu. After the windows update the lock option has been moved to new location.
In Windows 10 you can lock your PC in Multiple ways, in this article we are going to see how to fix Lock Option Missing From Power Menu and the Number of ways to Lock your PC.
Fix Lock Option Missing From Power Menu:
If you are encountering this issue after the windows update, then the lock option is hidden by the Windows update. You can re-enable this option manually using the following methods.
Check the Power Option:
Open Run command by pressing Windows + R and type Control and hit enter, this will open the control panel.
Now Look for the Power Option and click on it. Under the Power Option, click on Choose what the power buttons do.
After click that, first click on the Change settings that are currently unavailable. Under Shutdown settings, check the Lock option is Checked.
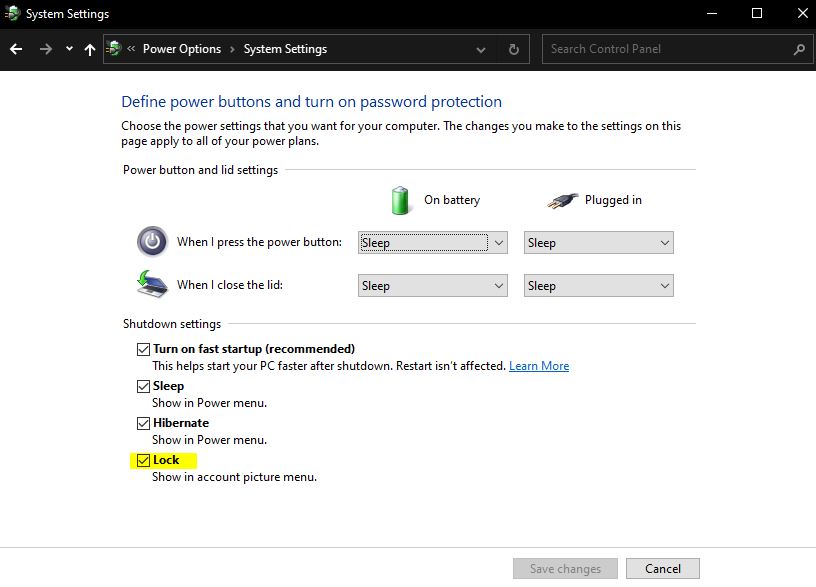
This will enable the Lock option.
Remove the Policy using Group Policy Editor:
Open run command by pressing Windows + R and type gpedit.msc and hit enter, this will open the group policy editor.
Now navigate to the following path
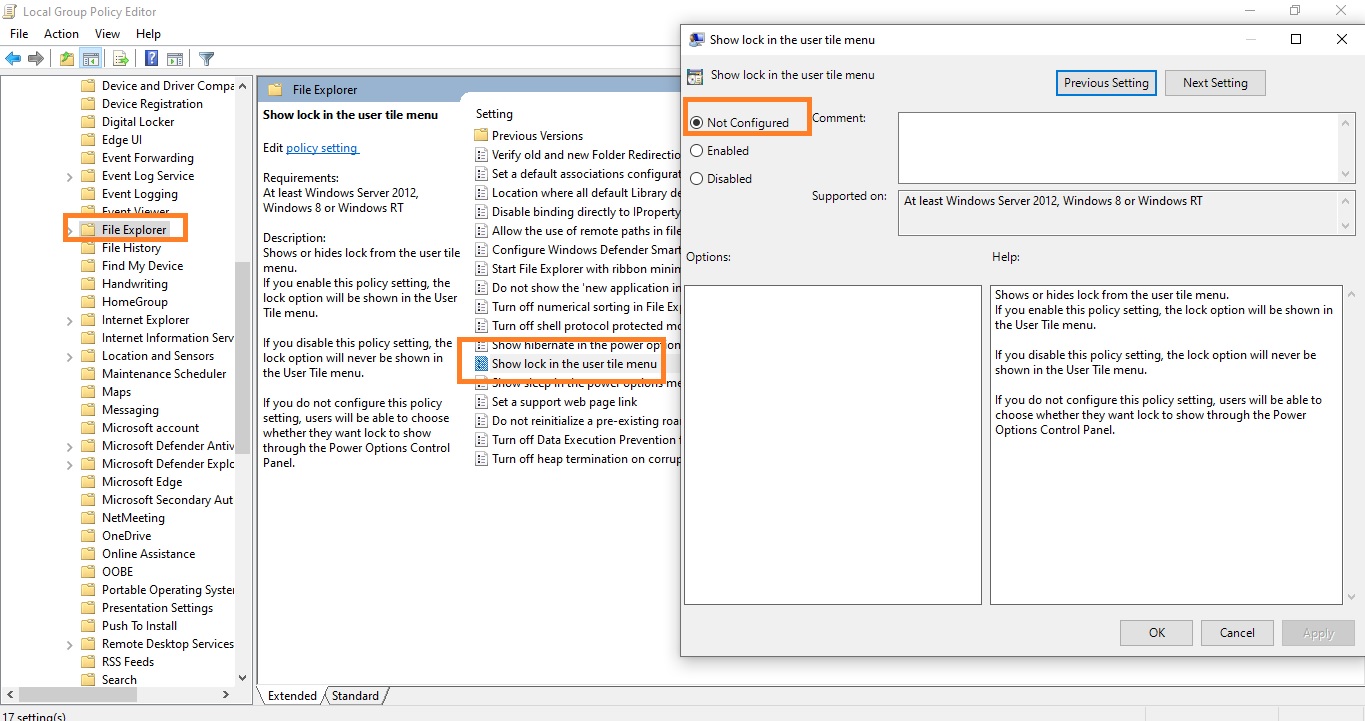
Computer Configuration > Administrative Templates > Windows Components > File Explorer
From the Left-hand side click on the File Explorer and from the right-hand side look for Show lock in the user tile menu and click on Policy setting.
Under Policy Setting check the Policy is set to Disabled, If it is in Disabled, move it to Not-configured or Enabled.
Fix Lock Option Missing Using Registry Editor:
Open Run command by pressing Windows + R and type Regedit and hit enter. This will open the Registry Editor.
Now navigate to the following path.
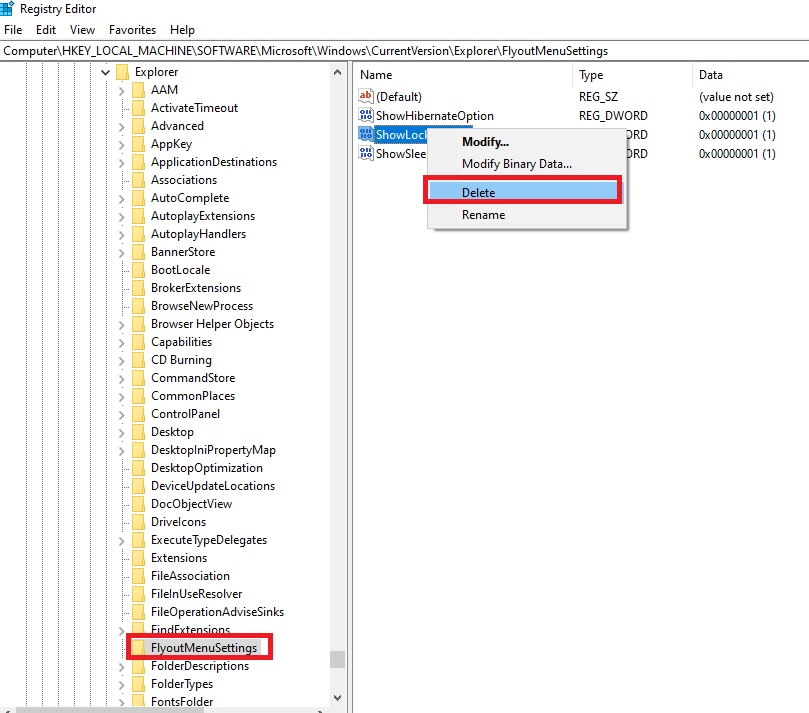
HKEY_LOCAL_MACHINE\SOFTWARE\Microsoft\Windows\CurrentVersion\Explorer\FlyoutMenuSettings
From the Left hand side click on the FlyoutMenuSettings Registry key and from the right hand side look for the DWORD named ShowLockOption.
Double click on the DWORD and set the Value to 1, or Just delete the ShowLockOption DWORD.
Now restart the system once and check the Lock option is visible in the User Profile menu.
Alternative Ways to Lock Your PC:
As I mentioned before, In Windows 10 you can lock your PC in Multiple ways, Lets see the methods one by one.
Lock Using Keyboard:
This is the quickest way to Lock your PC, Just press Windows Key + L key combination to Lock your PC.
Lock Using Power Option Menu:
Click on the Start Menu and click on the Profile Picture, there you can see the Lock option. Click on the Lock option, this will immediately lock your PC.
Lock Using Ctrl + Alt + Del:
Pressing Ctrl + Alt + Del, will give you the Power Options menu that contains Switch User, Sign out, Task Manager, and Lock. Click on Lock to lock your PC.
Lock Using Command Prompt:
You can Lock your PC/Computer using Command Prompt also.
Lock Using Desktop Shortcut:
Lock your PC/Computer, by creating a Desktop Shortcut.


