Recently one user reported that the Wifi icon missing in Windows Taskbar, in this post we’ll show how to fix Wifi icon missing from Windows Taskbar. In Windows we check the network connectivity by seeing the Network Icon on the taskbar, this icon is useful to give you a visual indication of the network connection status of your computer that you use to connect to a wireless network, wired Ethernet network, dial-up, or other network connections. This icon shows three types of status connected, not-connected, and Connected but no internet access. And, this icon is used to connect to the Wi-Fi with a single click and it’s also you can see the listed Wi-Fi networks.
Fix Wifi icon missing from Windows Taskbar:
If you encounter a similar issue, follow the below-mentioned resolution methods to fix the wifi icon missing in Taskbar issue. This issue occurs due to several reasons, Wi-Fi misconfigured settings, corrupted drivers, Windows System notification icon change, etc.
Solution 1: Check the Notification Setting
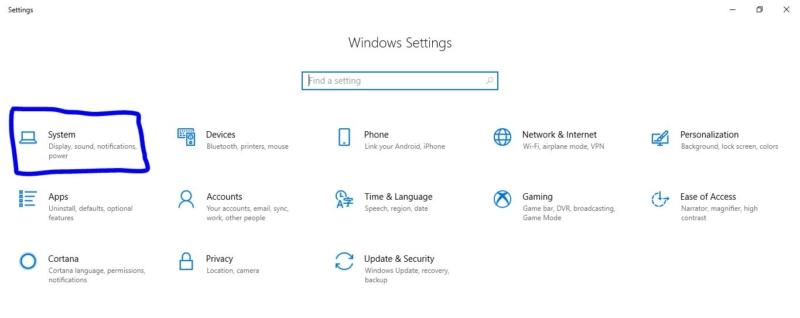
At first, if you notice the network icon missing, check the notification setting and open the setting from the start menu.
- Click on system and Notifications & actions.
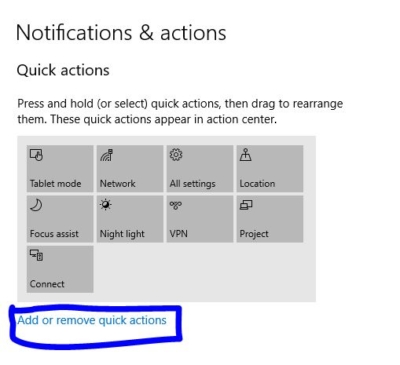
- Once you entered in notifications & actions setting, under the quick actions tab click on Add or remove quick actions.
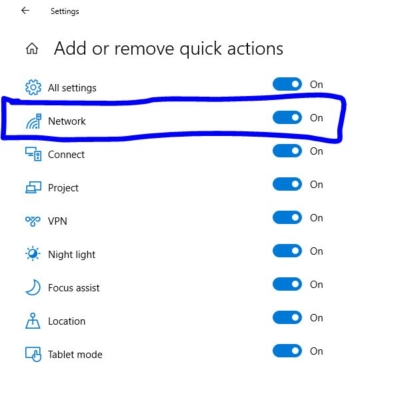
- Check on the network Quick action icon is turned on or not, If not enable it.
Solution 2: Enable the Networking Icon to Appear in the Notifications Area
- Right-click on the Taskbar and choose Taskbar settings.
- Under the Notification area section select which icon should appear on the Taskbar.
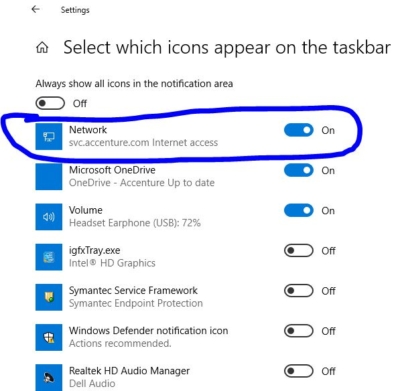
- Enable the Network Toggle switch to make it appear in the Taskbar.
On Windows 11, To add or remove the quick action icon, just Press and hold (tap) on the Quick Settings button on the taskbar until it opens.
Click/tap on the Edit quick settings (pencil) button.

Click on + Add button, choose the Wi-Fi icon and add the quick settings option to the taskbar.
Click on Done.
Solution 3: Enable Wi-Fi Adapter
Make sure the Wi-Fi network adapter is enabled, sometimes after the Windows driver update, this adapter will be in the disabled state. If the Wi-Fi Adapter is in the disabled state, the wifi icon won’t be visible in the Windows Taskbar. Follow the below steps to enable the Wi-Fi Adapter in Windows 11.
Open Windows Settings by pressing Windows + I and from the left-hand side click on Network & Internet and from the right-hand side choose Advanced network settings.
Under Related settings, click on “More network adapter options”, this will take you to the Network Connection Window.
Under the Network Connection Window, look for the Wi-Fi adapter and right-click on it, make sure it’s not greyed out, if the adapter is greyed out then it’s in a Disabled state.
To enable, right-click on the Wi-Fi adapter and choose Enable.
Check if the Wi-Fi icon is visible now on the Windows Taskbar.
Solution 4: Update Wifi Driver
Open Run command by pressing Windows + R and type devmgmt.msc and hit enter, this command will open the Device Manager.
Expand the Network adapters, right-click on the Wifi driver, and choose Update driver.

Or you can directly go to the Laptop or motherboard manufactures website and download the latest wifi driver.
Install the Latest wifi driver and restart your system once. Check if this resolves the issue.
Solution 5: Run Windows Network troubleshooter
Windows Troubleshooter is a wonderful tool that comes with all the versions of Windows 10, it helps users to troubleshoot various windows components. Under troubleshoot you can see a lot of windows components like audio, Printer, windows update, Bluetooth, keyboard, Power, etc. in that Network adapter is one of the windows components. Using troubleshooter it’s very easy to troubleshoot.
Open windows settings by pressing Windows + I and click on Update and Security, Next click on Troubleshoot.
Under Troubleshoot click on the Network Adapter and Run the Troubleshooter.
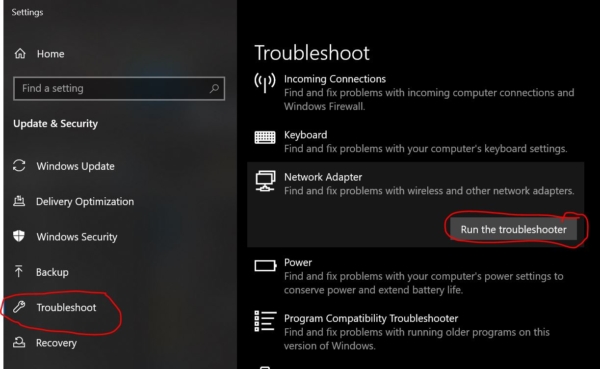
Once you start Troubleshooting then it will find and fix problems with wireless and other Network adapters.
Solution 6: Restart the Windows Explorer.
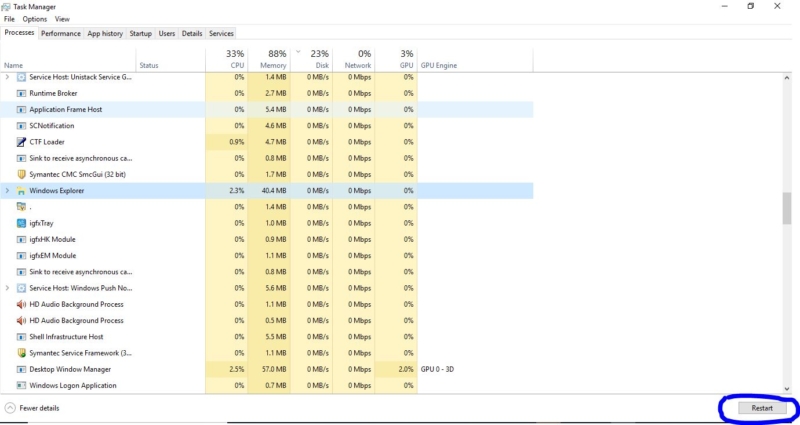
- Launch the Windows Task Manager by using the keyboard combinations Ctrl + Shift + Esc or right-clicking on the taskbar and then selecting ‘Task Manager’
- In the ‘Processes or Details’ tab, find ‘Explorer’
- Right-click Windows Explorer or explorer.exe and then select Restart. In Windows 7 select End Process.
- Click on File > Create New Task/New Task
- Type explorer.exe in the field and then press enter.
Solution 7: Rebuild the Icon Cache.
You may wonder why I have to rebuild the icon cache for network icon not appearing issue. Because icon cache corruption may happen sometimes, causing wrong icons to show up for certain programs or in certain areas of the Windows shell, or no icons at all. Rebuilding icon cache will clear all the corrupted icons and reset the icon cache. To know more about icon cache click here. To clear the icons cache in Windows 10, follow these instructions:
- Open Windows Explorer
- From the View tab, select Hidden items
- Then select Show selected items
- Go to C:\Users\User\AppData\Local\Microsoft\Windows\Explorer, where C:\ is the drive where you installed Windows 8 or 8.1 and User is the username of your account profile
- Select all files that begin with icon cache
- Right-click on these files
- Click Delete. To delete these files faster, press the Shift + Delete keys.
- Empty the Recycle Bin and restart the PC once.
Solution 8: Restarting the Network Service List.
- Open Run command by pressing Windows + R and type services.msc.
- Open the services management console and search for Network List Service.
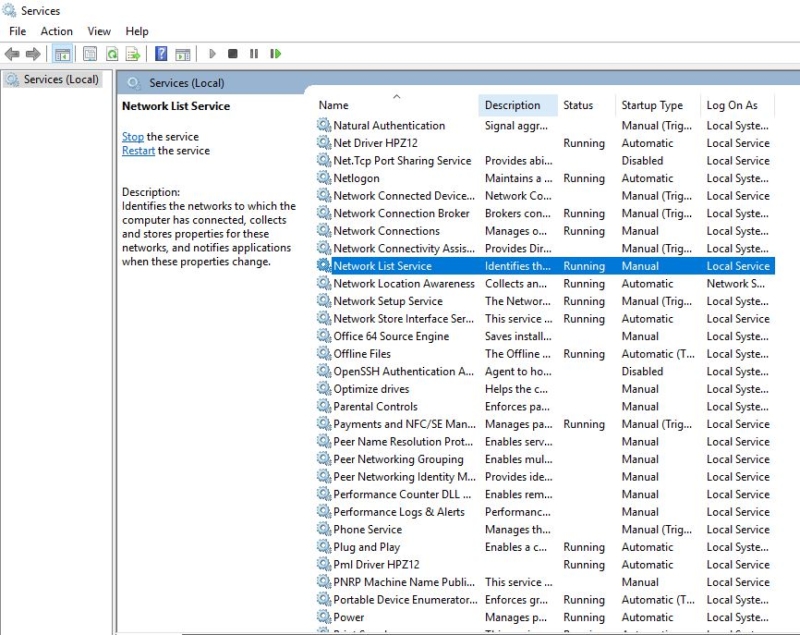
- Right-click on Network List Service and choose Properties.
- Select the startup type to Manual. And Start the service. If the service is already started restart the service once again.
Mostly this Solution will resolve the issue.
Solution 9: Use Command Prompt to fix the issue
Command prompt helps us to fix many windows and network-related issues, Open the command prompt in administrative mode and run the following commands, mostly this will fix the issue.
netsh winsock resetnetsh int ip resetipconfig /releaseipconfig /renewipconfig /flushdnsSolution 10: Check the Registry editor.
- Press the Windows + R, type ‘regedit’ and then hit Enter.
Navigate to the following registry key HKEY_LOCAL-MACHINE\SYSTEM\CurrentControlSet\Control\Network
- Under this key, locate the Config entry, right click on delete it. Don’t panic if you didn’t see this entry, it’s perfectly fine. Restart your computer. The config entry will automatically be reconstructed during a reboot.
If none of the resolution methods works, try recreating User Profile, or Resetting your Windows.
Read Also:
How to Troubleshoot and Fix Wi-Fi Not Connecting Automatically?
How to Enable End Task option on Taskbar context menu in Windows 11?

