In Windows Find My Device is a feature that lets you remotely track, Lock, and erase the data on a lost or stolen Windows Device like Laptop, Xbox, and mobile device. This feature can also allow you to control your device remotely. Using your Microsoft account, you can configure the Find My Device feature in Windows 10/11, this works only if the location of your device is turned on. This feature is very useful to track your device, if the location of your device is turned off then you won’t able to trace your device. If you turn on this feature then your device is always Traceable, Windows allows you to enable or disable the Find My Device Option using Windows settings. In this article, we’ll see how to Disable Find My Device Option permanently, so that users can’t access the Find the Device option using Windows Settings.
Disable Find My Device Option in Windows 10/11:
By default, the Find My Device Option is enabled in Windows 10/11, to Turn off the Find My Device Option just follow the below-mentioned steps.
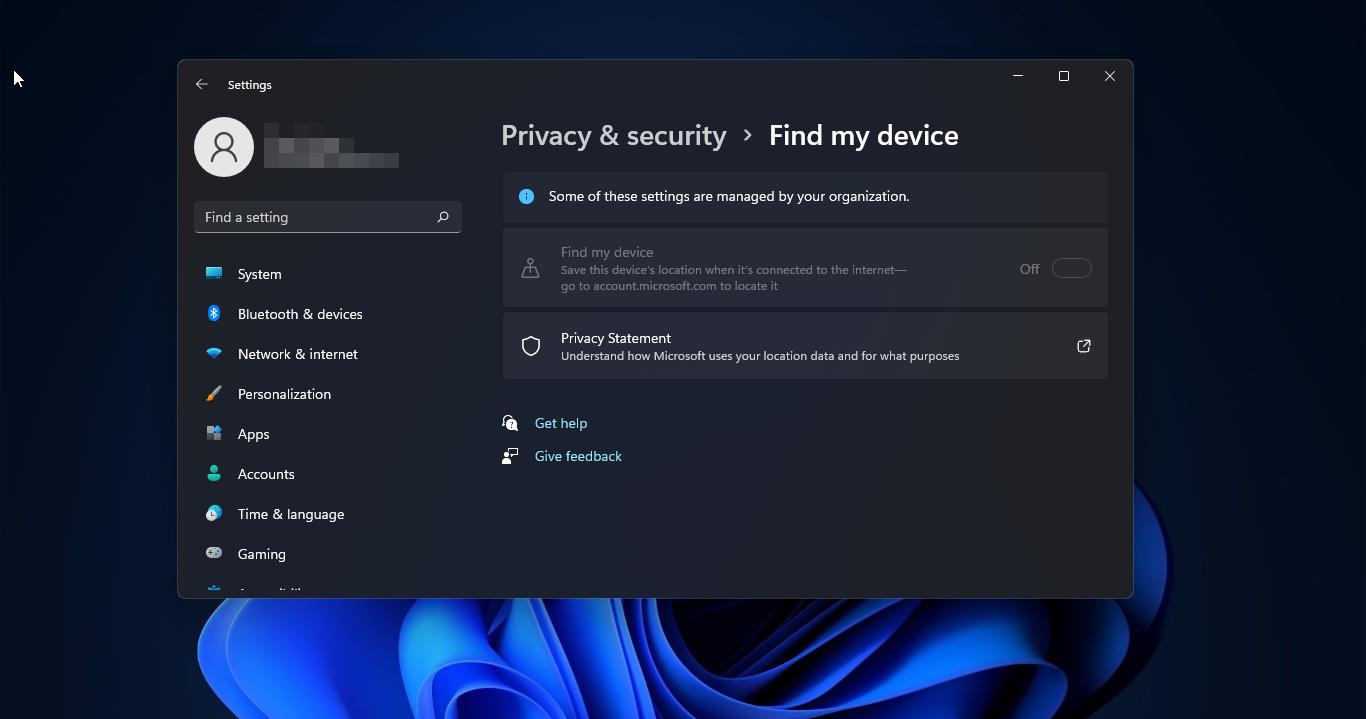
Open Windows Settings by Pressing Windows + I and click on Privacy & Security.
Under Privacy & Security from the right-hand side look for the Find My Device option. Turn off the toggle button to disable the Find my device.

If you want to permanently disable the Find my device feature, follow the below-mentioned methods.
Using Group Policy Editor:
If you are using Windows 10/11 Home edition, then this method is not applicable for you, just use the following registry editor method to Disable the Find my Device feature. This method is applicable for only Windows 10/11 Enterprise or Pro Users.
Read: How to Add Group Policy Editor in Windows 10 Home?
Open Run command by pressing Windows + R and type gpedit.msc and hit enter. This command will open the Group Policy Editor console.
Now navigate to the following path.
Computer Configuration > Administrative Templates > Windows Components > Find My Device
From the left-hand side click on the Find My Device and from the right-hand side look for the policy named, “Turn On/Off Find My Device”.
Double click on the Policy and open the Policy Settings. And choose Enabled, then click on Apply and Ok.

Once you applied the policy, open the command prompt and type gpupdate /force and then restart the system once.
Using Registry Editor:
Note: Modifying the Registry is risky, and it causes irreversible damage to your OS Installation Follow the steps correctly. Friendly advice Before Modifying Registry Creating Restore Point is recommended.
Open the Run command by pressing Windows + R and type Regedit and hit enter. This command will open the registry editor.
Now navigate to the following registry path.
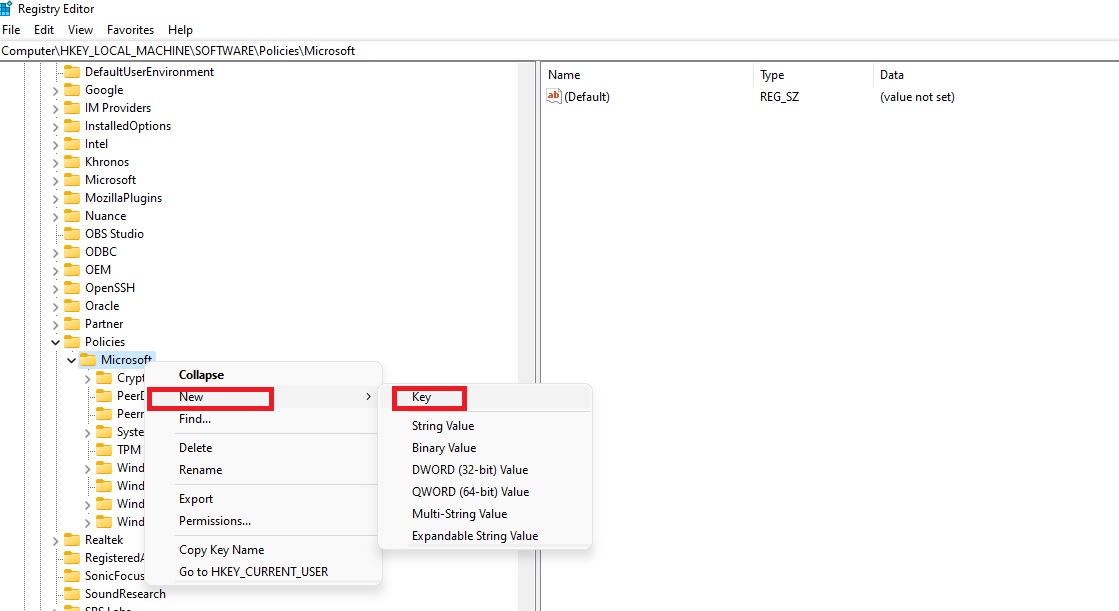
HKEY_LOCAL_MACHINE\SOFTWARE\Policies\Microsoft
From the left-hand side, right-click on the Microsoft Registry key and choose New > Key and name it as “FindMyDevice”.
Next right click on the FindMyDevice registry key and choose New > DWORD (32-bit) Value and name it as “AllowFindMyDevice“.
Double click on the AllowFindMyDevice and modify the value data as mentioned below.
0 – To Disable Find My Device
1 – To Enable Find My Device

Click on Ok, and restart the system once to make it effective.