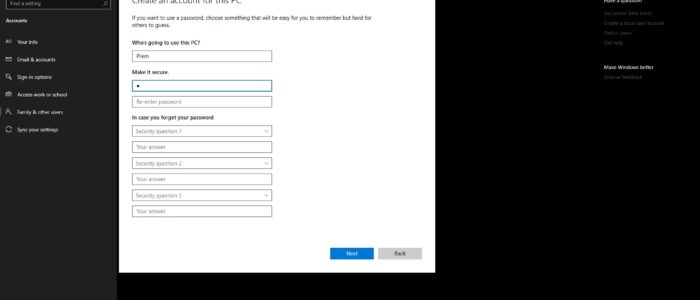
Microsoft introduced a security question in windows falls creator Update for creating a local account in windows 10, Most of the user don’t aware of security question added in windows 10. Now they included in windows build 17063, these security questions will provide an extra layer of protection for your local account in case you forget your password. Some of the available security questions for local account.
- What was your first pet’s name?
- What’s the name of the city where you were born?
- What was your childhood nickname?
- What’s the name of the city where your parents met?
- What’s the first name of your oldest cousin?
- What’s the name of the first school you attended?
If you are already using windows 10 without created security question, you can add it now. Follow the below steps to setup a security question for your local account.
- Press Windows + I to open Windows Settings.

- Click on Accounts.
- Click on Sign-in options.

- Under “Password,” click the Update your security questions link
- If prompted, enter your current account password.


- Click the OK button.
- Use the drop-down menu to select a security question.
- Type an answer.
- Then proceed to the next question and answer it. Then complete the remaining security questions.
- Click the Finish button.
You may wonder what is the use of creating the security question, the answer is so simple if you ever forget your password and you don’t remember your password you can try these answering security question and reset your account. At any time you can update or change questions. But mostly we can’t use these feature if you don’t want this feature you can disable this feature. This guide will help you to disable security Questions in windows 10.
Enable or Disable Security Question in windows 10
In windows 10 you can disable Security Question in three methods, Here i describe about all three methods.
- Using the Registry Editor.
- Using the Group Policy Editor.
- Using Power shell
Note: Modifying the Registry is risky, and it cause irreversible damage to your OS Installation Follow the steps correctly. Friendly advice Before Modifying Registry Creating Restore Point is recommended.
1. Disable Security Question Using the Registry Editor.
- Open run command by pressing Windows + R and type Regedit and hit enter to open the registry editor.
Now Navigate to the following path. HKEY_LOCAL_MACHINE\SOFTWARE\Policies\Microsoft\Windows\System
- Now right click on the system folder and create a new Dword 32.

- Set the name of this newly created DWORD as NoLocalPasswordResetQuestions.

- Now from the right-hand side Right-click on the newly created DWORD and modify the value to 1.
1–>Enable Security Question 0–>Disable security Question
- Click on Ok and close the registry editor and reboot to make the changes.
2. Disable Security Question Using the Group Policy Editor.
You can Disable or enable Security questions using Group policy Editor, If you are not aware of registry editing you can follow this method.
- Open run command by pressing Windows + R and type gpedit.msc and hit enter to open Group Policy Editor.
Now navigate to the following path. Computer Configuration > Administrative Templates > Windows Components > Credential User Interface

- On the right-hand side panel and Double click on Prevent the use of Security question for Local accounts and enable the policy.

To Disable the Security Question: Enable Prevent the use of Security question for Local accounts
To Enable the Security Question: Click on Not configure.
- Once done click on the exit group Policy editor and restart the PC to make a changes.
3. Disable Security Question Using Power shell
Using Powershell script is one of the handy tool to disable the security question. Github found a way to disable this feature using update_Allusers. Download the script from Github here. Update-AllUsersQA is a PowerShell script used to change or disable the security questions and answers for local users in a Windows 10 machine.
- First click on Clone or download folder and choose zip download option.

- Extract that zip folder and copy it to C drive for the easy use.
- Open power shell as an admin from the Cortana search.
- Now navigate the PowerShell to the C drive path, Type Cd\ this will change the path to the C drive
- Now again Type cd Update-AllUsersQA-master and hit enter, you are now ready to disable or enable the security question feature.

To Disable Security Question: Update-AllUsersQATo
Enable Security question: Update-AllUsersQA -answer SecretAnswer
To enable the security Question this is so simple just add –answer SecretAnswer
Note: If you are running the power shell script for the first time, you have to enable Execution of Scripts is Disabled on this system, click here to know more about that. Once done restart the system once to make it effective. I prefer this method is very easy and efficient way to handle more the 100 computers at the same time.