Print Preview is a feature that allows users to view an actual view of the print version of any document before printing a hard copy. By using Print Preview, you can find any errors that may exist or fix the layout before printing. And also, before printing you can change the Printer options, number of copies, and all page related settings. In MS word You can open printer preview by pressing Ctrl + P or Ctrl + F2. This shortcut Key opens print preview instantly. The actual use of the Print preview is to check and edit the document before printing the hard copy. But the recent update of Microsoft word does not allow users to edit the text in Print Preview Mode. Print Preview Edit Mode lets you edit the print preview without returning to the document. By default, this mode is disabled by Microsoft word, this article will guide you to Enable Print Preview Edit Mode in Microsoft word. You can use Print Preview Edit Mode feature instead of print preview.
Enable Print Preview Edit Mode in Microsoft word:
In Microsoft word, You can enable this feature in two Methods. Follow the below-mentioned methods to enable this feature.
Add the Print Preview Edit feature to the Quick Access Toolbar
Open an Empty or any word Documents, Click on File. Now click on Options, you will get a separate window that contains Microsoft Options.

Click on Quick Access Toolbar, now you can Customize the Quick Access Toolbar.
From the Choose Commands From the drop-down list choose All commands.
Now search for Print Preview Edit Mode. Then click on Add and then click Ok.
Now you can see the Print Preview Edit Mode Button on the Quick Access Toolbar, at the Top Right Corner.

Now if you click on this Print Preview Edit mode you can see the Print preview with Magnifier Mouse Cursor, On this page, you can edit the page. But this Magnifier Cursor only allows you to Zoom in or Zoom out and to edit the letter at the end of the Documents. Uncheck the Magnifier in the Preview section. Now you can get the cursor icon to click anywhere on the document and edit it.

Add the Print Preview Edit feature by customizing a ribbon
Open an Empty or any word Documents, Click on File.
Now click on Options, you will get a separate window that contains Microsoft Options.
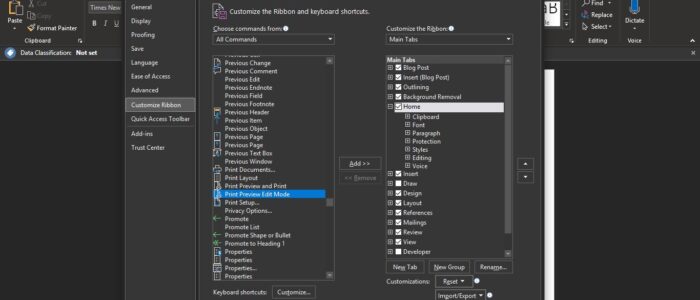
Click on the Customize Ribbon, Now you can customize the Ribbon and keyboard Shortcuts.
From the Choose Commands From drop-down list choose All commands. Now search for Print Preview Edit Mode.

Then click on Add and then click Ok.
wow thanks for this! been trying to figure out how to get rid of that magnifier!
Hi
In Print Preview Edit Mode I can see a completely blank page in a manuscript. I can’t see the blank page in the original Word document. If I hold the cursor over it I just get a circular no entry sign, I can’t delete it. I know it will be there when I send the ms off to print.
Advice most gratefully received!