Windows PowerShell is a command-line shell and scripting language designed especially for system administration. Its analog in Linux is called Bash Scripting. Built on the .NET Framework, Windows PowerShell helps IT professionals to control and automate the administration of the Windows operating system and applications that run on the Windows Server environment. PowerShell script can save you a lot of time on windows admin tasks. Using a PowerShell script, you can automate various tasks. The PowerShell script is a simple text file that contains a series of PowerShell commands, this text file needs to use the .PS1 extension for execution Purpose. To Prevent the Execution of malicious scripts, PowerShell enforces a security feature called Execution Policy. The execution policy is the feature that specifies the conditions under which PowerShell loads the configuration files and run the scripts. By default, PowerShell Execution Policy is set to restricted. There are four types of execution Policies available in PowerShell, following are the execution policies you can use. Restricted RemoteSigned AllSigned Unrestricted You can set the PowerShell execution policy by using the following cmdlet. Set-ExecutionPolicy On Windows, you set the Execution policy for the current user, local computer, or for a specific session. Execution policies for the current user and the local computer are stored in the registry. This article will guide you to Enable Windows PowerShell Script Execution on Windows 10.
Enable Windows PowerShell Script Execution:
You can enable the execution of the PowerShell script on Windows 10 in two different methods. Follow the below-mentioned steps to enable it.
Using Group Policy Editor:
Open Run command by pressing Windows + R and type gpedit.msc. This command will open the Group Policy Editor.
Now Navigate to the following Path.
Computer Configuration > Administrative Templates > Windows Components > Windows PowerShell
From the right-hand side look for the Policy named Turn on Script Execution. Double Click on it to open Policy Settings.
Under Policy Settings choose Enabled and there you can find three different Execution Policy.
AllSigned: Allow only Singed scripts
RemoteSigned: Allow local scripts and remote signed scripts
Unrestricted: Allow all scripts Set the execution policy to Allow Only Signed scripts.
Click on Apply and OK. Restart the system once. If you want to Disable it then follow the same steps above and choose the Disabled option.
Using Registry Editor:
Note: Modifying the Registry is risky, and it causes irreversible damage to your OS Installation Follow the steps correctly. Friendly advice Before Modifying Registry Creating Restore Point is recommended.
Open Run command by pressing Windows + R and type Regedit and hit enter. This command will open Registry Editor.
Now Navigate to the following path.
HKEY_LOCAL_MACHINE\SOFTWARE\Policies\Microsoft\Windows
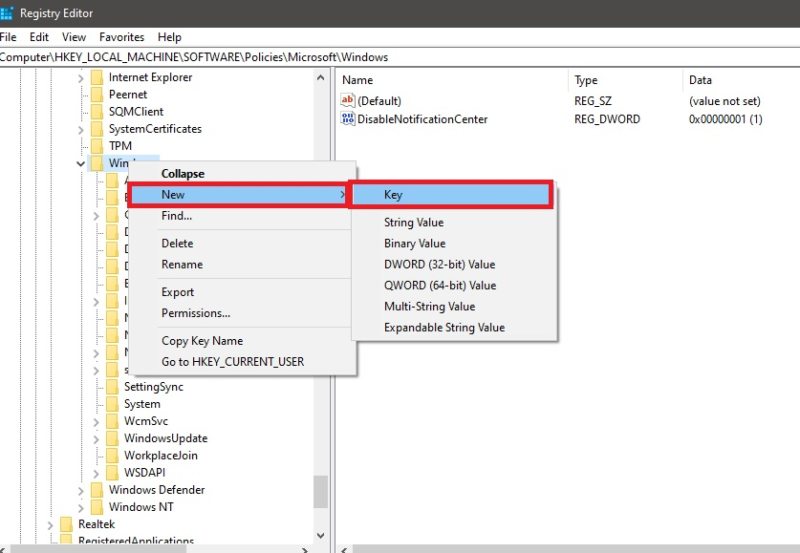
From the left-hand side right-click on the Windows and choose New > Key. And name the new registry key as PowerShell.
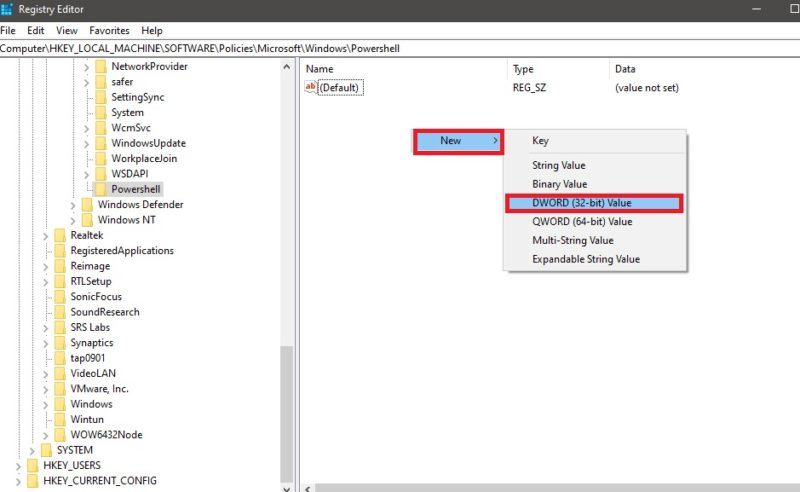
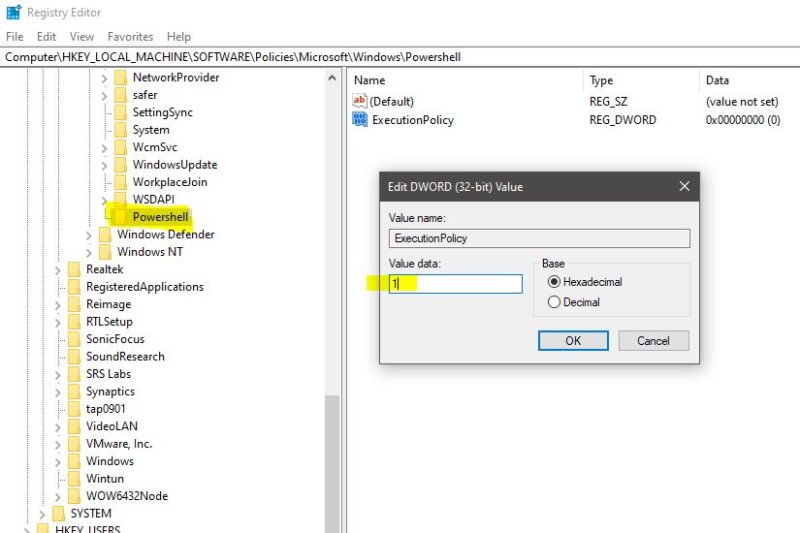
Click on the PowerShell key and from the Left-hand side Right-click on the empty area and choose New > DWORD (32-bit) Value. And Name the DWORD as EnableScripts.
Right-click on the newly created DWORD and choose Modify, and set the Value 0 – 1.
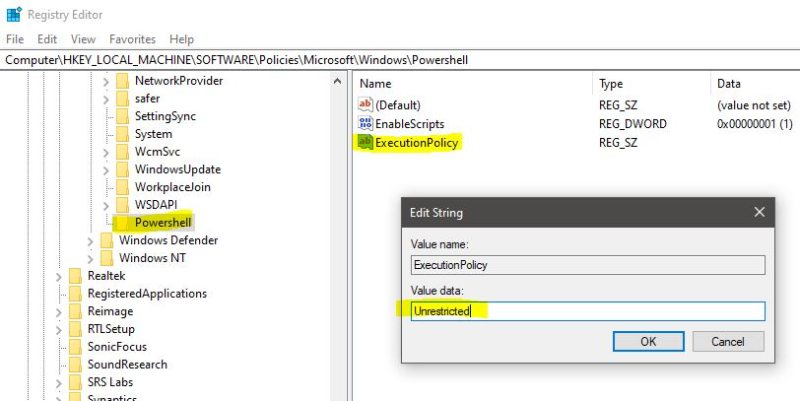
Now again right-click on an empty area and choose New > String Value. And Name the String Value as ExecutionPolicy.
And Right click on Newly Created String value and choose modify and enter the value as mentioned below.
AllSigned: Allow only Singed scripts
RemoteSigned: Allow local scripts and remote signed scripts
Unrestricted: Allow all scripts Click on Ok and Restart the system once.


