Microsoft released its major Operating System Windows 11 after 6 years, Windows 11 is rolled out on October 5, 2021. Microsoft announced that Windows 11 is free to Upgrade for existing Windows users. But to upgrade to Windows 11, the system has to meet the minimum system requirements. This rules out millions of existing Windows 10 devices from upgrading to Windows 11 with full support. But still, you can install Windows 11 on unsupported devices. But you’ll get the warning message before, during, and after the Windows 11 installation. This clearly indicates Microsoft doesn’t provide support if you install Windows 11 in an unsupported system. In recent preview builds you’ll get a “System requirements not met” watermark at the bottom right corner. And you can see the same warning message on the settings update page also. If you want to hide this Watermark then this article will guide you to Hide ‘System Requirements not met’ watermark in Windows 11.
Hide ‘System Requirements not met’ watermark in Windows 11:
Note: Modifying the Registry is risky, and it causes irreversible damage to your OS Installation Follow the steps correctly. Friendly advice Before Modifying Registry Creating Restore Point is recommended.
Open the Run command by pressing Windows + R and type Regedit and hit enter, This command will open the Registry Editor Console.
Now navigate to the following registry path
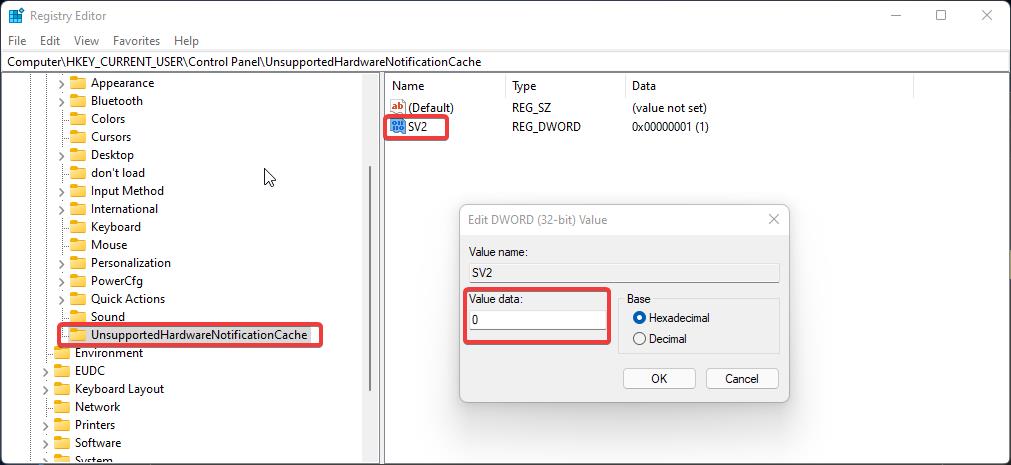
HKEY_CURRENT_USER\Control Panel\UnsupportedHardwareNotificationCache
From the left-hand side click on the UnsupportedHardwareNotificationCache Registry key and from the right-hand side look for the DWORD named SV2.
Double click on the SV2 DWORD and change the value from 1 to 0, Click on OK.
Restart your system once to make the changes effective.
Note: After the system restart, the Watermark in the bottom-right corner will be no longer visible. But this is a temporary fix, if you update the windows the Watermark will appear again. Follow the same steps again to make it disappear.
Method 2: Using Registry File:
Open Notepad and copy-paste the following code.
Windows Registry Editor Version 5.00

[HKEY_CURRENT_USER\Control Panel\UnsupportedHardwareNotificationCache]
"SV1"=dword:00000000
"SV2"=dword:00000000
Save it as RemoveWatermark.reg on Desktop Location, double-click on it, and merge the registry file. Now you’ll get one confirmation pop-up, click on Yes to confirm.
Restart the system once to make it effective. after the restart the watermark won’t be visible.
Read Also:
How to Remove System requirements not met watermark in Windows 11?


There is no SV2 at the location.. only SV1?
This whole situation is odd, because my computer was compatible and allowed the upgrade to v11, but now after the latest updates, the watermark is showing up? grrrr.