In this article, we’ll see how to Modify or change DHCP Lease Time on Your Router. Before Proceeding, first, you need to understand what is DHCP Lease Time. The DHCP lease time is an important part of DHCP settings. We know all the computers, servers, mobile devices communicate through the internet via IP address each and every device has its separate unique IP address. Devices will get the IP address from the DHCP server when it connected to the network. Every network has its own DHCP server, if you using a home network, then it may be built into your router. The DHCP server ensures that every device gets a unique IP address to connected to the Network. DHCP assigns an IP address to the client for a specific amount of time, this time is known as DHCP Lease Time.
In other words, DHCP Lease Time is the amount of time in minutes or seconds that a network device can use an IP address. Its kind of Reservation period, the IP address is reserved for that device until the reservation expires. In Windows 10 You can easily view your DHCP lease time period using PowerShell. This article will guide you to Modify DHCP Lease Time on Your Router.
Modify DHCP Lease Time on Your Router:
First, just note down the current DHCP Lease time Period, if you are using Windows 10 then follow the steps below to get the Lease time period.
Open PowerShell in elevated mode and type the following command and hit enter.
Ipconfig /all
This command will show full information about the current network interface IP address details. Find the following two pieces of information.
- Lease Obtained
- Lease Expires

The Lease Expires will show the reservation end date and time. If you want to increase or decrease the Lease time. Just follow the below-mentioned steps.
To Modify the DHCP Lease time, first you need to login to Your Router. To login to your router, first get the gateway IP address.
Open Command and type ipconfig and note down your Router Gateway IP address.

Now open any web browser and type the following URL in the address bar.
https://192.168.1.1 here I have entered my gateway IP address. Replace it with your Gateway IP address.
This URL will directly take you to the Router Login page, here you need to type your router Username and Password. Mostly the default login credentials is Printer below the router. Mostly users won’t change the Router username and password. If you already change the credentials then type the correct username and password to login to the Router.
This Router page contains the configuration settings of the router; you can manage the router and network configuration.
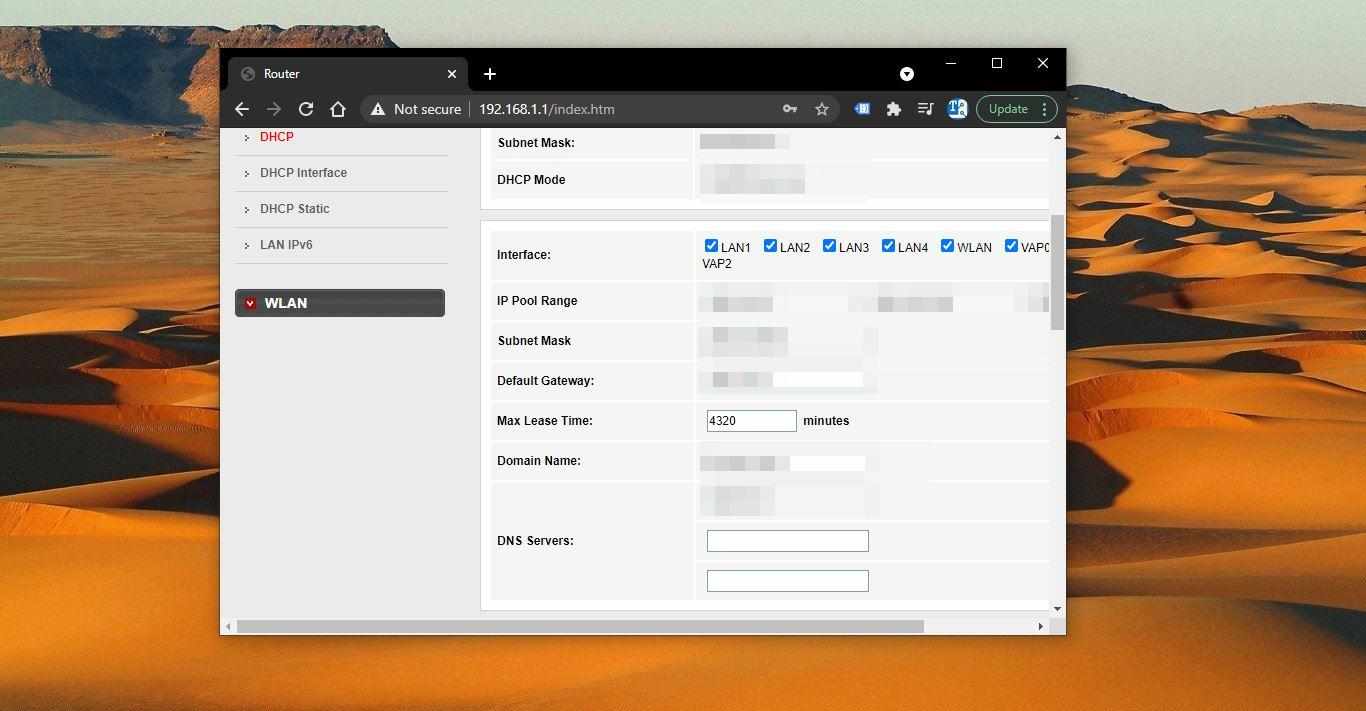
Once you reach the configuration page, click on Setup and choose the LAN Settings.
Under LAN settings look for the option, DHCP. Under the DHCP interface look for Max Lease Time.

Now you can see the default Max Lease Time Period, click on it and Modify the DHCP Lease Time. And choose Apply.
That’s it you have successfully changed the Lease time period.