Usually, to start a computer we have to move to our Desk and Press the computer power button and we have to move the mouse or keyboard to make the monitor active then finally we log in. This is quite an old procedure and the standard one. But what if you went on a vacation and you need some important file from your computer for that you have to take a remote of your PC, And no one is available in your home to help you. To avoid this situation and also to show a tricky method to switch on your PC, here we shown an easy and handy method to Turn on your computer with your android Phone. Before Proceeding this Method let’s discuss about WOL,
What is WOL and how it is works?
Note: To complete this setup your computer must support WOL(Wake-On-LAN)
- Wake on LAN is a technology that allows a network professional to remotely power on a computer or to wake it up from sleep mode. By remotely triggering the computer to wake up and perform scheduled maintenance tasks, the technician does not have to physically visit each computer on the network.
- Wake on LAN works by sending a wake-up frame or packet to a client machine from a server machine that has remote network management software installed. The Wake on LAN network adapter installed in the client receives the wake-up frame and turns on. The scheduled tasks then begin.
- To use Wake on LAN technology you need a Wake on LAN network adapter, Wake on LAN enabled motherboard, and remote management software:
- The Wake on LAN network adapter continually monitors the network looking for wake-up frames. The adapter must have a constant power source in order to boot up, which is usually from a special power supply that delivers a certain amount of power continually. The Wake on LAN adapter also decodes the wake-up frame to determine if it is a wake-up. The key to determining a wake-up frame is if the media access control (MAC address) address is repeated 16 times without breaks or interruptions.
- The motherboard must contain a complementary metal-oxide semiconductor (CMOS) that is designed to use Wake on LAN technology.
- The remote management software sends the wake-up frames. This software also enables a professional to disable Wake on LAN technology. The remote management software allows the scheduling of tasks that are needed and tells the computer to shut down or go into sleep mode when done.
Steps To Follow:
Step 1: Enabling WOL on BIOS
Before proceeding these steps, Go to BIOS setting and check for WOL setting is enabled. Restart your system and Press the desire function key as per your motherboard manufacturer. Most of the Motherboard has ( ESC, DEL, F2, or F8) as a BIOS setting Key. Try these combinations and enter into BIOS. Once you’re inside the BIOS, look for the Wake On LAN setting and enable it. You’re likely to find this along with other settings related to power management or networking. BIOS options vary from computer to computer, so you might have to do some digging of your own.
Step 2: Enable WoL for Your Network Adapter
After enabling WOL on Bios the next step is to verify your network adapter to setup the WOL setting.
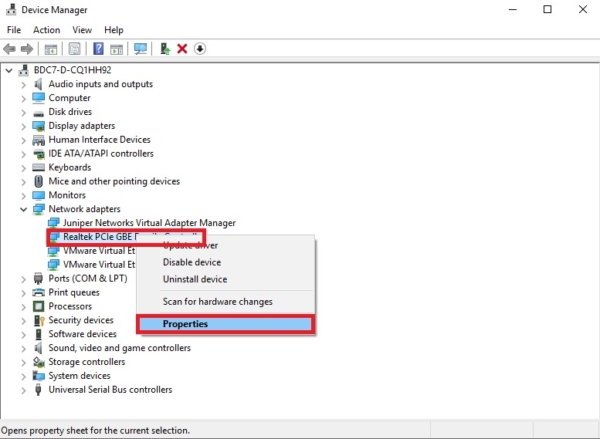
- Open run command by pressing Windows + R and type devmgmt.msc and hit enter to open device manager. Search for the network adapter in device manager. Expand the network adapter and choose the LAN network card.
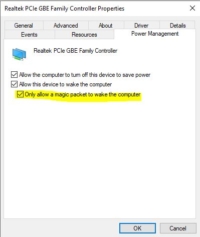
- Right-click on the Network card and select properties. In properties, window select the Power Management Tab.
- In power management Tab check allow this device to wake the computer. Also, check only allow magic packet to wake the computer.
- Once these options are enabled we are halfway done to Turn On Your computer with Your Android Mobile.
Step 3: Disable the Fast startup.
Disabling the Fast startup is the next step Because WoL only works when you’re trying to wake the computer from Sleep or Hibernation. WoL doesn’t work with the default hybrid shutdown in Windows 8 and Windows 10. The simple solution is to turn off fast startup. How to Disable the Fast Startup?
- Go to the control panel and search for and open “Power options” in the Start Menu.
- Click “Choose what the power buttons do” on the left side of the window. Click “Change settings that are currently unavailable.”Under “Shutdown settings” make sure “Turn on fast startup” is disabled.
- Now you can put your system to Sleep (Start > Power > Sleep).
Step 4: Installing wake on LAN on Android. This is quick and easy to install. Open play store and search for Wake on LAN, click and install it. Or click below to download the app.
- Open the Wake on Lan app from your android. Once you open the app you can see the plus button. Click on the plus button to add your computer.
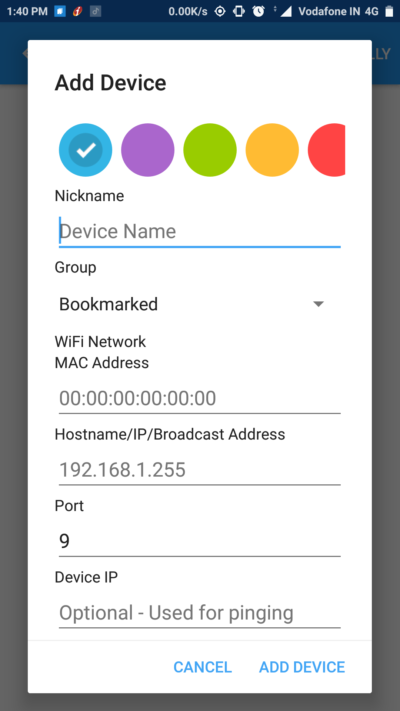
- At the Top right corner, you can see Enter manually button. Click on enter manually. Now it will ask some Device information.
- Enter your system hostname as a device name. To get the Hostname of your system go to cmd and Type Hostname.
- Then enter MAC address, to get MAC address goto cmd and type getmac. Now enter the mac address in the app.
- The enter IP address. To get the IP address goto cmd and type ipconfig /all. Type the gateway address in the field.
- Now everything is set, Give Add Device and now your device will be added in the List.
- Now you can Turn On your computer.





Try WolOn – Wake on LAN android app – https://wolon.app For me it works better and has more useful functionalities.