In this blog post, we will guide you on how to remove the Bing Chat Copilot button in Microsoft Edge using different methods. Also, we will focus on how to remove this Bing Chat button using the Registry editor. If you find this feature unnecessary and want to remove it from your Edge browser, then this step-by-step guide is for you.
What is Bing Chat Copilot Button?
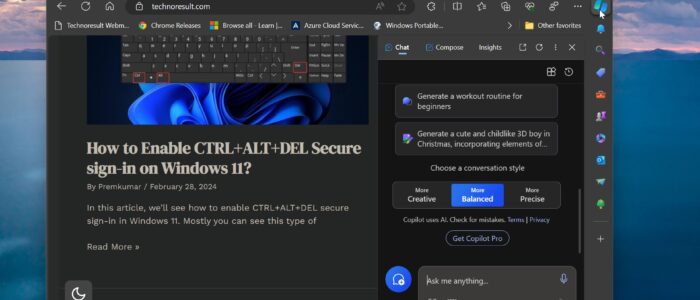
The Bing Chat Copilot button is a feature in Microsoft Edge that appears on the top right corner of the Edge browser window. It allows users to initiate a chat with a virtual assistant for help with various tasks such as searching the web, getting answers, or finding content. Microsoft added Bing AI Chat button to the Microsoft Edge 111 update. The update included the new “Discover” sidebar as well, it is also known as “Copilot with Bing Chat”, using this guide you can easily turn off the sidebar and copilot.
Reasons to Remove Bing Chat Copilot Button
While the Bing Chat Copilot button can be helpful for some users, there are several reasons why you might want to remove it:
- Personal preference: You prefer a clutter-free browser interface.
- Resource consumption: The button uses system resources even when not in use.
- Privacy concerns: You’re concerned about the data collection associated with the virtual assistant feature.
- Increased screen space: Removing the button can provide more space for other useful features or extensions.
Step-by-Step Guide to Remove Bing Chat Copilot Button
Method 1: Using Microsoft Edge Settings
The first step is to open the settings menu in Microsoft Edge. Follow these steps:
Launch Microsoft Edge by clicking on the Edge icon in your taskbar or by searching for it in the Start menu.
Click on the three-dot menu icon in the top-right corner of the browser window.
In the drop-down menu, select “Settings”.

The Settings page will open in a new tab. After opening the settings page, navigate to the “Sidebar” settings section.
Under the Customize sidebar section, Locate the “Always show sidebar” option.
Toggle the switch beside the option to the “Off” position.

The Bing Chat Copilot button will now be hidden from the Sidebar.
Method 2: Disable Bing Chat Copilot Button via Registry Editor
If you’re using a managed Windows environment or want to disable the Bing Chat Copilot button for multiple users, you can also accomplish this through the Registry editor. Here’s how:
Open the Run dialog by pressing the Windows key + R.
Type “regedit” (without quotes) and click “OK”.
This will open the Registry Editor console.
Navigate to the following registry path.
Computer\HKEY_LOCAL_MACHINE\SOFTWARE\Policies\Microsoft\Edge
Right-click on the “Edge” registry key and choose New > DWORD (32-bit) Value, and name the DWORD as “HubsSidebarEnabled”.
Double click on “HubsSidebarEnabled” DWORD and set the value data to 0, click on OK.

Now close the registry editor and Open Microsoft Edge and type edge://policy in the address bar and hit enter.
Click on Reload Policies, and Now the Sidebar will disappear along with the Bing button.

Remember, if you ever decide to re-enable the Bing Chat Copilot button or want to explore other features in Microsoft Edge, you can easily revert the changes by following the same steps described in this guide.
Disable the Microsoft Edge Sidebar using Microsoft Intune, If you want to implement this method for multiple users in your organization, then here is the way to achieve this via the Microsoft Intune admin portal.
Read Also:
How to Disable Copilot feature using Intune?
How to Disable Windows Copilot in Windows 11?
How to Disable the Microsoft Edge Sidebar using Microsoft Intune?
List of Windows Copilot Prompts to Change Windows Settings