Disk Management is a Microsoft Windows utility first introduced in Windows XP as a replacement for the fdisk command. Disk Management is used to manage drives installed in your computer like Hard Disk, Optical Disk Drives, and flash drives. The main purpose of Disk management is to partition drives, format drives, assign drive letters. You can also do many more things using Disk management. Earlier Microsoft used fdisk command to manage disk, then it is replaced with the diskpart, Diskpart is a command-line tool for disk management. You can also use Disk Management to check free hard drive space. Look under the Capacity and Free Space columns (in the Disk List or Volume List view) to see the total storage capacity of all the disks as well as how much free space is remaining, which is expressed in units (i.e. MB and GB) as well as a percentage. Find the screenshot below for reference.

To Open Disk Management you can use Run command for quick navigation. Open run command by pressing Windows + R and type Diskmgmt.msc and hit enter this will open the disk management tool.
OR you can navigate to the following path
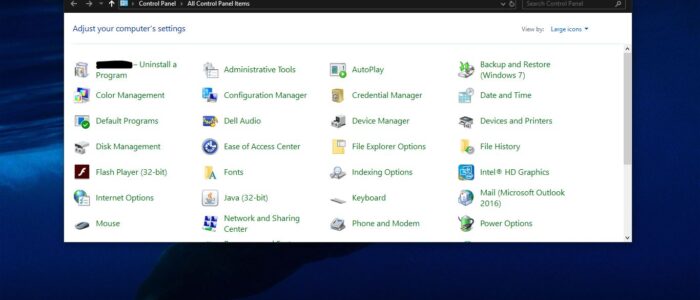
Control Panel\All Control Panel Items\Administrative Tools\Computer Management

Click and open computer management from the right-hand pane expand the storage and click on Disk Management.
By default, there is no control panel item for Disk Management, In this tutorial will show how to Add Disk Management to the control panel in Windows 10/8/7
Steps Add Disk Management to the control panel
Note: Modifying the Registry is risky, and it causes irreversible damage to your OS Installation Follow the steps correctly. Friendly advice Before Modifying Registry Creating Restore Point is recommended.
Open Notepad and copy-paste the below-mentioned code.
 Windows Registry Editor Version 5.00

[HKEY_CLASSES_ROOT\CLSID\{b46568bd-49f9-408e-a9c6-121f6b9555ed}]

@="Disk Management"

"InfoTip"="Create and format hard disk partitions"

"System.ControlPanel.Category"="2"

"System.ControlPanel.EnableInSafeMode"="3"

[HKEY_CLASSES_ROOT\CLSID\{b46568bd-49f9-408e-a9c6-121f6b9555ed}\DefaultIcon]

@="%WinDir%\\System32\\dmdskres.dll,-344"

[HKEY_CLASSES_ROOT\CLSID\{b46568bd-49f9-408e-a9c6-121f6b9555ed}\Shell]

[HKEY_CLASSES_ROOT\CLSID\{b46568bd-49f9-408e-a9c6-121f6b9555ed}\Shell\Open]

[HKEY_CLASSES_ROOT\CLSID\{b46568bd-49f9-408e-a9c6-121f6b9555ed}\Shell\Open\command]

@="mmc.exe diskmgmt.msc"

[HKEY_LOCAL_MACHINE\SOFTWARE\Microsoft\Windows\CurrentVersion\Explorer\ControlPanel\NameSpace\{b46568bd-49f9-408e-a9c6-121f6b9555ed}]

@="Disk Management"
OR Download the Registry file here Now Save it has Add_Disk_Management.reg on the desktop location. Double click on the registry file and you will get UAC pop up click on Yes, after that you will get one warning message as shown below give Yes and proceed.

That’s all you successfully added Disk Management to Control panel.
To Remove Diskmgmt from Control Panel.
Open Notepad and copy the below mentioned Code and save it as Remove_Diskmgmt.reg
 Windows Registry Editor Version 5.00

[-HKEY_CLASSES_ROOT\CLSID\{b46568bd-49f9-408e-a9c6-121f6b9555ed}]

[-HKEY_LOCAL_MACHINE\SOFTWARE\Microsoft\Windows\CurrentVersion\Explorer\ControlPanel\NameSpace\{b46568bd-49f9-408e-a9c6-121f6b9555ed}]
OR Download the registry file here. Double-click and merge the registry file to remove Disk Management from Control Panel.
Read Also:
How to Shrink Drive in Windows 11 using Command Prompt?