Windows Security Center is also known as Defender in windows 10. It is the Antivirus Programs which is inbuild in windows 10, Windows Defender is the next generation protection component of Microsoft Defender Advanced Threat Protection (Microsoft Defender ATP), Windows Defender comes with the most advanced feature, which starts from the design of a panel displaying its various modules and their status. You can find the seven protecting areas of the windows defender below.
- Virus & threat protection
- Account
- Firewall & network protection
- App & browser control
- Device Security
- Device performance & health
- Family options
From these seven protecting areas, Scanning the computer is the part of the virus and Protection feature, which is very important for any antivirus, once the defender is enabled the system full scan will happen automatically and the defender detects a suspicious file on your system. Windows Defender will continuously monitor your computer system for security thread. Defender offers you different types of scan options. You can find scan options like Quick Scan, Full scan, Custom scan, and Microsoft Defender Offline Scan under Virus & threat protection option. This article will guide you to scan individual Files and Folders using Microsoft Defender.
Scan individual Files and Folders using Microsoft Defender:
Using Defender you can scan any individual files and folder in three different ways. Let’s see the below-mentioned methods in detail.
Using Files Explorer:
In this method, we are going to use File Explorer to scan Individual files and folders. This is a simple and straightforward way to scan files and folders.
Open File Explorer by pressing Windows + E, and navigate to the file or folder path.
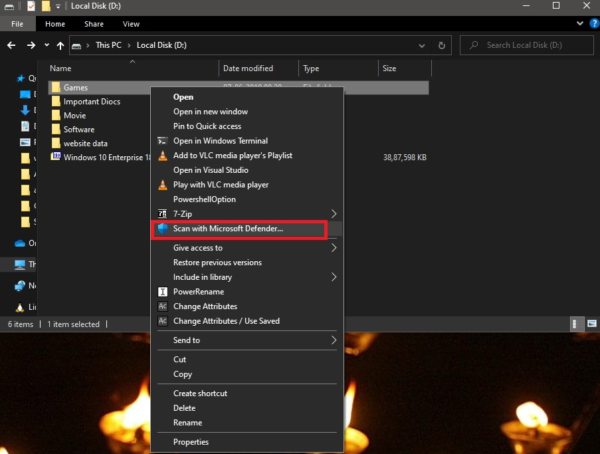
Next right-click on the file or folder and choose the Scan with Microsoft Defender option.
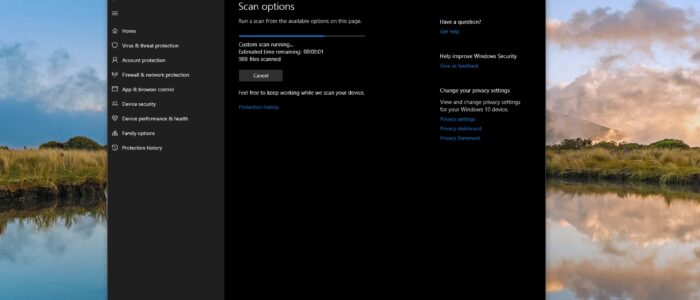
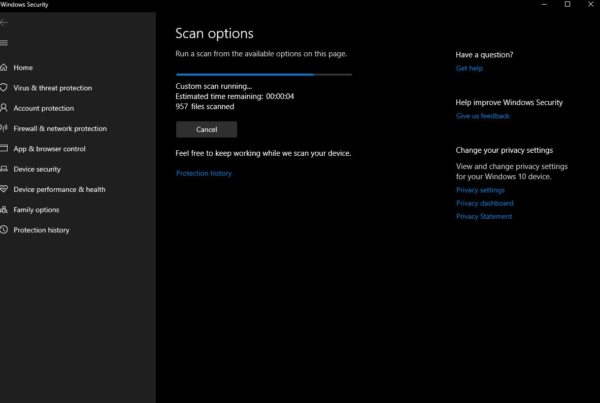
Now Defender will launch automatically and take you to the Virus & threat protection page. And under Scan options, you can see the Progress of the scanning. It will take time depends on the file or folder size.
Scan individual Files and Folders using Using PowerShell:
If you want to create a script to scan a specific file or folder with Defender using PowerShell then you can use the following command line.
Open PowerShell in elevated mode. And copy-paste the following command and hit enter.
Start-MpScan -ScanType CustomScan -ScanPath “D:\website data”

Note: Change the file or folder path with your actual path to file or folder to scan. If you want to scan a file then you need to enter the path with the file extension. The command will look like this. Start-MpScan -ScanType CustomScan -ScanPath “D:\website data\test.txt”
Using Command Prompt:
You can also use the command prompt to scan files or folders with Microsoft Defender.
Open Command Prompt in Elevated mode. Now type the following command and hit enter.
cd c:\ProgramData\Microsoft\Windows Defender\Platform
This command will take to the Windows Defender Platform path. Next, you need to verify that the Latest Version of Microsoft Defender is installed.
Now type Dir Command this will show the latest version of Microsoft Defender. Once you confirm the version of the defender then note down the version number. Now type the following command and hit enter to enter into the specific version folder. cd 4.18.2011.6-0 Type the following command and hit enter to scan files and folders
mpcmdrun -Scan -ScanType 3 -File “D:\website data”

Note: Change the file or folder path with your actual path to file or folder to scan. If you want to scan a file then you need to enter the path with the file extension. The command will look like this. mpcmdrun -Scan -ScanType 3 -File “D:\website data\test.txt “.
Read Also:
How to Scan for Virus using Command prompt in Windows 11?

