The WIN+X Menu is a pop-up menu with shortcuts to manage windows tools easily, it is also called as Windows Tools Menu, Power User Task Menu, Power User Hotkey, WinX Menu. By default, this shortcut menu is presented in Windows 10 and Windows 8. This WIN+X Menu was introduced in Windows 8 and developed in windows 10. You can bring up the WIN+X Menu with your keyboard shortcut by pressing Windows + X together and with a mouse, you can right-click on the windows menu to bring this Power user menu. If you are using a tablet you can press and hold the start menu icon to bring the power user menu. By default, the WIN+X menu in windows includes the below-mentioned tools
- Programs and Features
- Mobility Center
- Power Options
- Event Viewer
- System
- Device Manager
- Network Connections
- Disk Management
- Computer Management
- Command Prompt
- Command Prompt (Admin)
- Task Manager
- Control Panel
- File Explorer
- Search
- Run
- Shut down or sign out
- Desktop
Today in this tutorial will show you how to add shortcuts to WIN+X quick link menu in windows 10. There are three methods to customize the WIN+X Menu.
Method 1: Customize using File Explorer and Hashlnk
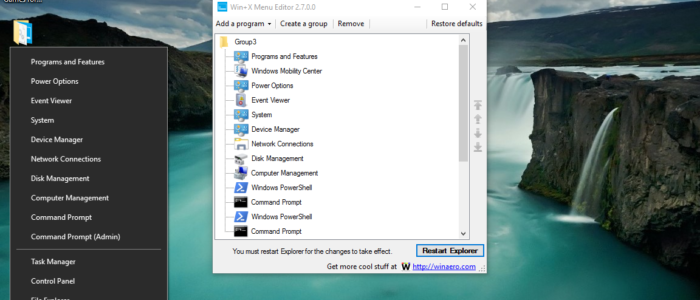
Method 2: Customize WIN+X Menu Editor.
Before proceeding to these methods, we will look into how to replace the command prompt with the windows power shell. This is the first modification which performed before customizing the WIN+X Menu. To perform this Just navigate to Settings > Personalization > Taskbar and then selecting the ‘Replace Command Prompt with Windows PowerShell …’ from the list of options.
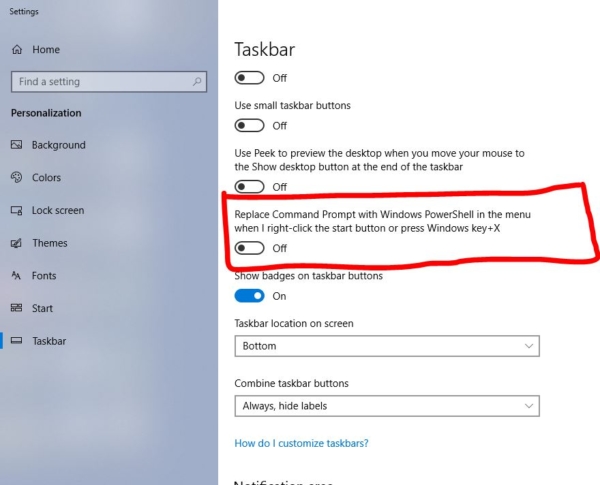
So this is the only direct customization option that is directly inbuilt in Windows 10.
Method 1: Customize using File Explorer and hashlnk
- First, we have to know the WIN+X Shortcut Folder path, The WIN+X Shortcut Folder path is mentioned below.
%LocalAppdata%\Microsoft\Windows\WinX
- Open run command by pressing Windows + R and paste the path in it, this will open the WIN+X shortcut path from the file explorer.
From there you can see three folders. Group1 Group2 Group3
- These Group are the categories that is separated in the WIN+X menu. Look the image below to see it in detail. Now you can Create a Shortcut for any program for example here I took putty shortcut.
- Copy and paste it into the Group Folder that you like.
- Next Download the hashlnk_0.2.0.0.zip file by Rafael Rivera on GitHub. from this link
- Extract the HashInk_0.2.0.0.Zip and Copy the hashInk.exe to Desktop and Note down the path.
- In My case I copied it to Picture Folder.
“C:\Users\PremNash\Pictures\hashlnk.exe”
- And also note down the shortcut path which you copied in the Group Folder in my case this is my shortcut path.
“C:\Users\PremNash\AppData\Local\Microsoft\Windows\WinX\Group2\putty.exe.lnk” Note: Once you created the shortcut you have to mention the path and file name correct or you can’t able to execute the command. If you don’t know the file name just right click on that shortcut which you pasted in Group folder and select details tab, from there you can see the file name and path details correct.
- Now open the Command prompt in admin mode. And past the following path as I shown below.
C:\WINDOWS\system32>"C:\Users\mx.premkumar\Pictures\hashlnk.exe" "C:\Users\mx.premkumar\AppData\Local\Microsoft\Windows\WinX\Group2\putty.exe.lnk"
- Once the command executed successfully you will get a message from the command prompt stating that “Hash generated and applied (0xD9B07119)”
- Now you can Open the Win + X menu and check it, The Putty will be present in the Group 2 part.
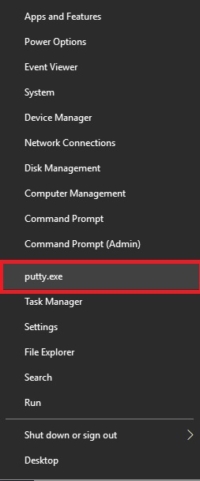
- If not just restart the Explorer from the task manager.
Method 2: Customize WIN+X Menu Editor.
This method is very easy compare to the previous method. Win+X Menu Editor is based on the hashlink (http://www.withinwindows.com/2012/04/04/windows-8-secrets-the-winx-menu-and-its-hashing-algorithm/)source code by Rafael Rivera. This Source code is developed like GUI software by Winaero.
- Click here to download the Software.
- Right-click on the WinXEditor and select run as administrator. Then click on Add a Program which you like.
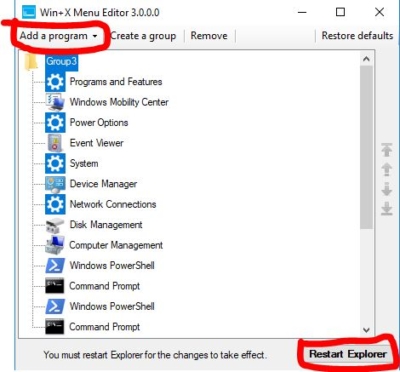
- You can also move the specified program to the specific Group. Right click on the program and choose Move to Group. Once done click on Ok.
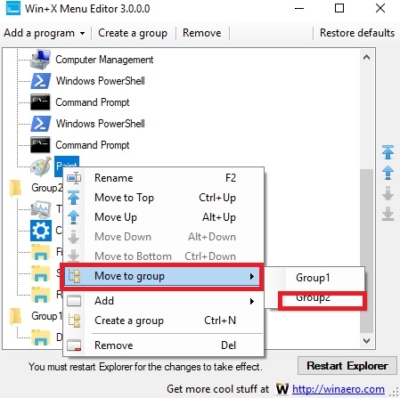
- Click on restart explorer once everything is over.

