If you are having a single partition on your computer, no worry using this method you can create one more partition without affecting any data on your computer. By default, Windows comes with Disk Management utility, Disk Management is a Microsoft Windows utility first introduced in Windows XP as a replacement for the fdisk command. Disk Management is used to manage drives installed in your computer like Hard Disk, Optical Disk Drives, and flash drives. The main purpose of Disk management is to partition drives, format drives, assign drive letters. You can also do many more things using Disk management. Earlier Microsoft used fdisk command to manage disk, then it is replaced with the diskpart, Diskpart is a command-line tool for disk management. You can do more functions using Diskpart command-line tool. This article will guide you to Shrink Drive in Windows 11 using Command Prompt.
Shrink Drive in Windows 11 using Command Prompt:
You can Shrink any Drive in Windows using two different methods, the First method by using the Disk Management tool, and the second method by using the disk part command line tool.
Method 1: Using Disk Management Console
Open Disk Management, open Run command by pressing Windows + R and type diskmgmt.msc and hit enter, this command will open the Disk Manager.
Right-click on the partition which is having more free space and choose Shrink Volume. set the shrink space, the system will automatically set the shrink space, if you want you can increase or decrease the shrink space. Then click on Shrink and create unallocated space.

Under the Shrink Properties, you have to Enter the amount of space to shrink in MB, calculate the size of how much you want to shrink the volume and click on the Shrink button.

The shrinking will take time depending on the HDD size and the volume that you are shrinking.
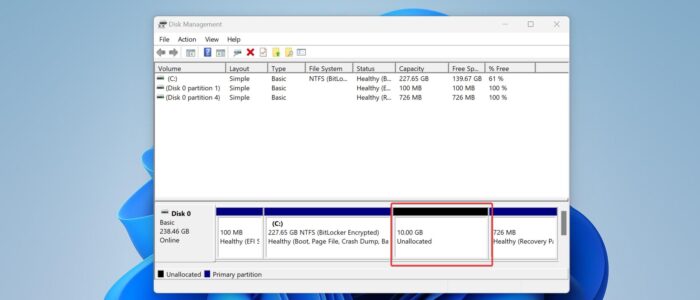
After the shrinking, you can see the Unallocated space, Right-click and create a new simple volume or you can right-click on any other partition and choose extend volume to increase space on that partition.
Find More about extending volume in Windows.
Method 2: Using Command Prompt
Open Command prompt in elevated mode, and type Diskpart, this command will open the Disk part command-line utility.
Type list volume to list out all the drives and partitions on your system.
Next type select volume # command to select the partition for shrink.
Type the following command to shrink the selected volume.
Shrink desired=<Size of the shrink space>
Eg: shrink desired=10240

This command will shrink the selected volume and create unallocated space.
Read Also:
Fix Unable to Delete Partition in Disk Management on Windows 10
Add Disk Management to control panel in windows 10