Windows Security Center is also known as Defender in windows 10. It is the Antivirus Programs which is inbuild in windows 10, Windows Defender is the next generation protection component of Microsoft Defender Advanced Threat Protection (Microsoft Defender ATP), Windows Defender comes with the most advance feature, which starts from the design of a panel displaying its various modules and their status. You can find the seven protecting areas of the windows defender below.
- Virus & threat protection
- Account
- Firewall & network protection
- App & browser control
- Device Security
- Device performance & health
- Family options
From these seven protecting areas, Scanning the computer is the part of the virus and Protection feature, which is very important for any antivirus, Once the defender is enabled the system scan will happen automatically when the defender detects a suspicious file on your system. For some reason, if you want to Enable or Disable the Windows Defender or Windows Defender Firewall. Then this article will guide you to Enable or Disable Windows Security Center or defender in Windows 10.
Disable Windows Security Center:
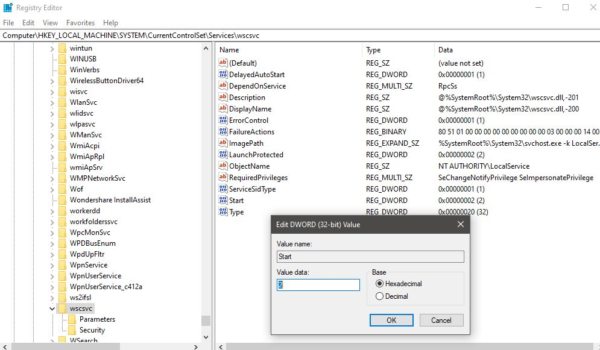
To Enable or Disable Windows Security Center we need to modify the DWORD value in the following registry path.
Note: Modifying the Registry is risky, and it causes irreversible damage to your Operating system. Friendly advice Before Modifying Registry, Creating Restore Point is recommended.
HKEY_LOCAL_MACHINE\SYSTEM\CurrentControlSet\Services\SecurityHealthService HKEY_LOCAL_MACHINE\SYSTEM\CurrentControlSet\Services\wscsvc
To make this process simple and handy we are going to create a registry file to enable or disable the Windows Security Center.
Open Run Command by pressing Windows + R and type Notepad and hit enter.
Now Copy paste the below-mentioned syntax into the text editor.
[HKEY_LOCAL_MACHINE\SYSTEM\CurrentControlSet\Services\SecurityHealthService]"Start"=dword:00000004

[HKEY_LOCAL_MACHINE\SYSTEM\CurrentControlSet\Services\wscsvc]"Start"=dword:00000004
Press Ctrl + S and save the file, choose the Preferable Location. And name it as DisableSecurityCenter.reg and save it.
Now Double click on the saved .reg file to merge it. You will get Prompt for UAC click on YES to approve the merge.
Once you receive the successful message, restart the system once.
To Enable:
Open Run Command by pressing Windows + R and type Notepad and hit enter.
Now Copy paste the below-mentioned syntax into the text editor.
[HKEY_LOCAL_MACHINE\SYSTEM\CurrentControlSet\Services\SecurityHealthService]"Start"=dword:00000002

 [HKEY_LOCAL_MACHINE\SYSTEM\CurrentControlSet\Services\wscsvc]"Start"=dword:00000002
Press Ctrl + S and save the file, choose the Preferable Location. And name it as EnableSecurityCenter.reg and save it.
Now Double click on the saved .reg file to merge it. You will get Prompt for UAC click on YES to approve the merge.
Once you receive the successful message, restart the system once. That’s it you have successfully enabled the Windows Security Center.
Read Also:
How to Enable LSA Protection in Windows 11?
How to Disable Data Execution Prevention (DEP) in Windows 11?
How to Disable Real-time Protection in Windows Security?


Works great. I just edit from REGEDIT and set “4”. Thanks!