Windows Security Center is also known as Defender in windows 10/11. It is the Antivirus Program that is inbuild in windows 10/11, Windows Defender is the next-generation protection component of Microsoft Defender Advanced Threat Protection (Microsoft Defender ATP), Windows Defender comes with the most advanced feature, which starts from the design of a panel displaying its various modules and their status. Windows security comes with seven protection areas like Virus & threat protection, Account, Firewall & network protection, App & browser control, Device Security, Device Performance & Health, and Family Options. You can use Windows Security to scan systems for viruses, protect accounts, manage device performance, and control apps and browsers. There are other security features like LSA, LSA stands for Local Security Authority, LSA protection is an important process that verifies a user’s identity, and it manages necessary system credentials like passwords and tokens related to Microsoft accounts and Azure AD accounts. Enabling the Local Security Authority protection will improve your system and account security and also it protect your credentials from attackers. This article will guide you to Enable LSA Protection in Windows 11.
Enable LSA Protection in Windows 11:
You can enable Local Security Authority in Windows 11 using three different methods, follow the below-mentioned methods to enable LSA protection.
Method 1: Using Windows Security
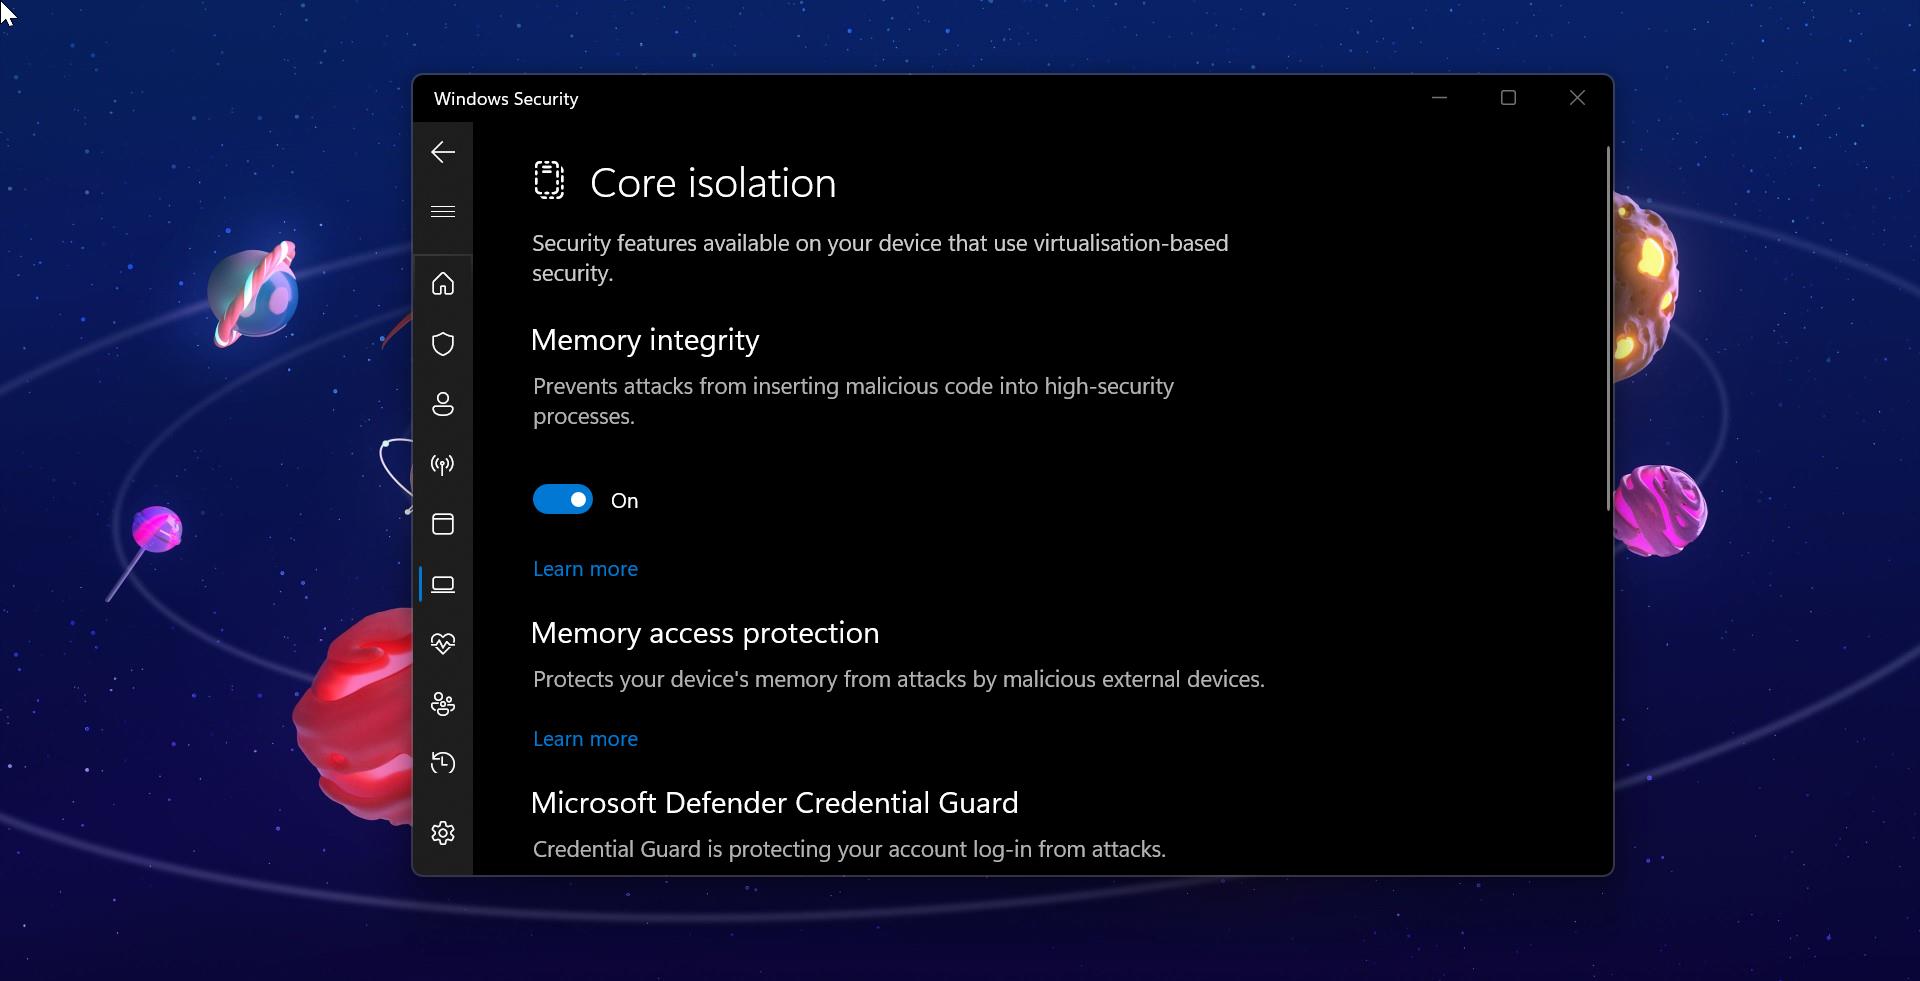
Open Windows Security, Click on the start menu, and search for Windows Security.
From the left-hand side click on Device Security and from the right-hand side choose Core isolation > Core isolation details.

Under Core isolation, you’ll be able to see Local Security Authority Protection option, By default, this option is turned off, turn on the toggle button to enable the LSA protection.

That’s it you can close the Windows Security window.
Method 2: Using Group Policy Editor
Open Run command by pressing Windows + R and type gpedit.msc and hit enter, this command will open the Group Policy Editor.
Now navigate to the following path
Computer Configuration > Administrative Templates > System > Local Security Authority
From the left-hand side click on Local Security Authority and from the right-hand side look for the policy named “Configures LSASS to run as a protected process”. Click on the Policy Settings to enable the policy.

Choose Enabled and set the Configure LSA to run as a protected process based on your requirements.

Click on Apply and OK.
Method 3: Using Registry Editor
Open Run command by pressing Windows + R and type regedit and hit enter, this command will open the Registry Editor console.
Now navigate to the following registry path.
HKEY_LOCAL_MACHINE\SYSTEM\CurrentControlSet\Control\Lsa
From the left-hand side click on the Lsa registry key and from the right-hand side look for the DWORD named RunAsPPL and RunAsPPLBoot.
Double-click on the DWORDs and set the value as 2 and click on OK.

Close the Registry editor and restart the system once.
Read Also:
How to Disable Non-critical notifications from Windows Security?
Fix The Windows Security Center Service can’t be started
Fix Unable to Enable Real-Time Protection in Windows Security
How to Disable Data Execution Prevention (DEP) in Windows 11?
LSA Protection Error in Windows: Fix Required Device Restart
Fix Local Security Protection is off Your device may be vulnerable