If your New to VMware Player and this is the first error you may encounter while playing any Virtual machine in VMware Player. Recently one user reported that he is facing issues while Powering on the VM machine inside VMware Player. The Error code will be like this. “VMware Workstation and Device/Credential Guard are not compatible. VMware Workstation can be run after disabling Device/Credential Guard” The Error code state that VMware Workstation cannot compatible with the current credential guard and it’s mandatory to disable the credential guard in Windows 10.
What is Credential Guard in Windows 10?
In Windows 10 Windows Defender Credential Guard is a security feature that uses virtualization-based security to protect your credentials, by default, this credential guard is enabled in windows 10, with credential guard enabled, only trusted, privileged applications are processed are allowed to access user secrets or credentials. The Pro version of Windows comes with Hyper-V, the in-house virtual machine solution from Microsoft built-into Windows. However, if you enable Hyper-V, it also enables the Windows Defender Credential Guard. Disabling the Hyper-V also Disable the Windows Defender Credential Guard.
Disable the Windows Defender Credential Guard:
There are two things you need to check for disabling the windows defender credential guard, the first one is to check the Hyper-V is enabled on your machine if it’s enabled we need to disable it. The second one is to check one Policy is enabled or disabled in the Group Policy Editor.
Step 1: Disable Hyper-V to fix Device/Credential Guard are not compatible issue
Open Run command by pressing Windows + R and type control and hit enter. This command will open the Control Panel.
In Control Panel, click on Programs and Features.
In Programs and Features from the Left-hand side you can see the Turn Windows features on or off. Click on it.
And you will get another Pop-up, Turn Windows features on or off. Uncheck the Hyper-V and give Ok.
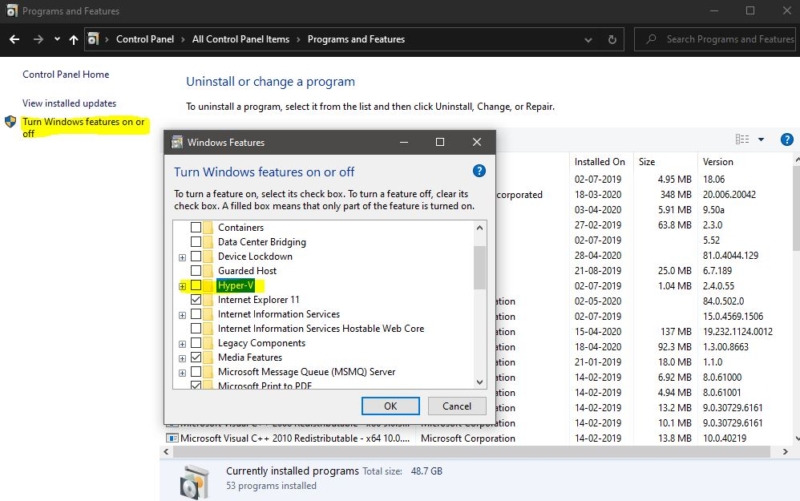
Then your computer will disable the Hyper-V and restart the system. Click on Restart Now. After the Restart Proceed Step 2.
Step 2: Disable the Device Guard Policy
Open Run command by pressing Windows + R and type gpedit.msc and hit enter this will open the Group Policy Editor.
In the Group Policy Editor, navigate to the following location:
Computer Configuration -> Administrative Templates -> System -> Device Guard
From the left-hand side click on Device Guard.
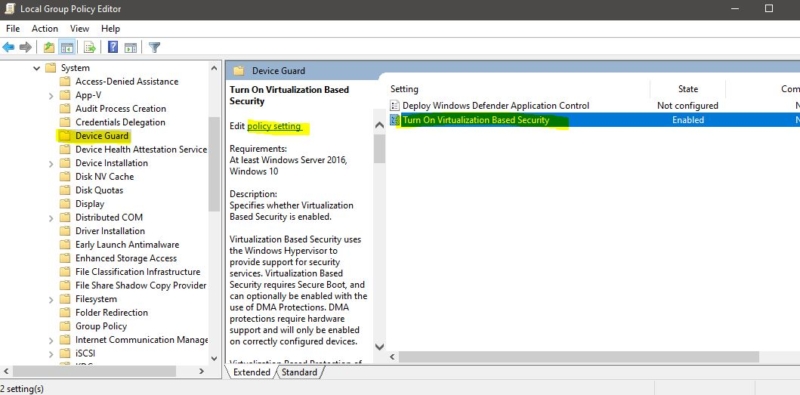
From the Right-hand side, you can see the Turn On Virtualization Based Security.
Double click on it to open policy settings. If the Policy is enabled click on Disable or Not configured to Disable the Policy.
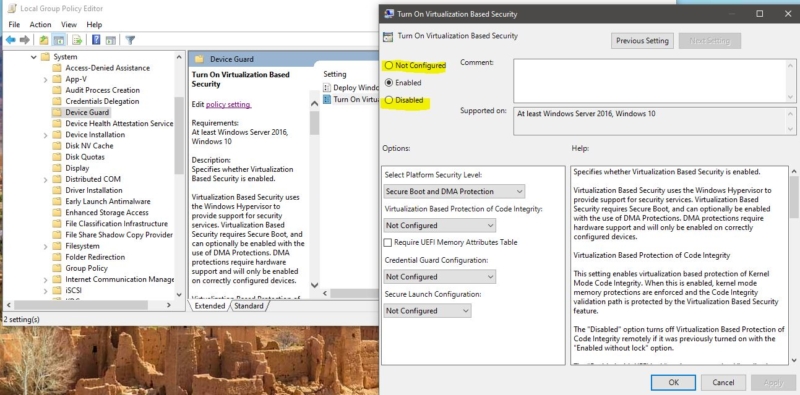
Click on Apply Ok. Restart the system once.
Step 3: Disable the Device Guard Policy using Registry Editor
Open Run command by pressing Windows + R and type Regedit and hit enter this will open the registry editor.
Now Navigate to the following location.
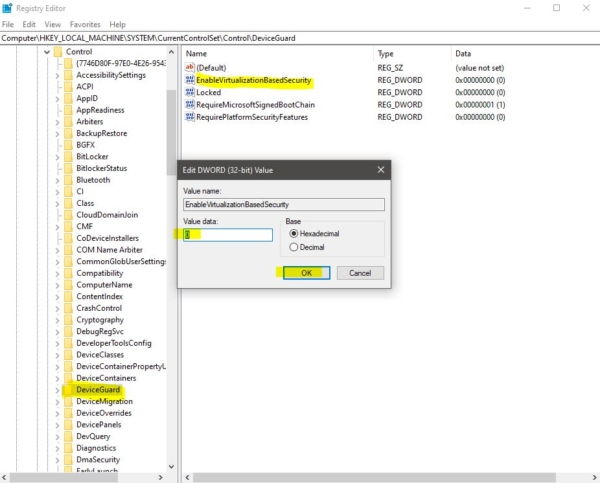
Computer\HKEY_LOCAL_MACHINE\SYSTEM\CurrentControlSet\Control\DeviceGuard
Click on Device Guard from the Left-hand side and from the Right-hand side you can see the EnableVirtualizationBasedSecurity.
If you are not able to see create it. Double click on EnableVirtualizationBasedSecurity and enter the Value 0 and give OK.
Next, navigate to the following location in the registry editor.
Computer\HKEY_LOCAL_MACHINE\SYSTEM\CurrentControlSet\Control\Lsa
From the left-hand side click on Lsa. And from the right-hand side Right-click on LsaCfgFlags and modify the value to 0.
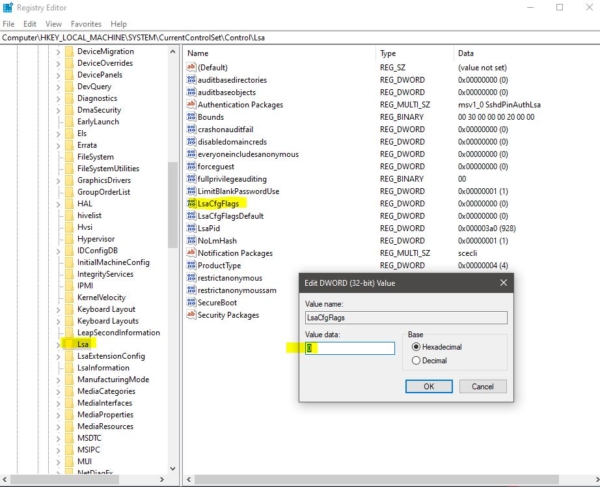
Click on Ok and restart the machine once to make it effective.
Step 4: Use Command Prompt
Open Command Prompt in administrative Mode. Then enter the following commands one by one.
bcdedit /create {0cb3b571-2f2e-4343-a879-d86a476d7215} /d “DebugTool” /application osloader

bcdedit /set {0cb3b571-2f2e-4343-a879-d86a476d7215} path “\EFI\Microsoft\Boot\SecConfig.efi”
bcdedit /set {bootmgr} bootsequence {0cb3b571-2f2e-4343-a879-d86a476d7215}
bcdedit /set {0cb3b571-2f2e-4343-a879-d86a476d7215} loadoptions DISABLE-LSA-ISO,DISABLE-VBS
bcdedit /set hypervisorlaunchtype off
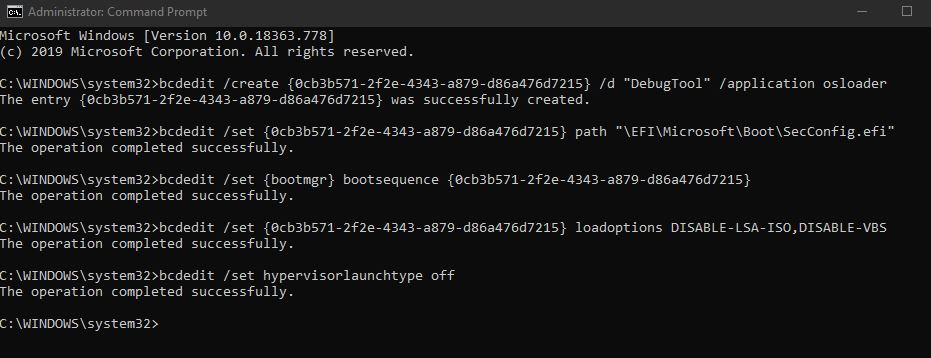
Once the Operation completed successfully then restart the system once and check the VM is running or not.
Step 5: Enable the Virtualization from the BIOS:
Most of the Laptops and systems are enabled with Virtualization by default but re-enabling this Option once again will fix the Credential Guard are not compatible issues. check the Virtualization.
Read Also:
How to Increase the Disk size in VM Virtual Box?


