The System Name or Hostname is referred to a device name that helps us to identify a computer or device that is connected to the network. In Windows, the system name will be automatically assigned once you install the Operating system. The system name must be unique, when you connect your computer to a network, the system name is used to identify your computer, if you assign the same name to a different computer then conflicts can appear between two or more computers. You can assign any name as a computer name or system name. But there are some restrictions when it comes to the length and the characters that are allowed as part of the computer name. The recent version of Windows such as Windows 11, Windows 10 will allow only 63 characters in length. A computer name can contain letters, hyphens, and numbers. You cannot use blank spaces and special characters like: ` ~ @ # $ % ^ & ( ) = + [ ] { } | ; : , ‘ ” . / ?. This article will guide you to change the System Name in Windows 11.
Related: How to Change New Folder Default Name in Windows 10?
Change System Name in Windows 11:
The system name is also called as computer name or Hostname, In Windows 11 you can change the system or computer name in different ways.
Change System Name in Windows 11 Using Windows Settings:
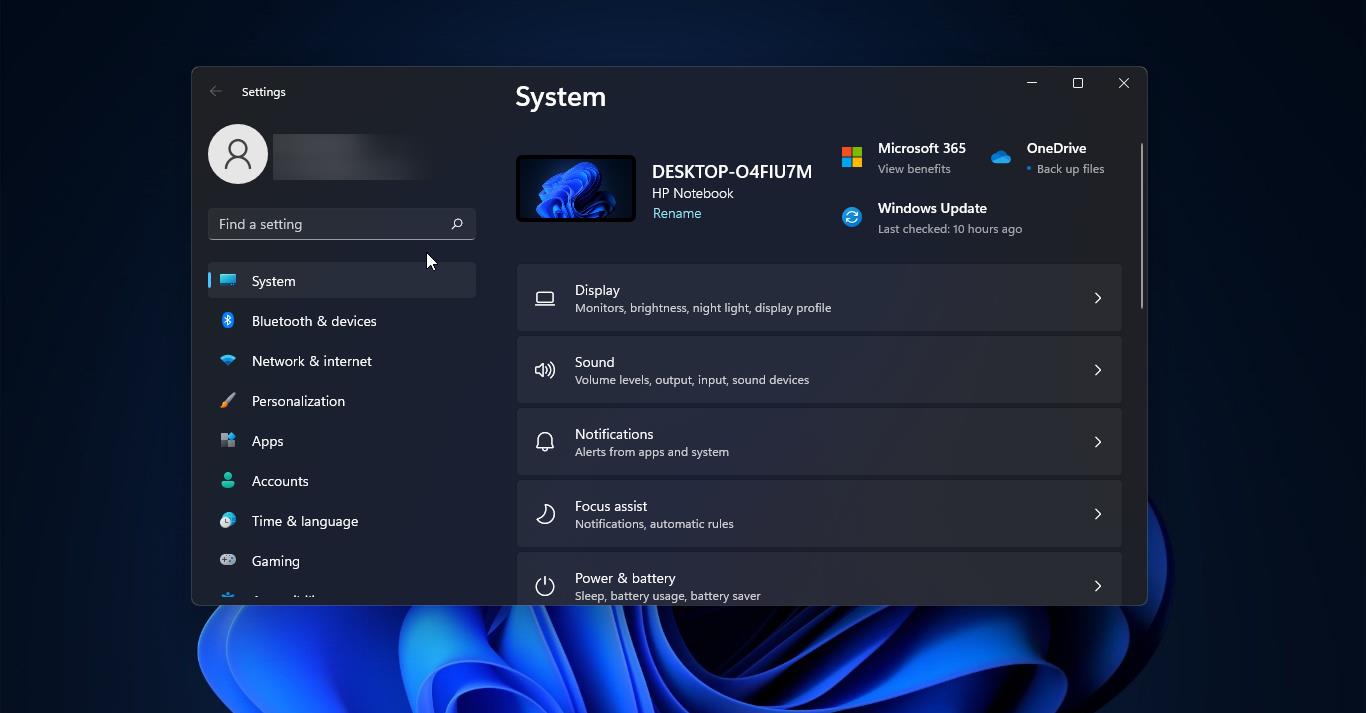
Open Windows Settings by pressing Windows + I and click on System and from the right-hand side you’ll find the system name at the top-right pane.
Click on the Rename link below the system name.

Now you’ll get one Rename your PC pop up, Delete the Current PC name and enter the New PC name, and click on Next.
Then click on Restart Now. That’s it you have successfully renamed your System name.
Using System Properties:
Open Run command by pressing Windows + R and type sysdm.cpl and hit enter, this command will open the System Properties Window.
In System Properties Window, under the Computer Name tab, click on the Change button.

Now you’ll get a separate pop-up, under the Computer name, Enter the New name, and click on OK.

Next, Restart the system once, to make it effective.
Using Command Prompt:
Open Command Prompt in elevated mode and type the following command. This command will change the System Name.
wmic computersystem where name=”%computername%” call rename name=””
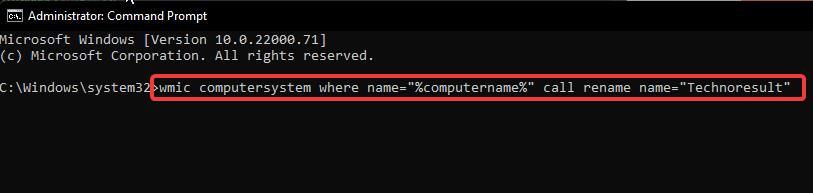
Enter the new system name in-between “” then hit enter. This command will change the system name.
Using PowerShell:
Launch PowerShell in elevated mode and type the following command to change the system Name.
Rename-Computer -NewName “SYSTEM-NAME” -Restart

Replace the SYSTEM-NAME With the actual name and hit enter. This command will change the system name and restart your system.