Introduction
Every computer operating system reserves a specific amount of memory for various purposes. This reserved memory helps the operating system run smoothly and efficiently. However, there may be situations where you want to disable reserved memory in Windows 11 to free up resources for other applications or processes.
In this guide, we will walk you through the steps to disable reserved memory in Windows 11. We will explain what reserved memory is, why it is important, and the potential consequences of disabling it. Additionally, we will provide you with detailed instructions on how to disable reserved memory in Windows 11 using different methods. So, let’s get started!
Understanding Reserved Memory
Reserved memory is a portion of the computer’s random access memory (RAM) that is allocated for specific purposes. It is a reserved space that is not available to regular applications or processes. The operating system uses this memory to store critical system data, including the kernel and drivers.
The main reason for reserving memory is to ensure the stability, security, and performance of the operating system. By reserving memory, the operating system ensures that critical components and processes always have enough memory to function properly. Without reserved memory, the system may become unstable and crash frequently.
Reserved memory also helps in preventing one application from accessing or interfering with another application’s memory space. It provides a level of isolation and protection between different processes running on the system.
Why Disable Reserved Memory?
While reserved memory is crucial for the proper functioning of the operating system, there may be specific situations where disabling it becomes necessary:
- Insufficient Free Memory: If your system has limited RAM capacity, disabling reserved memory can free up valuable resources for other applications and processes.
- Performance Optimization: Disabling reserved memory can potentially enhance the performance of certain resource-intensive applications or games by reallocating memory to them.
- Virtual Machine Configuration: If you are running virtual machines on your system, disabling reserved memory can provide more flexibility in allocating memory resources to the virtual machines.
It is important to note that disabling reserved memory can have potential consequences and should be done with caution. Proceed with the steps described in this guide only if you fully understand the implications and have a compelling reason to do so.
Methods to Disable Reserved Memory in Windows 11
There are different methods available to disable reserved memory in Windows 11. We will explain each method in detail so that you can choose the one that suits your requirements.
Method 1: Adjusting System Configuration
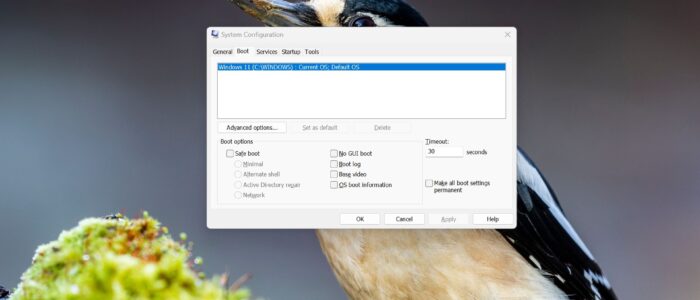
The System Configuration tool in Windows 11 allows you to control various system settings, including the allocation of reserved memory. Here’s how you can use this method:
Press the Windows key + R on your keyboard to open the Run dialog box.
Type “msconfig” (without quotes) and press Enter. This will open the System Configuration window.
Navigate to the “Boot” tab in the System Configuration window.
Click on the “Advanced options…” button.

In the Advanced options window, check the “Maximum memory” box.
Specify the maximum amount of memory you want your system to use.
Note: To disable reserved memory completely, you can uncheck the “Maximum memory” box.

Click on “OK” to save the changes.
Restart your computer for the changes to take effect.
Once you have disabled reserved memory using this method, your system will use the specified maximum memory value instead of reserving memory.
Method 2: Modifying Registry Settings
Another method to disable reserved memory involves modifying the Windows Registry. Here’s how you can use this method:
Press the Windows key + R on your keyboard to open the Run dialog box.
Type “regedit” (without quotes) and press Enter. This will open the Registry Editor.
Navigate to the following location in the Registry Editor:
HKEY_LOCAL_MACHINE\SOFTWARE\Microsoft\Windows NT\CurrentVersion\Multimedia\SystemProfileDouble-click on the “NetworkThrottlingIndex” DWORD value in the right pane.
Change the value data from the default “a” to “f“.

Click on “OK” to save the changes.
Restart your computer for the changes to take effect.
By modifying the NetworkThrottlingIndex value in the Registry Editor, you can disable reserved memory for network-related processes.
Method 3: Using Command Prompt
Windows Command Prompt provides a command-line interface to execute various commands. You can also use it to disable reserved memory. Here’s how:
Press the Windows key on your keyboard to open the Start menu.
Search for “Command Prompt” and right-click on it.
Select “Run as administrator” from the context menu.
In the Command Prompt window, type the following command and press Enter:
bcdedit /set “{current}” removememory 0

Restart your computer for the changes to take effect.
This command will remove the memory reservation for the current operating system.
Conclusion
In this guide, we have discussed the concept of reserved memory in Windows 11 and why you might want to disable it. We have provided you with three different methods to disable reserved memory, including adjusting system configuration, modifying registry settings, and using the Command Prompt. It is important to remember that disabling reserved memory can have potential consequences, so proceed with caution and only disable it if you understand the implications and have a valid reason to do so.
Remember to always make a backup of your system or create a restore point before making any changes to system settings or the Windows Registry.
By following the steps outlined in this guide, you should be able to disable reserved memory in Windows 11 and free up valuable resources for other applications and processes.