Windows 11 Comes with a lot of modifications like the Start menu, Taskbar, Windows Settings page, and etc, in that list Windows 11 also concentrate on Privacy and security features. In this article, we are going to see about DNS over HTTPS and how to enable DNS over HTTPS features in Windows 11. DNS over HTTPS or DoH is a privacy feature that is added as an option in Windows 11 so that users can switch to fully encrypted from an unencrypted network. Before proceeding to the topic first you need to Know about DoH.
DoH is a Privacy Feature, for example, if you are visiting any website using HTTPS protocol, Your DNS query is sent over an unencrypted connection. That means anyone can track your network packets, and the second problem with the unencrypted DNS is that it is easy for a Man-In-The-Middle attack, so hackers can tamper with the request and take you to any Phishing or Compromised website. To overcome this issue Windows 11 offers you to enable the DNS over HTTPS. Once you enabled DoH on your system, then whenever you visit any website, all your Quires will take over using HTTPS protocol.
Enable DNS over HTTPS feature in Windows 11:
You can use the DoH in Windows 11, enable this security feature in two different methods. Follow the below-mentioned methods to enable DOH.
Using Windows Settings:
Open Windows Settings by pressing Windows + I and from the left-hand side click on Network & internet.
And from the right-hand side, click on Ethernet, depending on how you are connecting to the Network.

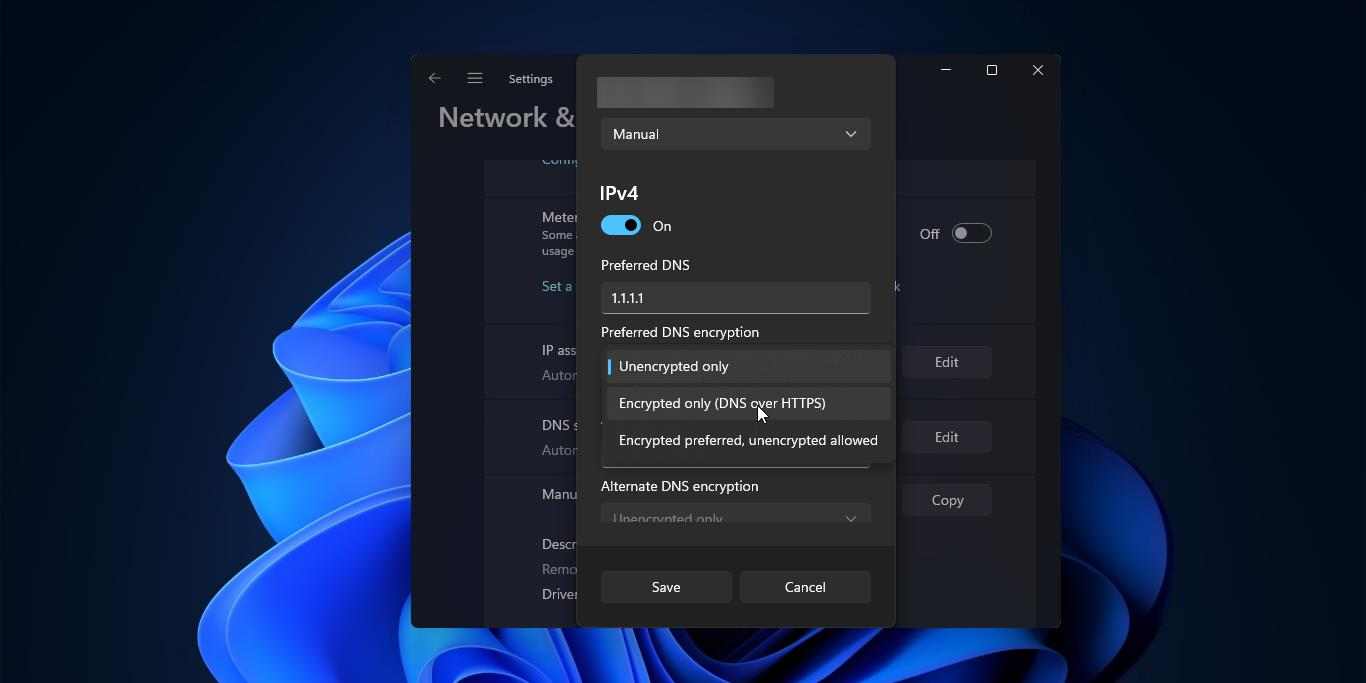
Then choose the Network Properties, under the Properties window, look for DNS server assignment, and click on Edit.

Under Edit DNS settings, click on the Drop-down menu and choose Manual. Enable the toggle button and turn on the IPv4 or IPv6.
Under Preferred DNS address enter the following IP address which supports DoH, there are lot of DoH available, and while most of them will work, but use the standard Domain Name Service.
Cloudflare (1.1.1.1 and 1.0.0.1 )
Google ( 8.8.8.8 and 8.8.8.4 )
Once you entered Preferred and alternate DNS IP addresses, click on the Preferred DNS encryption drop-down menu and choose Encrypted only (DNS over HTTPS).

Click on Save. If you are using an IPv6 address, then follow the same steps as mentioned above for IPv6.
Read Also: