A mouse cursor, also known as a mouse arrow, or mouse pointer, is a graphical image used to activate or control certain elements in a graphical user interface. More plainly, it indicates where your mouse should perform its next action, such as opening a program or dragging a file to another location. The mouse pointer follows the path of the user’s hand as they move their mouse. In Windows, you can customize the mouse cursor options using Windows settings. Mouse cursor size is standard in Windows 10/11, if you are using a bigger screen with high-resolution monitors then it can be hard for you to clearly see the Mouse pointer. To increase the Mouse cursor size, then you can use the following methods. This article will guide you to Increase Mouse Cursor size in Windows 11.
Increase Mouse Cursor size in Windows 11:
You can increase or decrease mouse cursor size using different methods, follow the below-mentioned methods to Increase Mouse cursor size.
Method 1: Increase Mouse Cursor Size using Windows Settings:
Open Windows Settings by pressing Windows + I and from the left-hand pane click on Accessibility and from the right-hand pane, scroll down and look for the Mouse and click on it.

Under Mouse > Related Settings click on Mouse Pointer.

Under Mouse Pointer, Increase or Decrease the size slider, it will make the mouse cursor size to increase/Decrease.
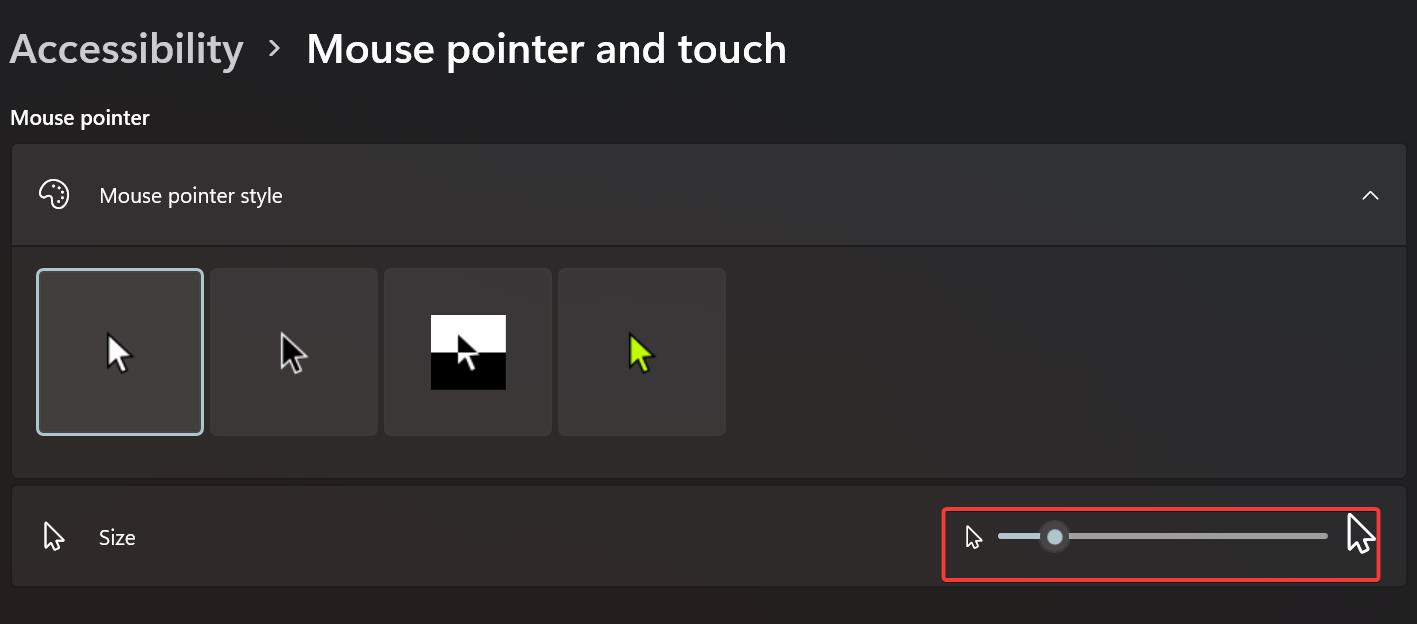
Choose the Mouse Pointer style to change the cursor style.
Method 2: Using Devices Settings:
Open Windows Settings by pressing Windows + I and from the left-hand side click on Bluetooth & devices and from the right-hand side, look for Mouse and click on it.

Under Mouse > Related settings, click on Additional mouse settings.

Under Additional mouse settings, click on the Pointers tab, click on the Scheme drop-down menu and choose the Windows Default pointer scheme.

Choose the Extra large scheme if you want to increase the pointer size, click on Apply and OK.
If you want to decrease the Mouse cursor size, choose None and then click on Apply and OK.
Method 3: Using Ease of Access Center:
Open Control Panel, set the icons to Large icons, and click on Ease of Access Center.

Under Ease of Access Center, click on Make the mouse easier to use.

On the next screen choose the Mouse pointers

Choose the Extra large scheme if you want to increase the pointer size, click on Apply and OK.
Method 4: Using Registry Editor:
Open the Run command by pressing Windows + R and type regedit and hit enter, this command will open the Registry Editor console.
Now navigate to the following registry path.
Computer\HKEY_CURRENT_USER\Control Panel\CursorsFrom the left-hand side click on Cursors and from the right-hand pane look for the Default String value.
Double-click on the Default String value and enter the following values in the value data field.
- Magnified
- Windows Black (extra large)
- Windows Black (large)
- Windows Black
- Windows Default (extra large)
- Windows Default (large)
- Windows Inverted (extra large)
- Windows Inverted (large)
- Windows Inverted
- Windows Standard (extra large)
- Windows Standard (large)
If you want to increase set the value data as Windows Standard (large) to decrease the pointer size, just delete the value and click on OK.

Close the registry editor and restart the system once.
Read Also: How to Disable the Mouse Scroll in Windows 11?