A Windows Theme is a collection of modifications to the interface which changes the way Windows looks and feels. A theme may alter the standard Windows icons, mouse cursor, and desktop background. It may also include new icons for My Computer, My Documents, My Network Place, Recycle Bin, and other standard Windows programs. Windows 10 offers users to change the theme using the personalization option. Under Personalization settings, you can find the themes option. By default, Windows 10 comes with 4 themes pack. There are several methods to install and set windows 10 themes. You can also download new themes from the Microsoft Store. Most of the organization restrict users from changing theme for some reasons. If you want to restrict Users from Changing themes in Windows 10, then this article will guide you to block the theme option using different methods.
Restrict Users from Changing theme in Windows 10:
This article will guide you to restrict users from changing Windows themes, using different methods. In the first method, we are going to use the Group Policy editor, and in the second method, we are going to use the Registry editor.
Using Group Policy Editor:
Open the Run command by pressing Windows + R and type Regedit and hit enter. This command will open the Group Policy Editor.
Now navigate to the following path.
User Configuration > Administrative Templates > Control Panel > PersonalizationFrom the left-hand side click on the Personalization and from the right-hand side look for the Policy named Prevent changing theme.
Double click on the Prevent changing theme and Open Policy settings. Now under Policy settings, choose Enabled and click on Apply and OK.
Close the Group Policy Editor and open the command prompt and type the following command to update the Policy.
Gpupdate /force
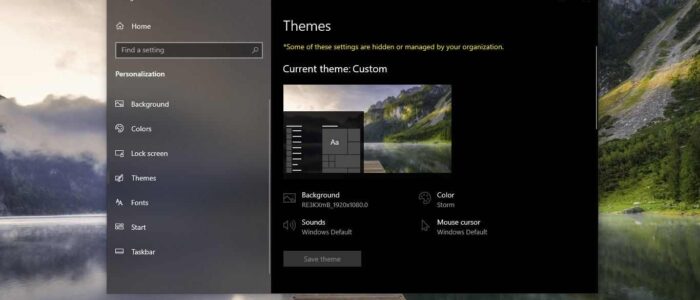
Now open the Personalization option, now you can see the themes option will be greyed out and shows an error message like “Some of these settings are hidden or managed by your organization.”
Using Registry Editor:
Note: Modifying the Registry is risky, and it causes irreversible damage to your OS Installation Follow the steps correctly. Friendly advice Before Modifying Registry Creating Restore Point is recommended.
Open the Run command by pressing Windows + R and type Regedit and hit enter. This command will open the Registry Editor console.
Now navigate to the following path.
HKEY_LOCAL_MACHINE\SOFTWARE\Microsoft\Windows\CurrentVersion\Policies\ExplorerFrom the left-hand side, right-click on the Explorer registry key and choose New > DWORD (32-bit) Value, and name it as NoThemesTab.
Now double click on the NoThemesTab DWORD and set the value 1 and click on OK.

Now restart the system once and check, this will disable the themes option.
If you want to bring the option back, just follow the same steps above and set 0 value to the NoThemesTab DWORD. This will bring back the themes option.
Read Also:
Show or Hide Windows Updates using PowerShell in Windows 10
How to Enable Hidden Themes in Windows 11?