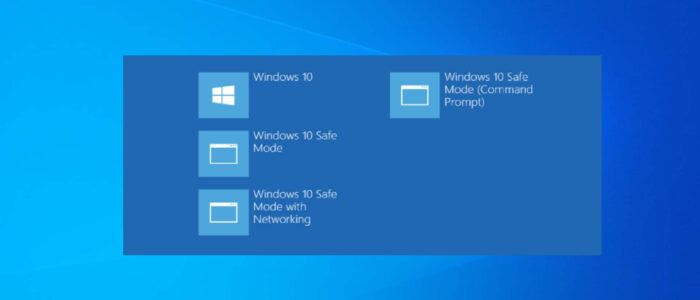
Windows 11 or Windows 10 whatever the operating system you use, sometimes you may encounter a problem or BSOD error, which you don’t know how to fix. And sometimes finding the root cause for these errors is very difficult, during that scenario booting your system into Safe Mode will give you the chance to fix the issue. Before Proceeding you need to understand what is Safe Mode. Then this article will guide you to Add Safe Mode to Windows 11 Boot Menu, so that you can choose the Safe mode options like other operating systems.
Safe mode is a diagnostic mode of a computer operating system (OS). It can also refer to a mode of operation by application software. In Windows, safe mode only allows essential system programs and services to start up at boot. Safe mode is intended to help you to fix most of the problems within an operating system. In safe mode, an operating system has reduced functionality, but the task of isolating problems is easier since many non-core components are disabled, such as sound, network drivers, graphics drivers, etc. It varies by the operating system. From Windows NT to Windows 7 you can access the safe mode by pressing F8. But this traditional method to access Safe Mode was canceled from Windows 8. The standard method to access safe mode is somewhat time-consuming and to access safe mode you need to press Shift and Restart and then you need to choose the Safe Mode Option.
Types of Safe Mode in Windows 11:
In Windows 11 you can access three different types of safe mode, each type of safe mode has different functionality.
1.Safe Mode:
This is the Basic type of Safe Mode with minimal graphics, when you boot into the Safe mode you can see the black desktop, and you may find the fonts and icons look big and with less sharpness. Because this safe mode will load only the basic drivers and services, disabling all other apps, programs, and utilities.
2.Safe Mode with Networking:
By default, Safe Mode will block all the drivers and services, if you want to access the networking then you need to access Safe Mode with Networking. This type of safe mode comes with additional drivers and services required for Networking. So you can access the internet for troubleshooting.
3.Safe Mode with Command Prompt:
Safe Mode with Command Prompt will boot Command prompt directly, this boot mode won’t show the Windows GUI. You can perform all the troubleshooting tasks using the CLI Command Line Interface.
Add Safe Mode to Windows 11 Boot Menu:
So we have learned about safe mode and types of safe mode and their functionalities. This article will guide you to add Safe Mode to Windows 11 boot menu.
To add the safe mode options to the boot menu, first, you need to add the safe mode options to the system configuration. Follow the below-mentioned steps to add safe mode options to System configurations.
Open Command Prompt in elevated mode, click on the start menu and search for Command Prompt and right-click on it and choose Run as Administrator.
Now type the following commands one by one to add the Safe Mode options to the System Configuration.
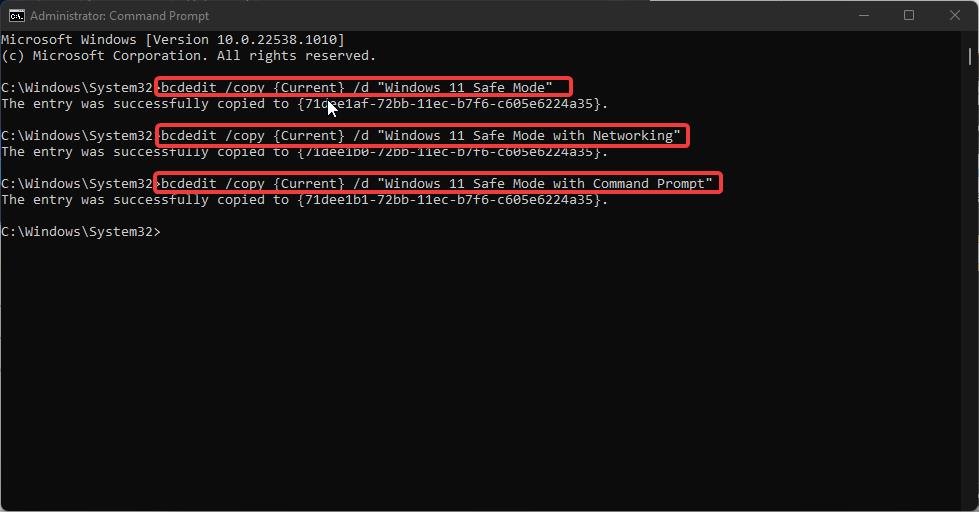
bcdedit /copy {Current} /d “Windows 11 Safe Mode”bcdedit /copy {Current} /d “Windows 11 Safe Mode with Networking”bcdedit /copy {Current} /d “Windows 11 Safe Mode with Command Prompt”These commands will add the safe mode options to the system configuration, Now open the System Configuration.
Click on the start menu and type “System Configuration” or just open the run command by pressing Windows + R and type MSConfig. This command will open the System Configuration.
Click on the Boot tab and under the boot tab you can see safe mode, safe mode with networking, and safe mode with command prompt.
Click on the Safe Mode and under Boot Options Check the Safe mode and choose Minimal. And click on apply and OK.
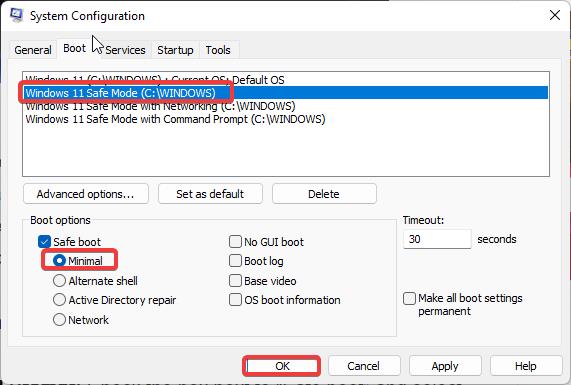
Next Click on the Safe Mode with Networking options, and choose Network. And click on apply and OK.
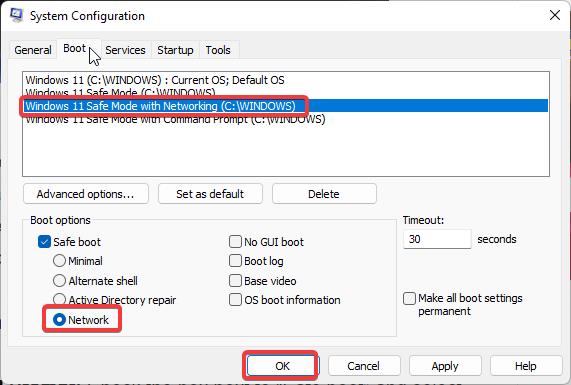
Click on the Safe Mode with Command Prompt, and choose Alternate Shell. And click on apply and OK.
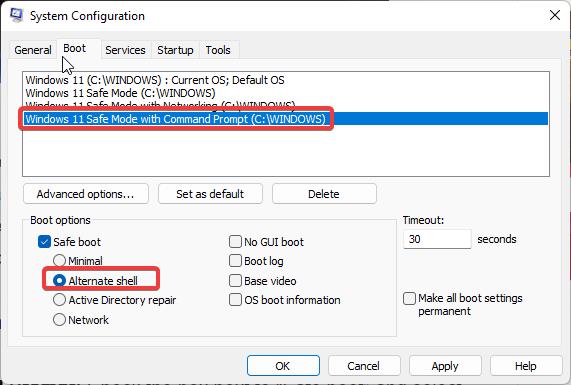
Finally, choose the Timeout and Check the Make all boot settings permanent option and click on Apply and OK.
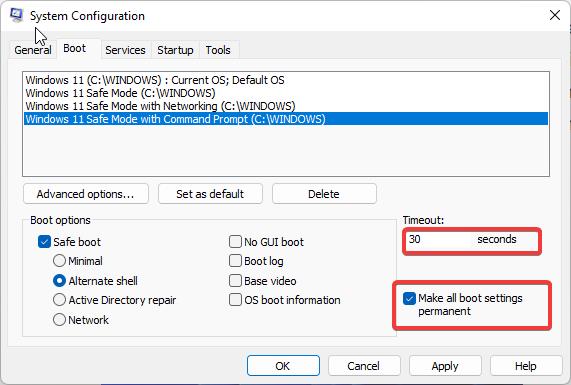
Now you’ll get the pop-up dialog box and it will show Restart or Exit without restarting, if you choose restart the system will restart and show the boot menu now you can Choose the Boot options.
Read More: F8 is not working in Win10, How to enable safe Mode in Windows10?
Add Safe Mode to Windows 11 boot menu using Command Prompt:
Open the command prompt in elevated mode, click on the start menu and search for cmd, right-click on it and choose Run as Administrator.
Next, type the following command to add a boot entry to the boot menu, we have mentioned three commands for three types of safe modes, just copy-paste the specific command to add a specific boot menu entry.
bcdedit /copy {Current} /d “Windows 11 Safe Mode”bcdedit /copy {Current} /d “Windows 11 Safe Mode with Networking”bcdedit /copy {Current} /d “Windows 11 Safe Mode with Command Prompt”This command will copy the Current identifier, once you enter the command you’ll get a successful message like this.

The entry was successfully copied to {9ce1da10-87ca-11ec-8be5-34735af87747}. You need to copy the Identifier value between the curly brackets {} and paste it in the following commands.
For Safe Mode (Minimal):
bcdedit /set {identifier} safeboot minimalFor Safe Mode with Networking:
bcdedit /set {identifier} safeboot networkFor Safe Mode with Command Prompt:
bcdedit /set {identifier} safeboot minimal

bcdedit /set {identifier} safebootalternateshell yes
Replace the {identifier} with the original value and hit enter, just enter the safe command which you want to add to the boot menu, if you want all the safe mode options then enter all the commands.
Restart the system once, after the restart you’ll notice the new boot menu entries.
Remove Safe Mode from Boot Menu:
If you want to remove the Safe Mode options from the Boot Menu you can use the following methods.
Using System Configuration:
Click on the start menu and type “System Configuration” or just open the run command by pressing Windows + R and type MSConfig. This command will open the System Configuration.
Click on the Boot tab and under the boot tab you can see safe mode, safe mode with networking, and safe mode with command prompt.
Click on the Safe Mode and under Boot Options Check the Safe mode and choose Minimal. And click on safe mode options which you want to remove and then click on Delete.
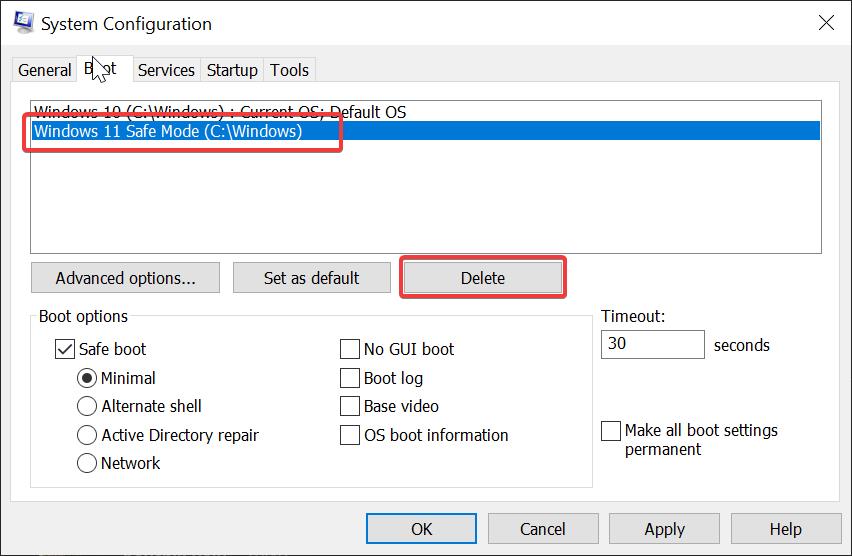
Then finally click on Apply and OK.
Using Command Prompt:
Open Command Prompt in elevated mode and click on the start menu and search for Command Prompt and right-click on it and choose Run as Administrator.
Now type the following command to delete all the safe mode options from the boot menu.
bcdedit /delete {identifier}
Here you need to replace the {identifier}, if you are not able to find the identifier then type bcdedit this will load all the Boot Entries. Look for the Safe Mode boot entries and the Note down the Identifier value.
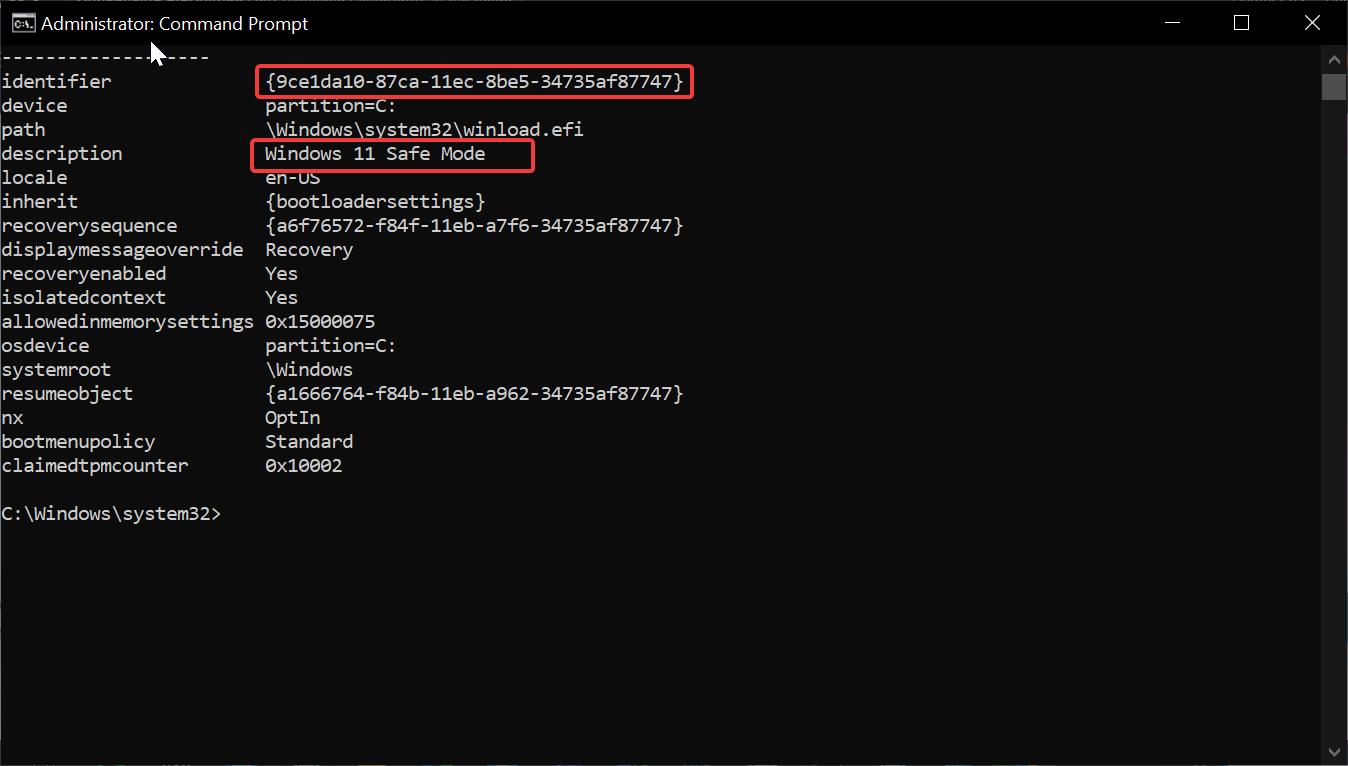
Replace the identifier value in the above command and hit enter. This will remove the safe mode option from the Boot Menu.
Read Also:
How to Disable Safe Mode in Windows 11?
How to Modify Boot Menu Timeout in Windows 11/10?

