Windows 11 comes with the new File Explorer which is completely based on the Windows UI Library (Win UI), this new file explorer retains the same familiar version of the legacy version. And Windows 11 file explorer has new visual elements, tweaks, a new command bar, new icons, and many more improvements. The new design for File Explorer matches with the Windows 11 design, and recently Microsoft released the most awaited Tabs feature for Windows 11 File Explorer. After a long awaiting period of time, Microsoft finally released the tabs feature in file explorer on Windows 11, this feature was first introduced in Windows 11 insider Preview build 22572, to all Windows Insiders. And later this feature was rolled out to all Standard Windows 11 users, you may see this feature from Windows 11 22H2. If you don’t like this feature and want to switch to classic Windows 11 File Explorer, then this article will guide you to Disable Tabs in Windows 11 File Explorer.
Disable Tabs in Windows 11 File Explorer:
By default, the Tabs feature is enabled in Windows 11, like a browser you can open tabs in Windows 11 File explorer, and you can open a new tab by pressing Ctrl + T and close the current active tab by pressing Ctrl + W. Also, you can find the UI option to add and Close tabs, for the Note, there is no direct option to Disable Tabs feature in Windows 11. Follow the below-mentioned steps to disable tabs in Windows 11 file explorer.
You can disable this File Explorer tabs feature in Windows 11 by using a third-party tool called ViveTool.
You can download this tool from the GitHub page, click here and download. Download the Zip file.
Next, you need to extract it, right-click on the Zip file, and choose Extract all. Extract all the files to the Windows > System32 folder.
You’ll get an admin prompt, click on yes and extract all the files to the System32 folder.
Next, open the command prompt in elevated mode, right-click on the Command prompt and choose Run as administrator.
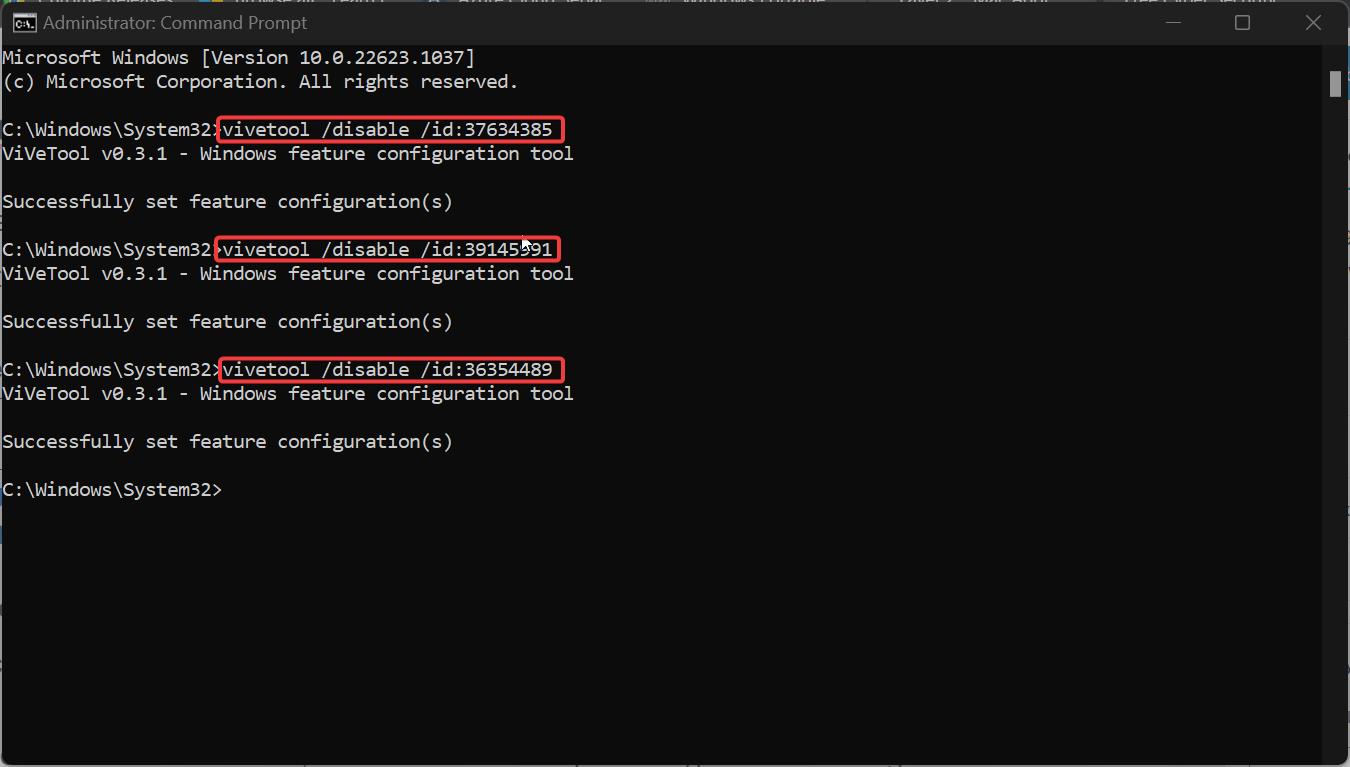
Type the following commands and hit enter.
vivetool /disable /id:37634385
vivetool /disable /id:39145991
Once you executed these commands, the tabs feature will get disabled, and you can’t open the tabs by pressing the shortcut or you can’t find the option to add tabs.
Type the following command in the command prompt to disable File Explorer’s new navigation pane.
vivetool /disable /id:36354489

Close the command prompt and restart the system once to make the changes effective. After the restart, you can see the classic Windows 11 File Explorer.
To Restore the tabs feature, follow the same steps and type the following commands one by one to Enable the tabs back.
vivetool /enable /id:37634385
vivetool /enable /id:39145991
Type the following command to restore the new navigation pane.
vivetool /enable /id:36354489
Once you executed the commands, close the command prompt and restart the system once.
Read Also:
Fix Quick Access not showing in Windows 11 File Explorer
How to Block Ads in Windows 11 File Explorer?
How to Hide the Navigation pane in Windows 11 File Explorer?
How to Restore Classic File Explorer in Windows 11?
How to Enable File Explorer Tabs in Windows 11?
How to use File Explorer size filter in Windows 11?
How to Drag Explorer tab as new Window in Windows 11?


