If you are associated with WiFi, but the Internet is not working on Windows 11, it can occur due to various reasons, including network misconception, older drivers, DNS issues, or problems with your Internet service provider (ISP). While your device can show a strong WiFi connection, it may not be able to communicate with the Internet due to these underlying issues. General reasons include incorrect network settings, intervention from safety software, a temporary disturbance in old or faulty network driver, or router or modem. Sometimes, troubleshooting the network in Windows 11 can help identify and fix the problem, but in other cases, manual problems are necessary. To solve this, you can try to restart your router and PC, flush DNS cash, reset the network adapter, update network drivers, or even reset a full network. Checking Windows updates for any pending system updates can also help fix the compatibility problems. In this guide, we will guide you through the most effective troubleshooting methods to resolve this issue.
Fix Connected to WiFi but internet not working:
Follow the below-mentioned resolution methods to fix Connected to WiFi but internet not working issue.
Solution 1: Check the Wifi Network
Make sure your Wifi network, is working fine by connecting to other devices like mobile or other laptops and check the internet connection. If the wifi network is working fine on those devices then you need to verify your wifi network settings. Follow the next resolution method to check the wifi network settings.
Solution 2: Forget and Reconnect to the Wi-Fi Network
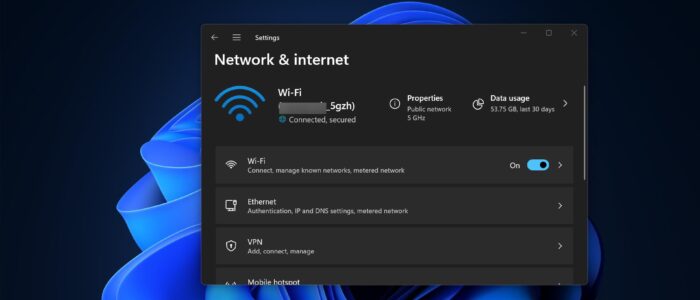
Open Windows Settings by pressing Windows + I, and from the left-hand side, click on Network & Internet.

From the right-hand side, click on Wi-Fi.
Then click on Manage Known networks.

Under Manage Known Networks, Choose the Wi-Fi network which you want to remove and Click on Forget.

Next, Disable the Wi-Fi enable back, then connect to the same network by entering the credentials. Now, Windows will connect to the Wi-Fi network without any error.
Solution 3: Reset Network
Open Windows settings by pressing Windows + I and from the left-hand side click on Network & internet, and from the right-hand side pane look for Advanced network settings.
Click on Advanced network settings, and under the More settings section click on Network reset.

Under Network reset click on the Reset Now option, this will remove and reinstall all your network adapters, and set other networking components back to their original settings.

Note: If you configured other network software such as VPN client software or virtual switches then you have to reconfigure after the Network Reset.
Click Here to learn more about Resetting the Network using Command Prompt.
Solution 4: Run Windows Network troubleshooter
Windows Troubleshooter is a wonderful tool that comes with all the versions of Windows 10, it helps users to troubleshoot various Windows components. Under troubleshoot you can see a lot of windows components like audio, Printer, windows update, Bluetooth, keyboard, Power, etc. in that the Network adapter is one of the Windows components. Using a troubleshooter it’s very easy to troubleshoot.
Open Windows settings by pressing Windows + I and click on Update and Security, Next click on Troubleshoot. Under Troubleshoot click on the Network Adapter and Run the Troubleshooter.

Once you start Troubleshooting then it will find and fix problems with wireless and other Network adapters.
Solution 5: Update Network Drivers
Once you encounter this error then there might be a chance of network driver issues, or sometimes if the network driver won’t update automatically so it often causes network issues.
Open Run command by pressing Windows + R and type Devmgmt.msc this will open the device manager.
Look for Network adapters and expand it, Update all the network adapters.

Also, reinstall the Wi-Fi network adapter. Mostly, this will fix the issue if not follow the next solution.
Solution 6: Check for Proxy
Open Run command by pressing Windows + R and type inetcpl.cpl and hit enter, this command will open the Internet Properties.
Click on the Connections Tab from the top tab list.
Under the Connections tab, click on LAN Settings.

Under LAN Settings, uncheck Use automatic configuration script, and check Automatically detect settings.

Click on OK and try to connect the VPN and check.
Solution 7: Update the BIOS
Sometimes Outdated BIOS will cause several issues, mostly audio and wifi drivers won’t work properly if you are having an outdated BIOS. So, make sure your laptop’s BIOS version is updated. Go to the manufactures official website and download the latest version of BIOS and update. Mostly this will resolve the issue.
Solution 8: Disable IPV6
IPv6 or Internet Protocol Version 6 is the latest version of Internet protocol, IPv6 use 128-bit addressing support, and IPv6 protocol can handle packets more efficiently, improve performance and increase security. It enables internet service providers to reduce the size of their routing tables by making them more hierarchical. Some organizations moved to IPv6 still most of the old sites and companies are still in IPv4, so if you are facing this issue, you can disable the IPv6 in Wi-Fi properties and check.
Open Windows Settings by pressing Windows + I and click on Network & Internet. click on status.
Open Change adapter options then Right-click on the Wi-Fi adapter and choose Properties.
Uncheck the Internet Protocol Version 6(TCP/IPv6) and click ok.

By following this guide, you should be able to identify and fix the Connected to WiFi but internet not working problem. If you are still facing the problem, check with your ISP once.
Read Also:
Fix can’t connect to this network error on Windows 10
How to Fix Network Icon on Taskbar Missing?
How to fix Limited Network connectivity in your windows 10 machine?
How to use Multiple Internet connections at same time in Windows 11/10?
How to Troubleshoot and Fix Wi-Fi Not Connecting Automatically?