In the Windows environment, a user profile is a record of user-specific data that defines the user’s working environment. The record can include display settings, application settings, and network connections. Windows 11/10 includes a user profile folder in the OS partition drive, which contains files and folders, like Desktop, Documents, Favorites, Downloads, Searches, Pictures, and more. By default, this folder is located at C:\Users\<username>. You can access this folder using File Explorer or by using the run command prompt, by default, the user profile folder will be automatically named by Windows, during the User profile creation. You can give the User Profile name as per your choice, and you can change the user profile name easily. But Changing the User profile folder name is little tricky, many applications and Windows Settings rely on the user folder name as part of a pathway to the required data for them to run correctly. Changing the User profile folder name can easily break the software or even it can corrupt entire user profile. This Windows guide will show you the easiest and safest method to rename your Windows User Profile Folder.
Change User Profile Folder name in Windows 11/10:
Before proceeding create one Local user account and make it as administrator for safety purposes, if you have any important data on your current user profile, safe all the data in C drive or any other different partition. Note: Changing the name of the User Profile folder will not change the user name.
Follow the steps carefully and don’t skip any step. If you have multiple user profiles note the user profile name which you want to rename.
First Sign out of the current user profile which you want to change the User Profile folder name, and login to the administrator account.
If you do not have an administrator account, then you can temporarily enable the built-in Administrator account in Windows 11. And Sign in to the admin account.
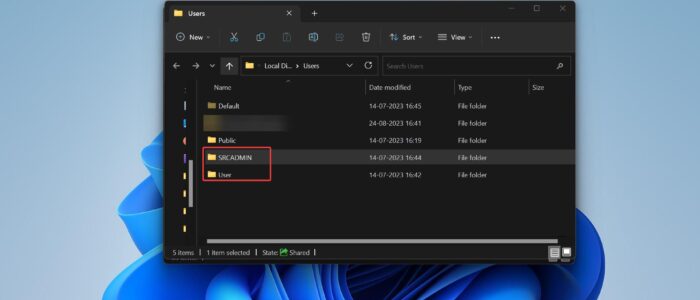
First, we need to get the SID of the user account for which you want to change the user profile folder name. For Example, in my case, I am trying to change the SRCADMIN user profile folder name to Technoresult.
Open Command Prompt or PowerShell in elevated mode, type the following command, and hit enter.
wmic useraccount get name,SIDthis command will display the list of SID of all user profiles present on your system.
Note down the SID for which you want to change the user profile folder name, in my case I need to make a note of SRCADMIN SID. Once you note down the SID, then follow the remaining steps.

Open Run command by pressing Windows + R and type regedit and hit enter, This command will open the Registry Editor console.
Now navigate to the following Registry path.
Computer\HKEY_LOCAL_MACHINE\SOFTWARE\Microsoft\Windows NT\CurrentVersion\ProfileListUnder ProfileList you can see the list of SID’s, click on the SID which you note down before, in my case I clicked on the SRCADMIN SID registry key.
Computer\HKEY_LOCAL_MACHINE\SOFTWARE\Microsoft\Windows NT\CurrentVersion\ProfileList\S-1-5-21-3027397175-4150215279-2475751092-500From the right-hand side you can see the ProfileImagePath string value, double click on the String value, and change the user profile folder path name. I have changed the path from SRCADMIN to Technoresult.

Once you modified the name click on OK and close the Registry editor.
Next, open the Users folder, Open the Run command and type .. (two dots), and hit enter, This will open the users folder directly.
Here you can see your Old user profile folder (SRCADMIN), which we already modified the name in the Registry, Now you have to change the folder name (Technoresult), exactly as modified in the Registry.

Once you change the folder name, you can close the File Explorer.
Next, we need to create a Directory Symbolic Link using the Command prompt, Open the Command prompt in elevated mode, and type the following command.
mklink /d “Old Profile folder path” “New Profile folder path”Update the old profile folder path and the new profile folder path with your actual folder names. In my case, the command will appear as follows:
mklink /d “C:\Users\SRCADMIN” “C:\Users\Technoresult”That’s it We have successfully changed the User Profile Folder name in Windows 11/10, If you are using OneDrive, SignOut your OneDrive and SignIn back, you can see the new user profile folder name while signing in.
Finally Clear and Rebuild the Windows Search Index, for better search, because some entries might point to the old profile folder name. rebuilding will point the entries to the new profile folder.
Read Also:
Add User Profile folder to Navigation Pane to File Explorer
How to move User Folder to another drive in Windows 11?

