In Windows, the built-in administrator account is the first user account that is created when the operating system is installed. The built-in admin account was originally intended to facilitate setup and disaster recovery, by default the built-in admin account was disabled. You can enable the admin account using the following methods, Enabling the admin account could impose a security risk, sometimes you need to enable the Built-in administrator account to troubleshoot problems and manage system settings. In Windows 11 you can enable Built-in administrator account using three different methods.
Enable Built-in administrator account in Windows 11:
Follow the below-mentioned steps to enable or disable the built-in admin account.
Enable Built-in administrator account using Command Prompt:
Open Command Prompt in elevated mode, click on the start menu and search for Command Prompt and right click on it, and choose Run as Administrator.
Type the following Command to enable the Windows built-in administrator account and hit enter.
net user "Administrator" /active:yes
This command will enable the built-in admin, next sign-out from your current account and sign in to admin account. If you want to disable the admin account, just open the command prompt in elevated mode and type net user “Administrator” /active:no . This will disable the admin account.
Using PowerShell:
Open PowerShell in elevated mode, click on the start menu, search for PowerShell and right click on it, and choose Run as Administrator.
Type the following command to enable the built-in admin account and hit enter.
Get-LocalUser -Name "Administrator" | Enable-LocalUser
That’s it admin account will be enabled, you can log in to the admin account. If you want to disable the admin account, use the same steps above and instead of Enable-LocalUser, you have to modify the command like this, Get-LocalUser -Name “Administrator” | Disable-LocalUser.
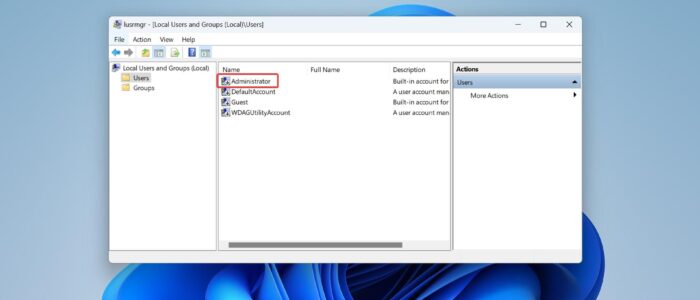
Enable built-in administrator using Computer Management:
Open the Run command by pressing Windows + R and type lusrmgr.msc and hit enter, This command will open the Local Users and Groups.
Look for the Administrator account, right-click on it, and choose Properties.
Under Administrator Properties, click on the General tab and uncheck Account is disabled option.

Click on Apply and OK.
That’s it, Now you can log in to the Administrator account, and if you want to disable the account, follow the same instructions and just check the “Account is disabled” option to disable the admin account.
Read Also:
Delete Built-in Administrator Account in Windows 10
Built-in Administrator account error
How to Add user to administrator Group in windows 11/10/8?