Bitlocker is a feature that protects your hard disk from external attacks or offline attacks. It is a full-volume encryption feature included with Microsoft Windows (Pro and Enterprise only) versions starting with Windows Vista. It is designed to protect data by providing encryption for entire volumes. By default, it uses the AES encryption algorithm in cipher block chaining (CBC) or XTS mode with a 128-bit or 256-bit key. This encryption algorithm is strong enough to protect your HDD and your data. For example, if your HDD is encrypted and you lost your HDD and if someone tries to access your data without the Recovery key then they can’t get anything.
BitLocker also protects your data if a malicious user boots from an alternate Operating System. With either attack method, BitLocker encrypts the hard drive so that when someone has physical access to the drive, the drive is unreadable. There is one more feature Microsoft includes along with the Bitlocker, that is Bitlocker PIN or Pre-Boot PIN Pre-boot authentication with full-disk encryption products (including BitLocker) is a process that requires a user to authenticate prior to making the contents of the system drive accessible. In the case of BitLocker, BitLocker encrypts the entire drive, including all system files. We have already seen how to encrypt Drive using BitLocker, this article will guide you to Disable BitLocker using cmd or PowerShell.
Disable BitLocker Using cmd or PowerShell:
In Windows 11 you can disable BitLocker using different methods, Use the following methods to remove BitLocker encryption.
Disable BitLocker Using Control Panel:
This is the very easiest method, Windows has a direct option to Enable, Disable, or Suspend the BitLocker, and ensure you have administrator access to Modify the BitLocker Control.
Open the Control Panel and click on System and Security, and then choose BitLocker Drive Encryption.
Under BitLocker Driver Encryption, you can see a list of encrypted drives, choose the Drive on which you want to Disable the BitLocker. Click on Turn Off BitLocker.

A message will be displayed, stating that the drive will be decrypted and that decryption may take some time. Click Turn off Bitlocker / Decrypt the drive to continue and turn off BitLocker on the drive.
This will decrypt the Hard disk. You can also use cmd or PowerShell to disable BitLocker.
Using Command Prompt:
Open the command prompt in elevated mode, click on the start menu and search for Command Prompt, right-click on it, and choose Run as Administrator.
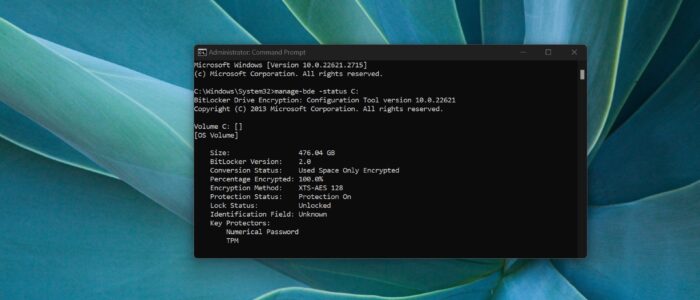
First, check the BitLocker encryption status by executing the following command.
manage-bde -status <drive letter>:

Ensure the Conversion Status is Fully Decrypted.
Replace <drive letter> with the actual drive letter where BitLocker is enabled (e.g., C:).
To disable BitLocker on a specific drive, use the following command:
manage-bde -off <drive letter>:
Again, replace <drive letter> with the actual drive letter.
Now check the encryption status using manage-bde -status <drive letter>: command, if the results show “Percentage Encrypted: 100%”, then the drive is fully encrypted.
Using PowerShell:
Open PowerShell in elevated mode, Or Press Win + X and choose “Windows PowerShell (Admin)”.
To check the BitLocker status on a specific drive, use the following command.
Get-BitLockerVolume -MountPoint <drive Letter>:

Replace <drive letter> with the actual drive letter.
To disable BitLocker on a specific drive, use the following command:
Disable-BitLocker -MountPoint <drive letter>:
Remember to replace <drive letter> with the actual drive letter where BitLocker is enabled.
Read Also:
How to Enable Bitlocker using PowerShell in Windows 11?
Prevent Users from Decrypting BitLocker in Windows 11
How to Reset BitLocker Pin Using PowerShell?
How to enable Bitlocker using cmd line in Windows?
Fix The Group Policy Settings for BitLocker startup options are in conflict

