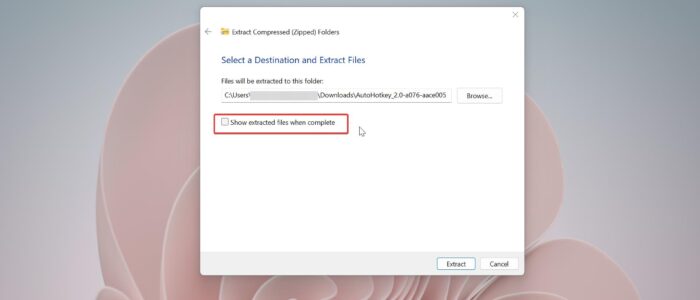
In Windows 10 and 11, you can zip or compress any file or folder using the “Send to” > “Compressed (Zipped) Folder” option from the right-click context menu. Compressed files are one or more files that have been combined into a single file in a space-efficient manner to reduce their total size. This is useful when disk space is limited or when people download files. Since multiple files can be stored in a zipped file, a single file can be downloaded and then unzipped to easily download many files at once. In Windows 10/11, you don’t need any additional software to compress a file. To compress a file or folder, right-click on it and choose “Send to” > “Compressed (Zipped) Folder. In the same way, you can unzip the compressed zipped folder or file by right-clicking on that Zipped folder and choosing “Extract All”, this option will ask you to select the destination and you can see the option to “Show extracted files when complete”. If you check this option, Folder will open automatically once it’s extracted. If you uncheck this option, then you need to open the folder manually after the folder extraction. By default, this option is enabled and checked during the folder extraction, but if you want to hide this option, or disable it permanently, then this article will guide you to Disable Show Extracted Files When Complete option in Windows 11.
Disable Show Extracted Files when Complete:
By default, Show Extracted files when complete option is enabled, and you can see this option during the Extracting files or folders under Extraction Wizard. You can check this option to open the folder automatically after the folder extraction or uncheck the option to do it manually. This method will hide or disable “Show extracted files when complete” permanently.

Note: Modifying the Registry is risky, and it causes irreversible damage to your OS Installation Follow the steps correctly. Friendly advice Before Modifying Registry Creating Restore Point is recommended.
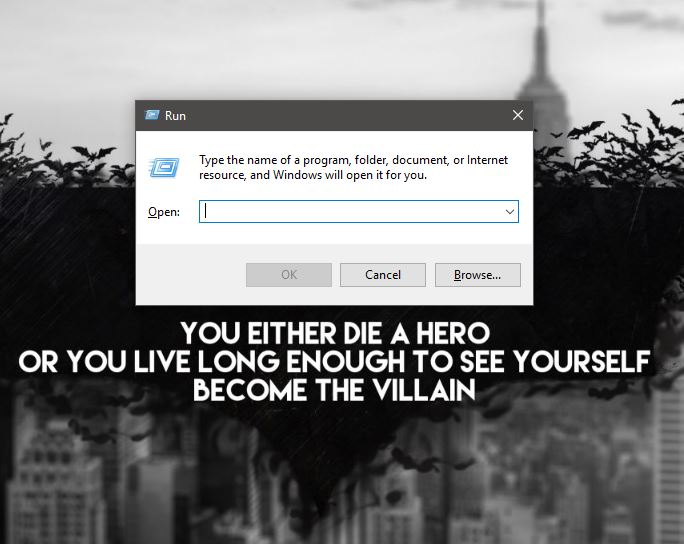
Open Run command by pressing Windows + R and type Regedit and hit enter, this command will open the Registry Editor console.
Now navigate to the following registry path.
HKEY_CURRENT_USER\Software\Microsoft\Windows\CurrentVersion\Explorer\ExtractionWizardFrom the left-hand side click on the ExtractionWizard registry key and from the right-hand side look for the DWORD named ShowFiles.
Double-click on the ShowFiles DWORD and set the value to 0 and click on OK.

Close the Registry Editor and restart the system once.
Post restart the “Show extracted files when complete” option will not be visible in the Extraction Wizard.
To enable the option back, just follow the same steps and modify the ShowFiles DWORD value to 1 and click on OK, this will bring the option back.
Read Also:
Fix Compressed (Zipped) Folder Missing from Send to Menu
Fix Show Extracted Files when Complete option missing in Windows 11