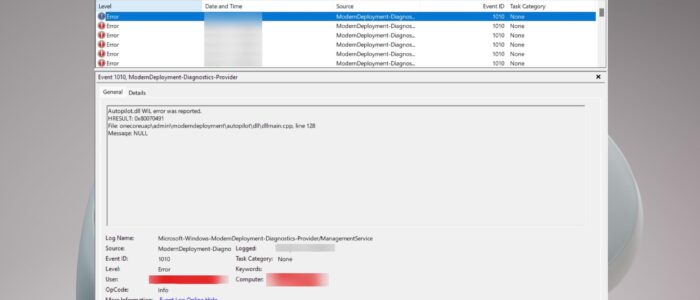
Autopilot.dll error was a common error in Windows operating systems, and you’ll notice this error in Event Viewer. Recently one user reported that he received many error messages in the Event Viewer, and all the errors are reported as “Autopilot.dll WIL error was reported”. And few users reported that this issue occurred after the Windows Update, particularly after Windows 11 Upgradation. This error causes unexpected crashes, random system reboots and system hangs, some users also reported technical issues like touchpad issues due to this error. During the investigation we noticed that this error occurs after the laptop or System Sleep, when we woke the laptop or system up, then we faced all the issues. This error doesn’t throw any error window, it silently causes all the issues which I have mentioned before. And the only way to see this error is by opening the event viewer and checking the error event logs. If you encountered the same issue, then follow this guide to fix Autopilot.dll error in Windows 11.
Autopilot.dll error in Windows 11:
Autopilot.dll error occurs many times per hour, and it causes various technical issues on your laptop, follow the below-mentioned resolution steps to fix this issue.
What causes Autopilot.dll error in Windows 11?
Autopilot.dll error is mostly caused by the following reasons. The first and very common reason is outdated Windows running on your PC or laptop. Then Overclocked memory, some users Overclocked their PC for better performance. Next Dysfunctional Microsoft account sign-in assistant service. Follow the below-mentioned resolution methods to fix this issue.
Method 1: Disable Microsoft Account Sign-in Assistant service:
Once you encounter this error, the first thing you have to disable the Microsoft Account Sign-in Assistant service. This Sign-in Assistant service enabled user sign-in through the Microsoft account identity service. If there is any issue with this service, then the failure details are recorded into the Event Log. Disabling this service will do the trick to fix this error. Follow the below-mentioned steps to Disable the Microsoft account sign-in assistant service.
Open Run command by pressing Windows + R and type services.msc and hit enter, this command will open the Service Management Console.
Next Search for “Microsoft Account Sign-in Assistant service”, right-click on it, and choose Properties.

Under Service Properties, click on the General tab, and under Startup type choose Disabled.

Save the changes by clicking on Apply and OK.
Close the Service Management console and Restart the system once, mostly this will resolve the issue.
Note: Disabling this service will block the sign-in access to Outlook Calendar, Phone, and other Microsoft apps.
Method 2: Check for Windows Update:
Windows updates are very important and mandatory to keep our systems secure and bug-free but sometimes in Windows, updates won’t happen properly. Some users reported that this error may occur also if there is any pending update. So follow the steps to overcome this issue.
Open Command Prompt and type Services.msc and hit enter.
Search for windows Installer and Windows Update services are running. If these services are running then proceed to the next step.
Open Windows Settings by pressing Windows + I and from the left-hand side click on Windows Update.
Under Windows Update, click on Check for updates.
Method 3: Run DISM and SFC scan:
Open the Command Prompt in elevated mode.
Type the following commands one by one, wait for the command to execute fully, once the command is executed successfully, type another command.
DISM /Online /Cleanup-Image /CheckHealth
DISM /Online /Cleanup-Image /ScanHealth
DISM /Online /Cleanup-Image /RestoreHealth
The above-mentioned commands will fix the corrupted system files, it will download and replace the damaged files automatically. And this will fix almost any kind of system-related issue. More about DISM.
Method 4: Disable Overclocking XMP:
If you Overclocked your Memory then reverse the changes to normal and disable XMP settings. XMP or Extreme Memory Profiles is an intel technology that allows you to change multiple memory settings by simply creating and choosing multiple profiles. It allows you to overclock your memory and it helps you to increase the memory speed rather than the Standard memory speed. It depends on the motherboard and type of memory you have, so check your system manufacturer’s website and revert those settings.
Read Also:
Fix vcruntime140.dll was not found error on Windows 11