High Disk and CPU Usage are the most common issue for Windows 10/11 users, this will slow down your system to the maximum level. If you ever feel slowness on your system, first you need to open Task Manager and check the CPU and Disk utilization. If you see CPU and Disk Utilization constantly hovering near 100%, then there is something wrong with your PC. You need to show clear attention to fix this issue. In this article, we’ll see what causes this 100% Disk and CPU usage and how to fix it in different ways.
Generally, Hard Disks have specific read and write speeds, the normal hard disk has 80-150MBps, even the best high-end hard disks have 200MBps disk write speed. When Disk usage reaches its maximum capacity, then you will get 100% disk usage on Task Manager. This issue mostly occurs when HDD is occupied with over tasks or services running in the background. And this issue may occur due to the following instances.
- Improper Hard Disk connections
- Problem with the Windows Updates
- Background Windows Services and features
- Corrupted OS files
- Malware and buggy updates
- Problematic Hard Disks
If you ever feel slowness on your system, then you can use this guide to fix this issue. Here we have mentioned all the possible resolutions methods to fix 100% Disk or CPU utilization. If you don’t know what causes this issue, you can follow the resolution methods one by one to fix this issue.
Fix 100% Disk and CPU Usage issue:
To fix this issue we are going to check the entire computer from hardware to applications, If you are using a warranty laptop then we have given a specific way to check and resolve this issue. Follow the resolution methods one by one, and check if the disk usage is getting dip after each resolution method.
Solution 1: Run Hardware Diagnostics:
Once you notice that your system is getting really slow, open the Task Manager by pressing Ctrl + Alt + Del and choose the Task Manager. Under Task Manager Click on the Process tab and check the CPU and Disk Utilization. If you notice high disk and CPU utilization, then the first step in the troubleshooting process is to check the Hard Disk. You need to run the Hardware Diagnostics.
There are many ways to check your Hard Disk health, either you are using the HDD or SDD the checking process is the same. If you are using any specific Company HDD or SDD, you need to download the Diagnostic tool from the manufacturer’s website. Download and install the Diagnostic tool and then run the Diagnostic tool.
Using BIOS: Also you can check your HDD or SDD health via the BIOS, Restart your system, and go to the BIOS settings > Advanced and under Advanced click on your HDD or SDD, there you may find Quick and Extended HDD check option. Click on it and run the diagnostic. If your hard disk is fine then you may not get any error, if you got any error then there is a problem with your Hard Disk.
Most of the Users may use the DELL or HP Laptop, in DELL laptops you can find the hardware diagnostic tool in the BIOS, restart your system, and press F12 and in the BIOS menu you’ll find the Hardware diagnostic tool. This tool will check the entire laptop hardware and display the results. If there is any issue with the Hard Disk then you’ll get an error. Then you need to replace the Hard disk.
For HP laptops, you can download the Hardware Diagnostic tool from the HP manufacturer website and then follow the steps from the site and check the HDD health.
Using Third-Party Software: There are many third-party softwares available on the internet to check the Hard Disk health. One of my favorites is CrystalDiskInfo. It is a really simple, yet powerful, tool. It is a free-to-use tool that is extremely light and offers all the required information, such as temperature, health status, hard disk type, and features, and other attributes, like read/write error rate, spin-up time, etc. Download the tool and run the Diagnostic tool and check the results. If there is any issue with the Hard disk, you need to replace the HDD as soon as possible.
Solution 2: Check the Hard Disk Connectivity:
If there is no issue with the Hard Disk then the second step is to check the Hard Disk cabling. Open your PC and check the HDD is connected to the correct SATA slot, or just clean the dust and reconnect it once. If you are using SSD then there is no issue, you can skip this solution.
Solution 3: Check for any Pending Updates:
Most of the users will feel the system’s slowness suddenly, some users may report that “my system is fine yesterday and suddenly the system is behaving very slow”. In this scenario, you need to check if there are any pending updates are there.
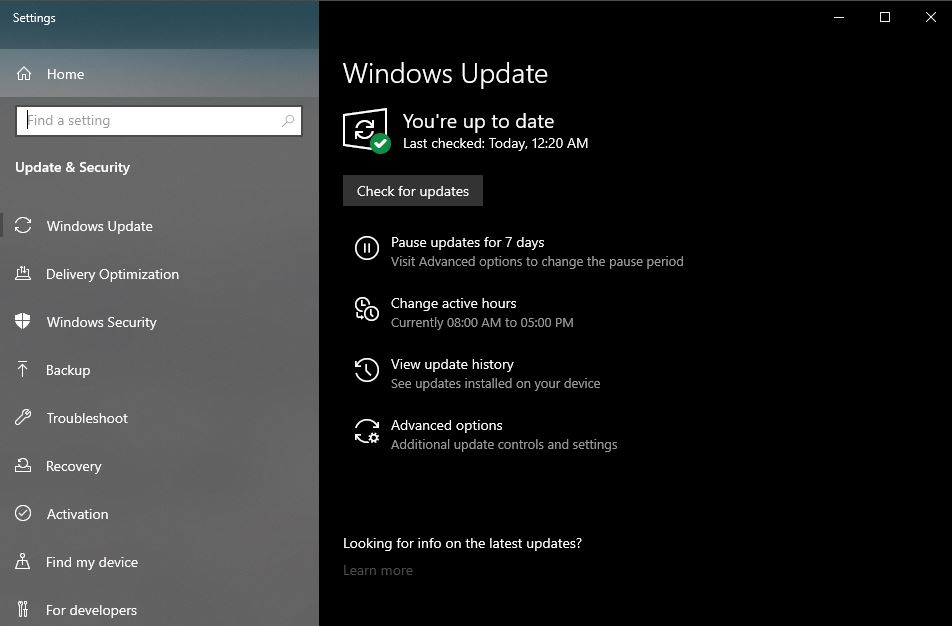
Open Windows Settings by pressing Windows + I and click on Windows Update.
Check if there are any pending updates by clicking on the check for updates button, Windows will automatically download and install the updates.
Once the updates are installed, restart your windows system to complete the windows installation.
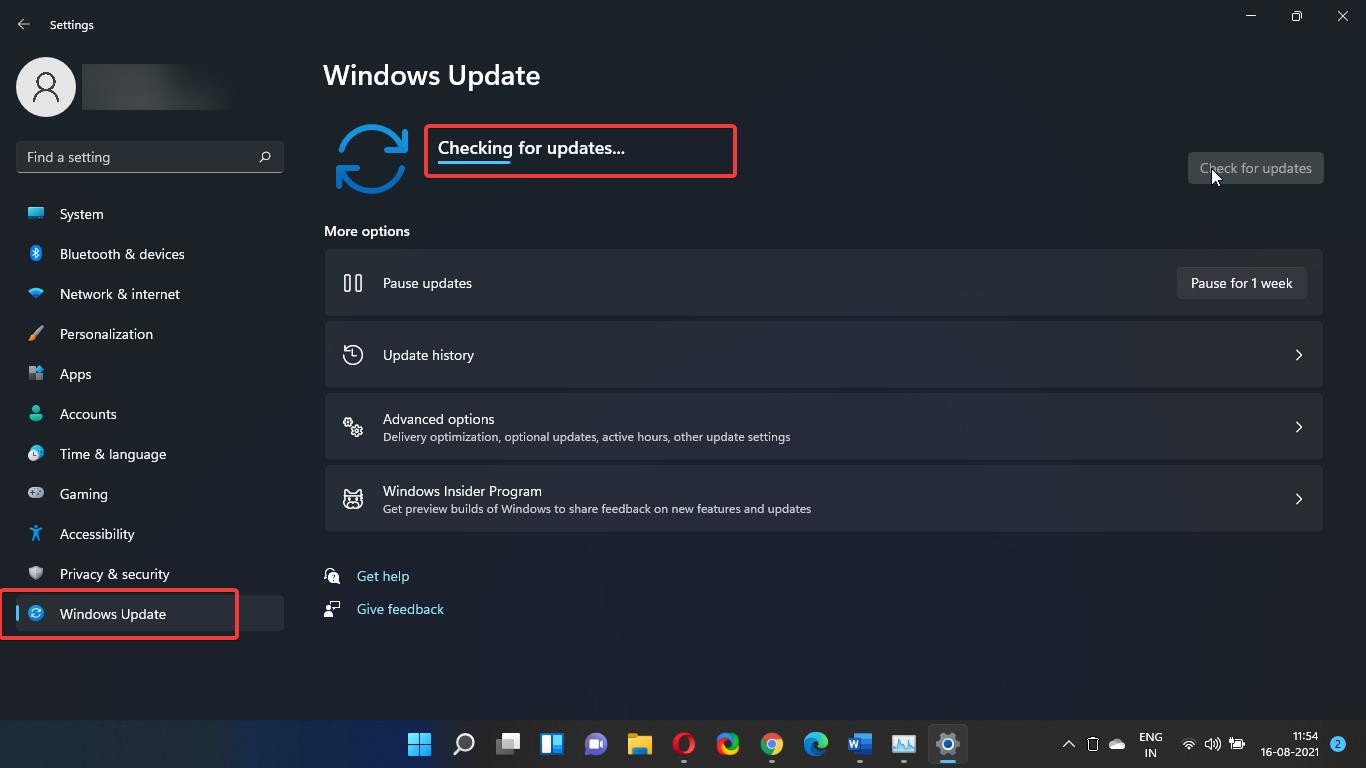
Once the update installation is completed successfully, then log in to your system and check the CPU utilization.
So, the first three solutions are the basic troubleshooting steps you must follow when your system gets slow.
Solution 4: Delete and Rebuild Search Index:
Windows Search is one of the main culprits that actually use High Disk and CPU utilization most of the time. If there is any issue with the indexing then you may get High Disk and CPU utilization. To fix this issue, you need to Delete and rebuild the search index.
To Rebuild Search Index:
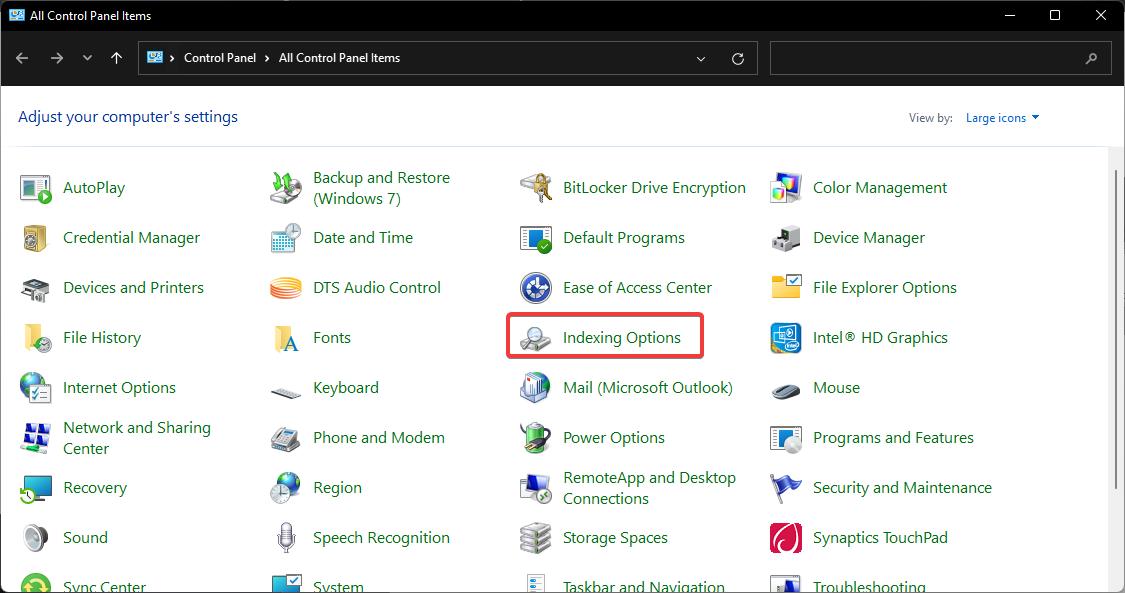
Open Run command and type control and hit enter and switch the view to Large icons and then choose Indexing options.
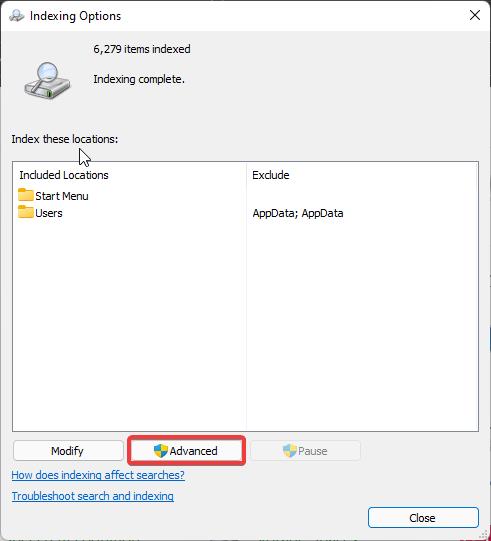
Under Indexing click on the Advanced option.
Under Advanced Option, click on the Index settings tab, and then under Troubleshooting click on Rebuild.
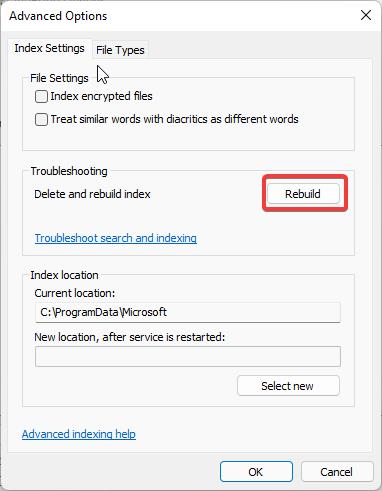
This will rebuild the search index, it will take some time depends on your computer speed and the number of files on your system.
Rebuilding the Index will temporarily fix 100% Disk and CPU Usage, If you want to permanently disable the Windows Search Index then follow the next solution.
Related: How to Rebuild Search Index Using Batch File?
Solution 5: Disable Windows Search Index:
Open Run command by pressing Windows + R and type Services.msc and hit enter. This command will open the Services Management Console.
Now Look for the Windows Search Service. Double-click on the Windows Search and open the service properties.
Set the Startup type to Disabled and click on Apply and OK.
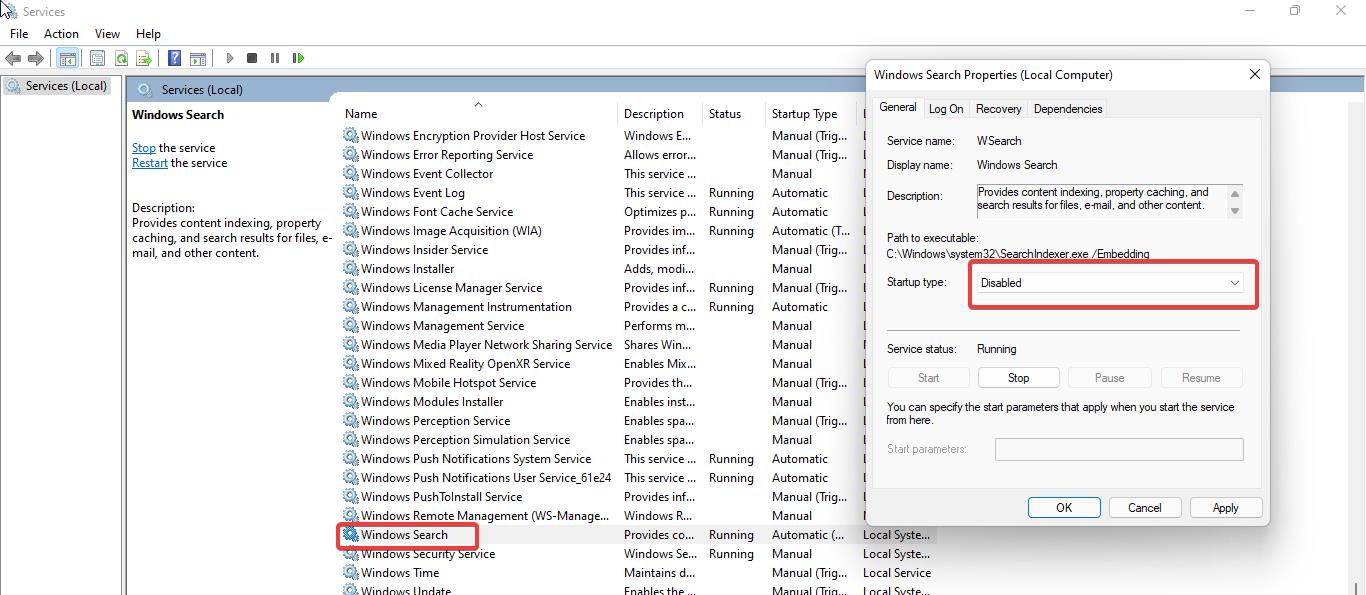
This will disable the Windows Search and now your Disk utilization will get reduced automatically.
Solution 6: Stop Superfetch (SysMain) Service:
After Windows Search Superfetch is one of the potential problems that stresses out your system hard disk. This service was first introduced in Windows Vista, then it was renamed after the 2018 update. It analyses the usage patterns of your frequently used programs and apps and preloads their data into memory. So, whenever you are calling for the program it will load fast. But this service is not working perfectly, running this service will lead to performance issues. Disabling this service will release the stress out from your Hard Disk.
Open run command by pressing Windows + R and type Services.msc and hit enter. This command will open the Services Management Console.
Now look for SysMain service and double-click on it.
Under Startup Type, click on the drop-down menu and choose Disabled, then click on Apply and OK.
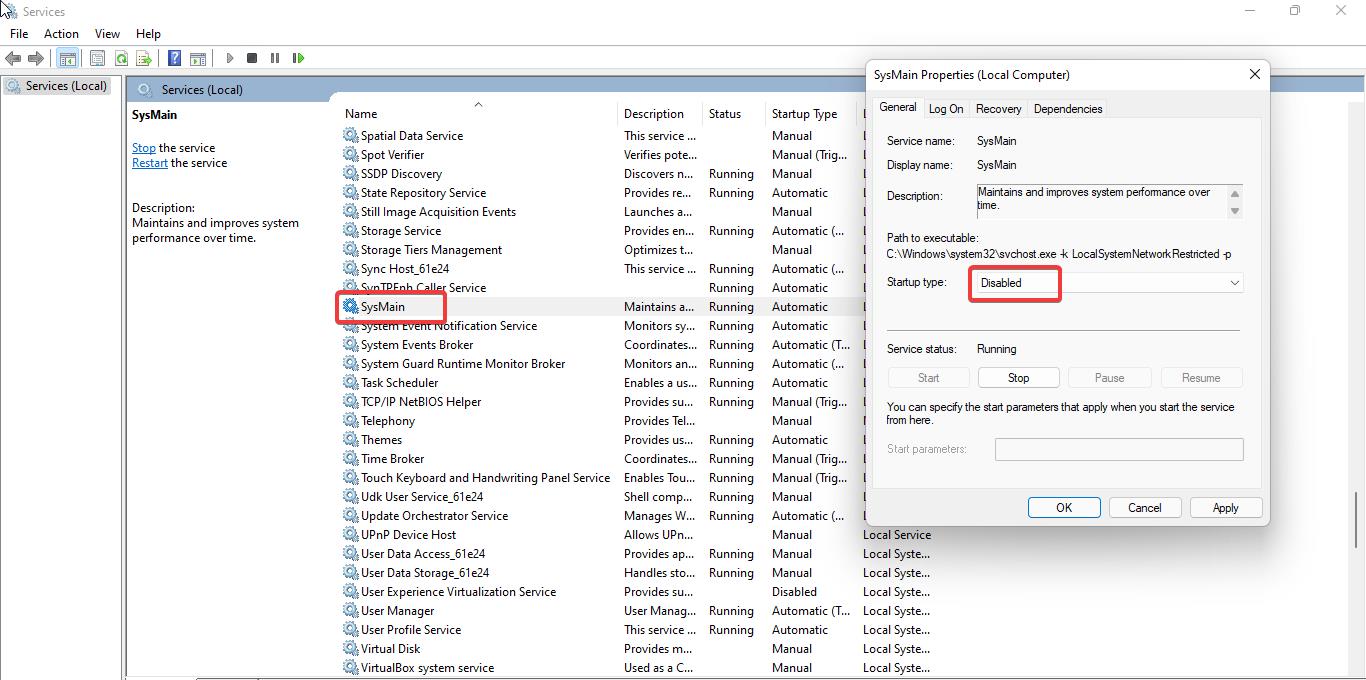
Restart the system once and check the disk usage once again. Mostly this will fix 100% Disk and CPU Usage.
Solution 7: Manually Assign Virtual Memory:
In Windows Virtual Memory is an essential component that is designed to remove and temporarily store less frequently use modified pages allocated in the RAM to the hard drive. Increasing the Virtual Memory will increase your system performance. Follow the steps below to reset the paging and to increase the virtual memory manually.
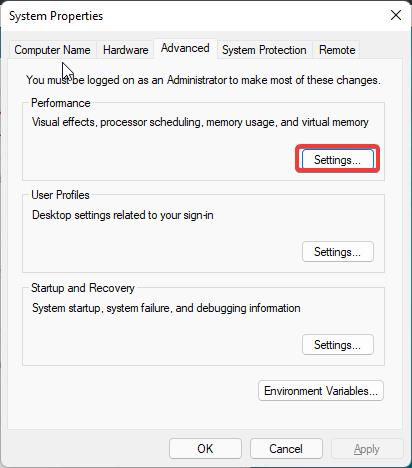
Open Run command by pressing Windows + R and type sysdm.cpl and hit enter. This command will open the System Properties.
In the System Properties Window, click on the Advanced tab. And under Performance click on the Settings.
Under Performance Options, click on the Advanced tab, under Virtual memory click on Change.
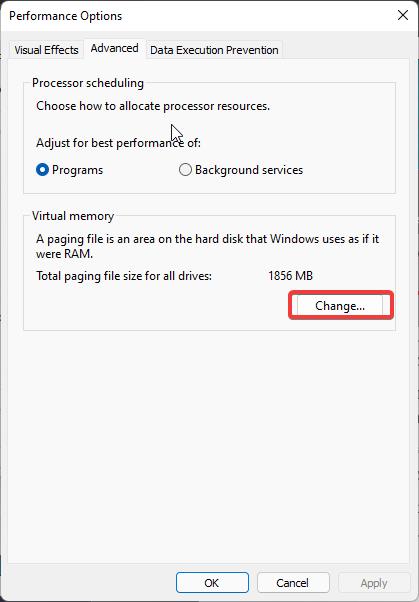
Next Uncheck the box that says “Automatically manage paging file sizes for all drives”.
Select the partition where Windows is installed mostly C: Drive, and then check the Custom size.
Under Custom size set the Initial Size (MB), the Initial Size is Mostly the Recommended value. Check the Recommended value and type the same in the Initial size field.
Then maximum size would be not more than 1.5 percent of your RAM size. But keep limited to 8092 MB, which is good for paging file size.
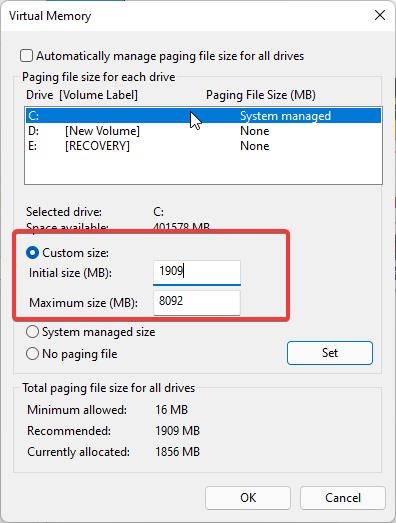
Once you set the min and max file size, then click on OK and restart the system once.
Solution 8: Clear Temp Files:
A temporary file or temp file is a file created to hold information temporarily while a file is being created. After the program has been closed, the temporary file should be deleted. Temporary files are used to help recover lost data if the program or computer is abnormally halted. Microsoft Windows and Windows programs often create a.TMP file as a temporary file. All the temp files are located in the Temp folder, this Temp folder is located at the following path by default.
C:\Windows\Temp
Clear all the temp files:
Open run command and type Temp and hit enter. This command will directly open the Temp folder.
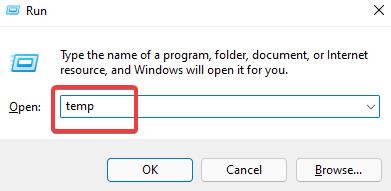
Next, delete all the files from the Temp folder.
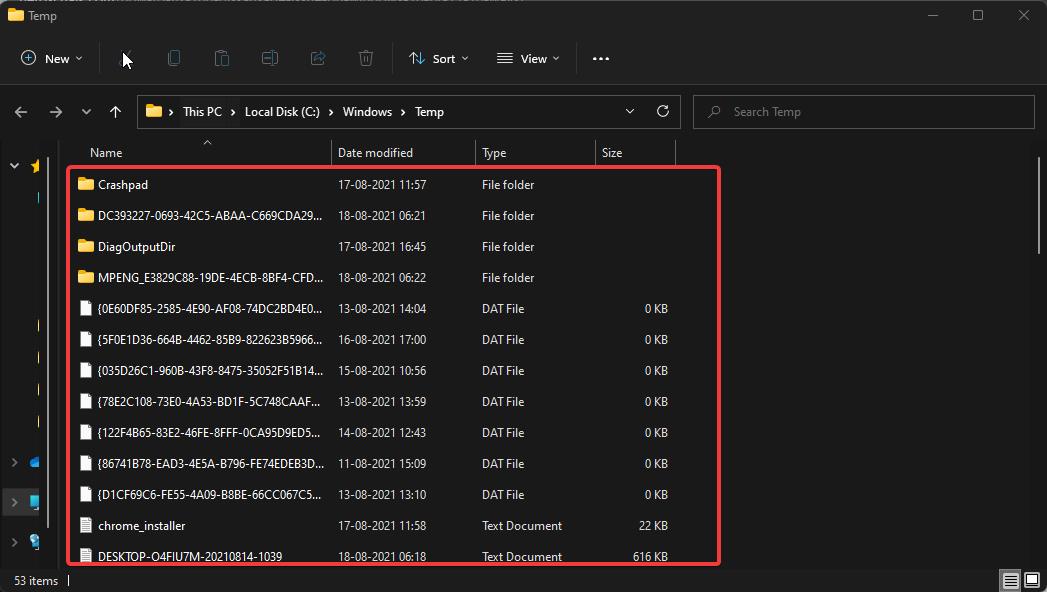
Type %temp% in the run command and delete all the files from it. Do the same for prefetch locations.
Read: Windows Temp Files in Windows 10
Solution 9: Reset OneDrive Sync:
Sometimes Syncing tools like OneDrive will cause a high disk utilization issue, normally during the syncing process, OneDrive will sync the data from the Hard Disk, which will usually take a lot of Disk processes. Sometimes this syncing process got stuck and the OneDrive will keep syncing even when the process is actually over and there’s nothing left to sync. This causes high disk utilization. To fix this issue, it’s better to reset the OneDrive Sync.
Open Run command by pressing Windows + R and type the following command.
%localappdata%\Microsoft\OneDrive\onedrive.exe /reset
This command will immediately stop the syncing process and will do the reset.
Solution 10: Stop Disk Defragmentation:
Disk Defragmentation also known as “defrag” or “defragging”, it is the process of reorganizing the data stored on the hard drive, and it increases the overall efficiency of retrieving the data in the future and thereby improving the overall performance of the computer. And also, it cleans the storage and provides additional storage capacity. And it is the process that secretly increases the disk usage, it doesn’t show up as the process in the Task Manager. If you already started or scheduled the Defrag then disabling the Defrag will help you to reduce the Disk utilization.
Open Windows Start Menu and search for Defragment and Optimize drives.
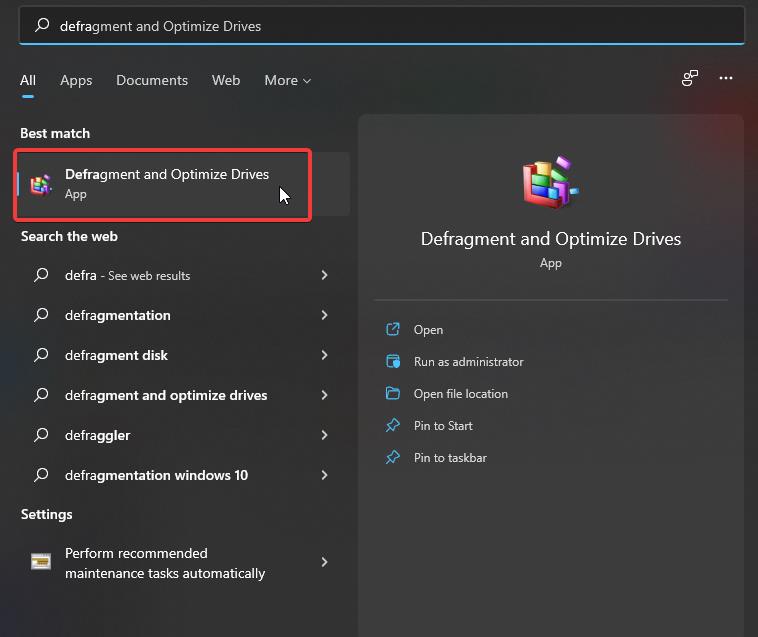
Now click on the Change Settings option.
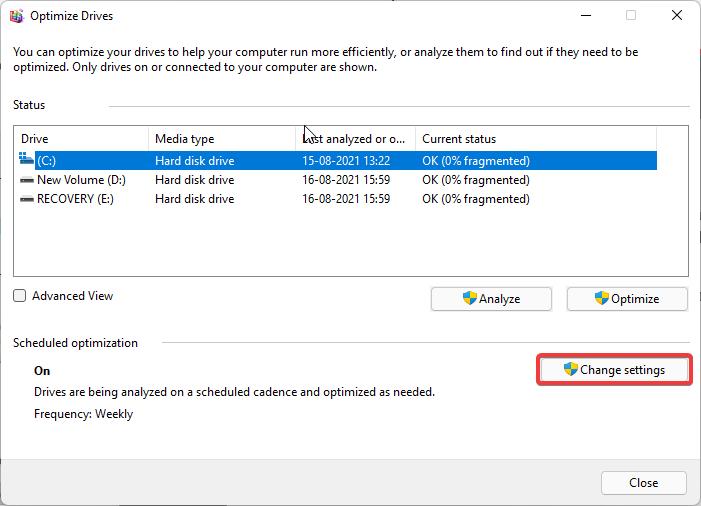
Next uncheck Run on a schedule and click on OK.
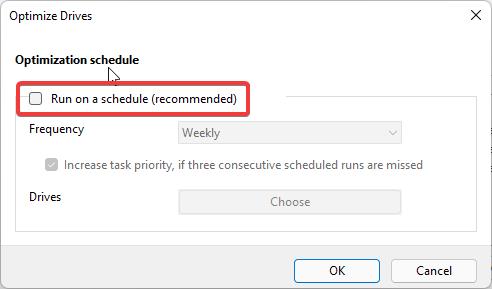
This will stop the disk defragmentation from starting automatically and reduces the disk load.
Solution 11: Disable the DiagTrack Service:
DiagTrack or Connect User Experiences and Telemetry service that usually takes most of the CPU and Disk Usage. Disabling the service will reduce the disk load.
To disable it temporarily, open task manager by pressing Ctrl + Alt + Del and choose Task Manager.
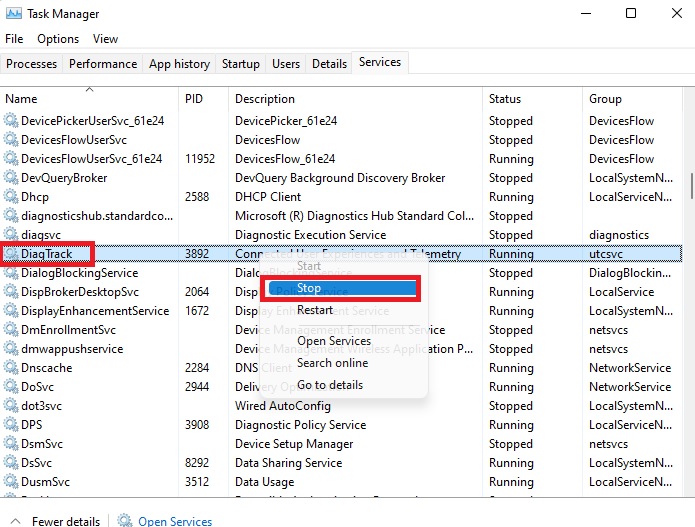
In Task Manager click on the Services tab and look for the DiagTrack.
Right-click on the DiagTrack and choose Stop. This will stop the service immediately. But this method will disable the Service temporarily. If you want to disable it permanently then follow the below-mentioned steps.
Open Run command by pressing Windows + R and type services.msc and hit enter. This command will open the services management console.
Now look for the Connected User Experiences and Telemetry service and right-click on it and choose Properties.
Under the Properties window, under startup type click on the drop-down menu and choose Disabled.
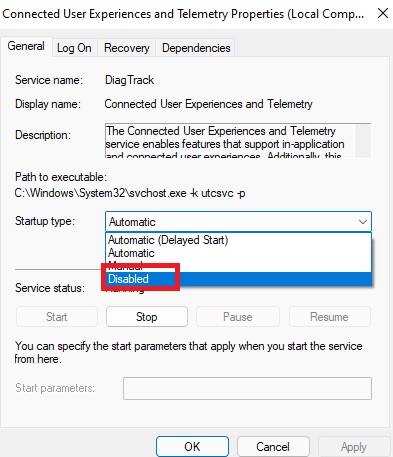
Click on Apply and OK.
Solution 12: Update Storage Device Drivers:
Sometimes outdated Storage Device drivers also cause high disk and CPU utilization. Advanced Host Controller Interface PCI-Express models also cause this type of issue, especially the StorAHCI.sys driver causes high load on disks. To identify the driver issue, open task manager and click on the Process tab and check which process is taking a lot of Disk space. If you are not using the AHCI driver then you can disable that specific driver.
Update Storage Device Drivers:
Open Run command by pressing Windows + R and type devmgmt.msc and hit enter. This command will open the Device Manager.
Under Device Manger Look for “IDE ATA/ATAPI controllers” driver, then right-click on it and choose update.
Next, expand the Storage Controllers, and right-click on Microsoft Storage Spaces Controller, and choose Update.

Once you update the driver restart the system once and check the disk utilization.
Solution 13: Run SFC Scan:
Sometimes corrupted system files will start multiple services and processes and force high disk utilization. To check and fix the corrupted system files, we are going to use the SFC scan, System file check is a utility built into the Operating System that will check for system file corruption. The sfc /scannow command (System File Check) scans the integrity of all protected operating system files and replaces incorrect, corrupted, changed, or damaged versions with the correct versions where possible.
Open Command Prompt in elevated mode.
Type the following commands one by one, wait for the command to execute fully, once the command is executed successfully, type another command.
DISM /Online /Cleanup-Image /CheckHealthDISM /Online /Cleanup-Image /ScanHealth
DISM /Online /Cleanup-Image /RestoreHealth
The above-mentioned commands will fix the corrupted system files, it will download and replace the damaged files automatically. And this will fix 100% Disk and CPU Usage.
Read: What is the use of SFC scan and DISM in windows?
Solution 14: Run Antivirus and check for any Malware:
Viruses and malware are the main culprits for High Disk and CPU utilization, even though you are running quick scans regularly, it is recommended to run deep or full scans often. A full scan can identify the malware on your system and fix any potential infestations. If you are using Windows defender then use the following steps to run the full scan.
Open Windows Settings by pressing Windows + I and select Privacy & Security from the left-hand side panel, and click on Windows Security.
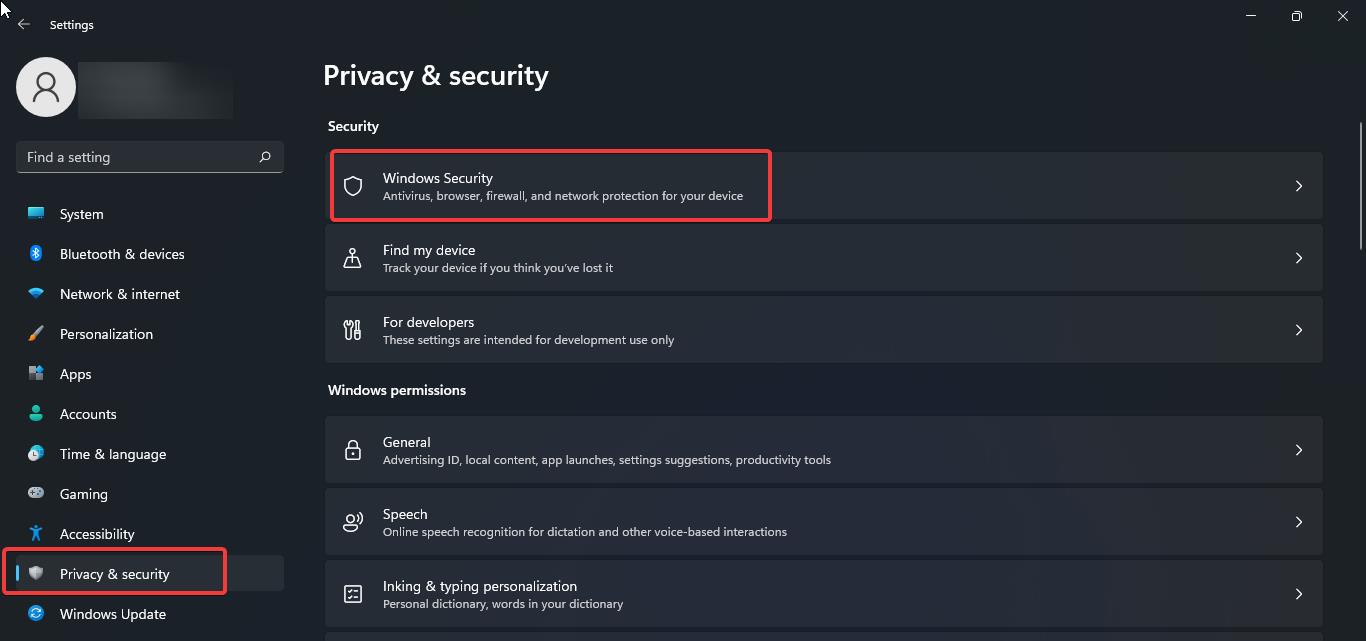
Under Windows Security, click on Virus & threat protection.
Under Virus & threat protection, click on the scan option.
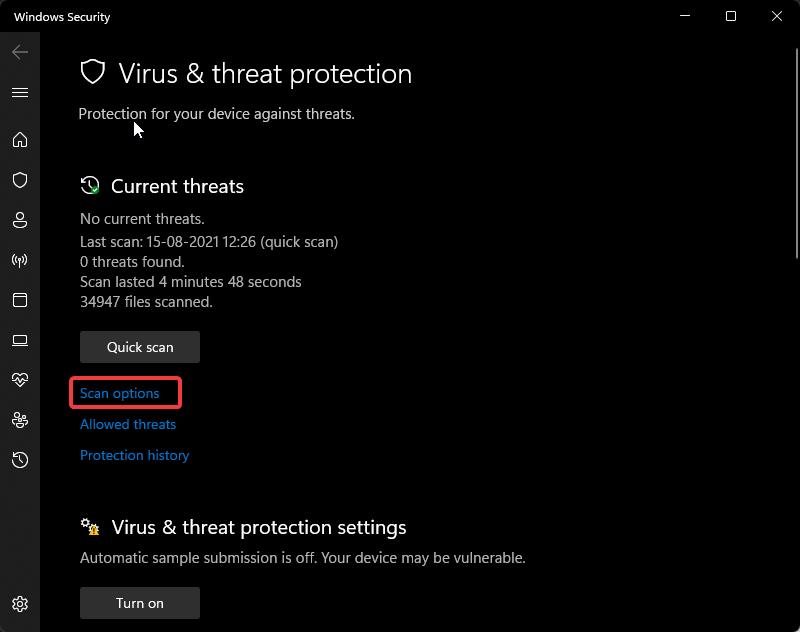
Then under Scan Options click on Full scan and start the scan. Usually, a full scan will take a lot of time.
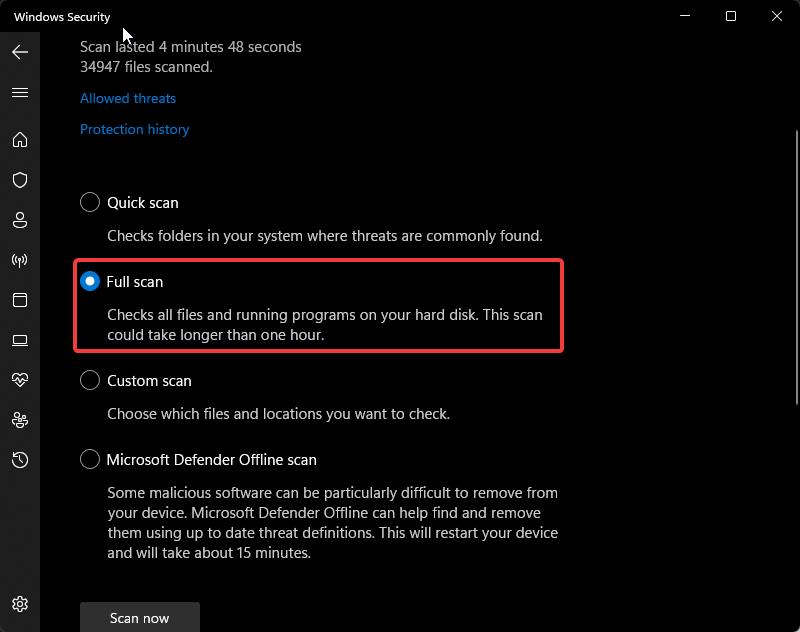
Once the scan completes successfully, restart your system once and check for the Disk utilization.
Solution 15: Switch to High Performance Power Settings:
Most of the users use low-Performance power mode or standard power mode to reduce battery usage. If you are using the standard power mode then it might cause 100% Disk usage. Switch to Higher-Performance mode to reduce the Disk usage and CPU usage.
Open the Control panel, set the view to Large icons, and click on Power Options.
Under Power Options from the left-hand side click on Create a Power plan.
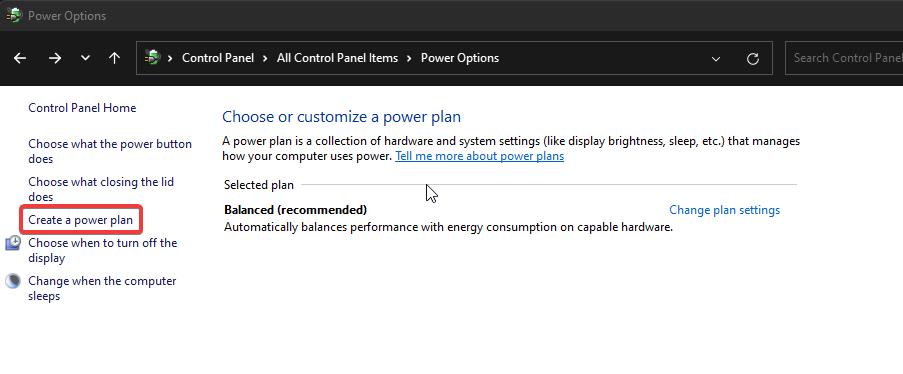
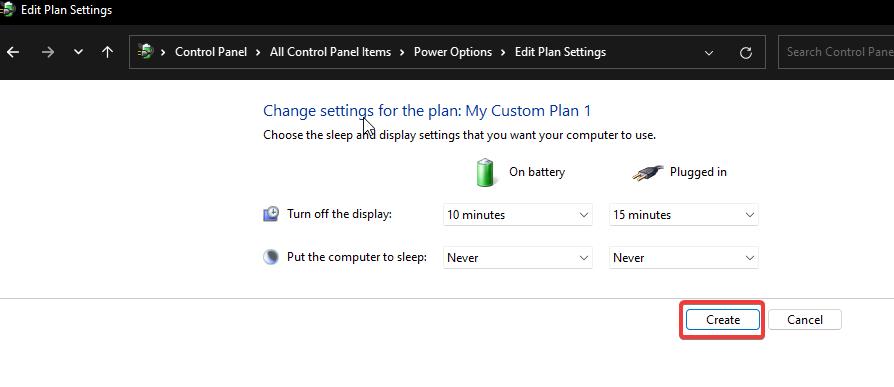
Under Create a power plan, select High performance, and enter the Plan name and click on Next.
And then click on Create.
Solution 16: Disable Windows Tips, Tricks, and Suggestions:
If you are a new user then Windows Tips, Tricks, and Suggestions are very useful for you, but they are not all that important, and these features are enabled by default in Windows 10/11. Keeping them on will utilize more disk memory resources. Follow the below-mentioned steps to turn off these features.
Open Windows Settings by pressing Windows + I and select System.
Under System click on Notifications, Under Notifications Uncheck the following options.
Offer suggestions on how I can set up my device
Get tips and suggestions when I use Windows
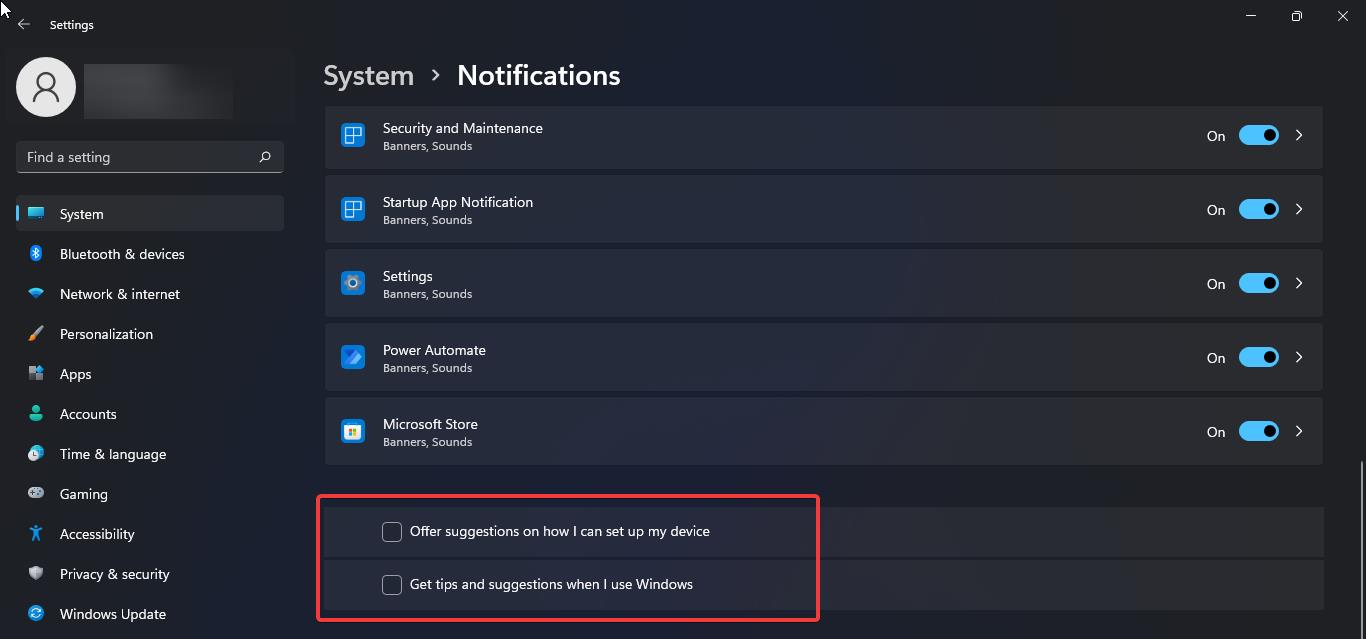
If you want to turn off the notifications for other apps and features, then select that particular app and turn it off. This will reduce the disk load and help you to fix 100% Disk and CPU Usage.
Solution 17: Disable Windows Defender:
Microsoft Defender also Known as Windows Defender is an anti-malware component of Microsoft Windows. It is an official Protection Program provided by Microsoft to Protect computers running windows from Spyware and malware. Windows Defender will automatically scan the system by default and check for any malware or viruses on your system, sometimes there may be a chance that two scannings will start, and that may interrupt each other. If both of these start scanning and fixing issues, then load on the disk may get increase and lead to 100% Disk Usage.
Steps to Disable Windows Defender.
Solution 18: Disable ‘Preload pages’ in Google Chrome:
In Google Chrome there is a feature called Preload Webpages, the feature that helps to load the pages faster. It analyses our movement and predicts where you might click on the next page and preloads the page’s data in the background. So, when you click on the link it will open immediately. It will utilize a lot of data and increase your disk and memory utilization in Windows.
Steps to Disable Preload pages in Google Chrome:
Launch Google Chrome and click on the menu the three dots icon from the top left corner and choose Settings.
Under Settings, from the left-hand side click on Privacy and Security and then click on Cookies and other sites data.
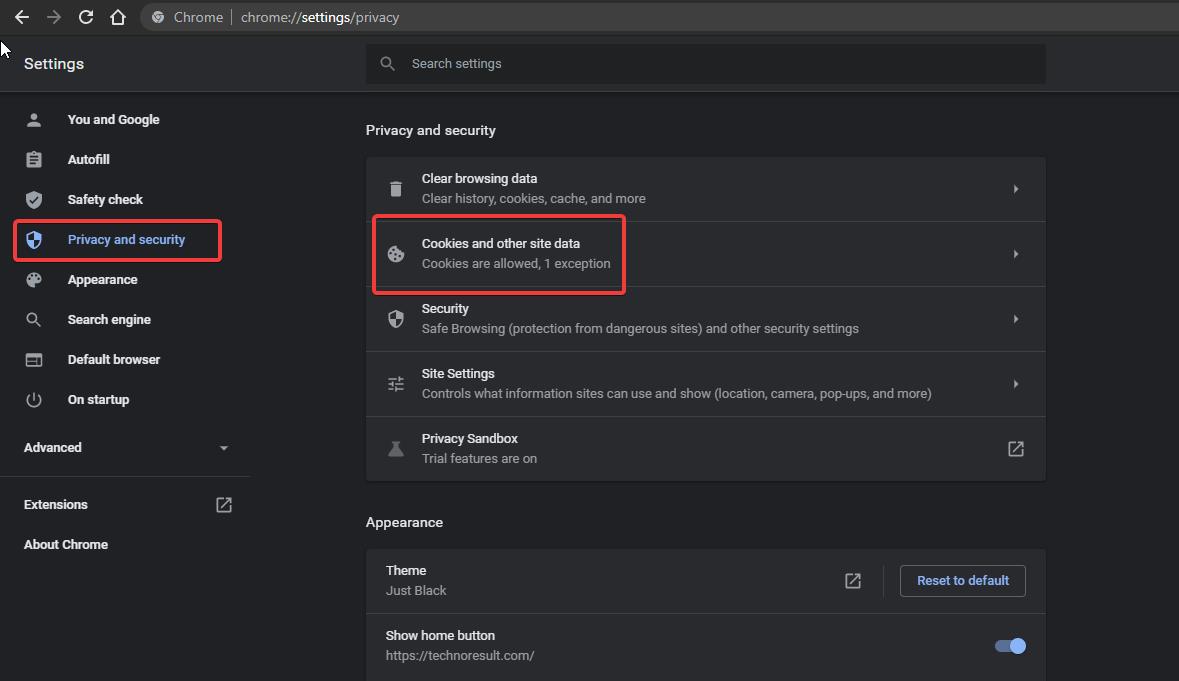
Under Cookies, settings look for Preload pages for faster browsing and searching and turn off the toggle button.
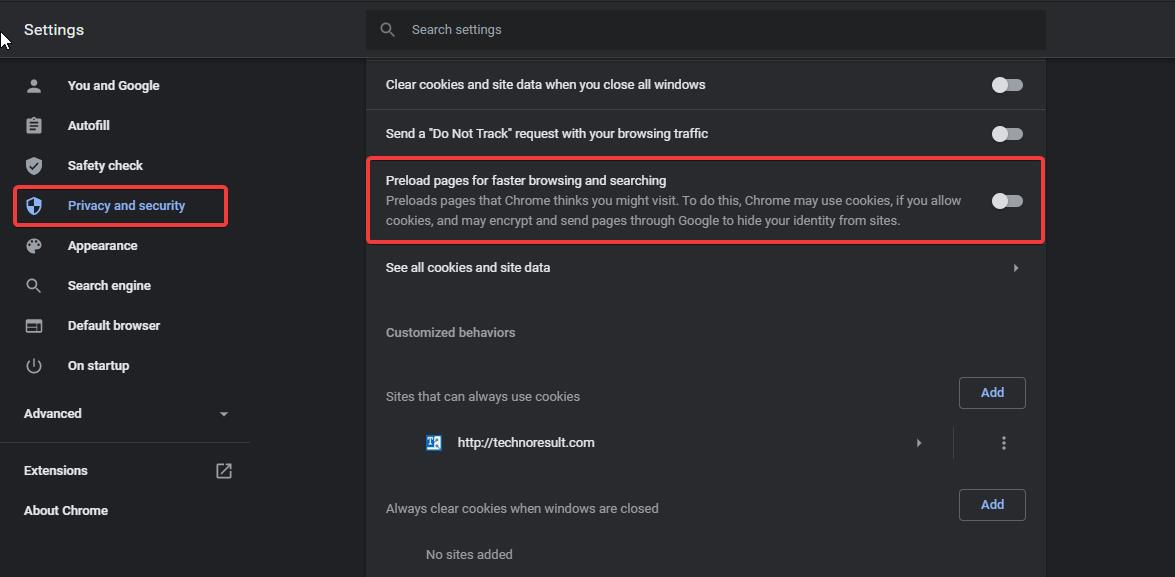
This will disable the Preload pages and reduce your disk and memory usage, and this will fix 100% Disk and CPU Usage.
Solution 19: Check for Windows Update:
Sometimes not updating the Windows will also cause high disk and memory usage, so check if there is any pending update and install the update and restart the system once.
Open Windows Settings by pressing Windows + I and then select Update & Security.
From the left-hand side click on Windows Update and from the right-hand side click on Check for Updates.
Solution 20: Reset your PC:
If the above-mentioned methods don’t give a proper resolution, then this is the last and final method. In this method, we are going to reset the PC. crashes and bugs have become a regular occurrence and hindering productivity, it could be a good idea to reset the PC to its factory defaults and start all over again.
That’s it we have mentioned all the possible resolutions to fix the 100% Disk and CPU Usage issue in Windows 10/11, and we hope that one of the resolution methods will fix the high disk and CPU utilization. After completing one resolution method make sure whether it fixes the issue or not by firing up the Task Manager. Some of the resolution methods require a restart, so restart the system once and check for utilization. Mostly this will fix the issue.

