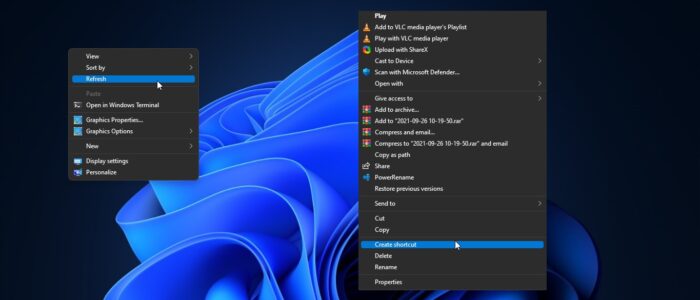
In Windows 11 Insider Preview build there are a lot of improvements and some new features have been added by Microsoft. The most notable feature of the Windows 11 Insider Preview build is the new right-click context menu. This is the menu that appears when you right-click on the Desktop, applications, drivers, folders. This new menu has a more open look, and it is inspired by Fluent Design. Most of the users are not adapted to this new Windows 11 right-click context menu. Particularly Microsoft hides the Refresh option from the right-click context menu. If you want to do refresh you need to right-click on the desktop and choose More items > Refresh. Most of the users thought that Microsoft removed the Refresh option from the context menu, because of the new design. If you are having the habit of right-clicking on the desktop and selecting the refresh directly, then get used to the new operation. If you want the classic Windows 10 right-click context menu, then this article will guide you to Enable classic windows 10 context menus in Windows 11.
Here we are going to Enable the full context menu, so whenever you right-click on any items or desktop, then you’ll get the classic Windows 10 style context menu.
Related: How to Disable Windows 11 New Right-click context menu?
Enable Classic Windows 10 context Menus in Windows 11:
You can enable the classic windows 10 context menu in Windows 11 using different methods, follow the below-mentioned methods carefully. And all the methods involve a registry editor, so before proceeding make sure you are creating the restore point.
Note: Modifying the Registry is risky, and it causes irreversible damage to your OS Installation Follow the steps correctly. Friendly advice Before Modifying Registry Creating Restore Point is recommended.
Using Windows Terminal:
Open Windows Terminal in elevated mode and choose PowerShell profile and copy-paste the following command into the Windows Terminal.
reg.exe add "HKCU\Software\Classes\CLSID\{86ca1aa0-34aa-4e8b-a509-50c905bae2a2}\InprocServer32" /f /veThis command will add a new registry key, and this will disable the new windows 11 context menu and enable the classic context menu.
Once the command executed successfully, restart the file explorer once. If you want to restore the new context menu back the follow the below mentioned steps.
Open Windows Terminal in elevated mode and choose PowerShell profile and copy-paste the following command into the Windows Terminal.
reg.exe delete "HKCU\Software\Classes\CLSID\{86ca1aa0-34aa-4e8b-a509-50c905bae2a2}\InprocServer32" /f
So, this command will delete the particular registry key, and you’ll get the windows 11 context menu back.
Using Registry Editor:
Open Run command by pressing Windows + R and type regedit and hit enter, This command will open the Registry Editor Console.
Navigate to the following Registry path.
HKCU\Software\Classes\CLSID
Next, Right click on the CLSID and choose New > Key and name it as “{86ca1aa0-34aa-4e8b-a509-50c905bae2a2}”.
Next Right click on the newly created key “{86ca1aa0-34aa-4e8b-a509-50c905bae2a2}” and choose New > Key and name it as InprocServer32.

Once you created InprocServer32 key, right hand side look for the default string value, double click on the string value and modify the value data.
Just leave the value data empty and click on Ok and close the registry editor. Restart the file explorer once. Now you’ll see the old classic right click context menu.

If you want to bring the back the new classic windows 11 context menu back, just navigate to the following registry path, and delete the following registry key.
Computer\HKEY_CURRENT_USER\Software\Classes\CLSID\{86ca1aa0-34aa-4e8b-a509-50c905bae2a2}
Delete the registry key \{86ca1aa0-34aa-4e8b-a509-50c905bae2a2}
Next close the Registry editor and restart the system once. Now you’ll get the windows 11 context menu back.
Using Third-Party Tool:
Download Winaero tweaker from this link. This is all in one app from Winaero, it will include almost all apps released by Winaero along with new tweaks and options. This tool supports Win 7, Win 8, Win 8.1, Win 10, and Win 11.
Extract the Zip file and install the Winaero tweaker.
From the left-hand side under Windows 11, click on Classic Full Context Menus. And from the right-hand side check the Enable Classic full context menus box.

This option will enable the classic context menus in Windows 11. To disable just open the same tool and uncheck the option. This is one of the easiest methods, Thanks to Winaero.
Read Also:
How to Restore Classic Windows 10 start menu in Windows 11?

Thank You so much! This methods working very properly!