Disk Cleanup is a Microsoft Windows maintenance utility, which is used to clean your Hard drive by deleting unwanted cache files, temporary files, and windows updates files. While performing disk analysis, the Disk Cleanup tool will target different types of categories, the following categories are mentioned below.
- Compression of old files
- Temporary Internet files
- Recycle Bin
- Removal of unused applications or optional Windows components
- Setup log files
- Offline web pages (cached)
- WinSxS (Windows component store)
- Temporary Windows files
- Downloaded program files
The Disk cleanup utility displays the identified files and the amount of storage space that each file has used in your hard drive. Based on this data you can choose the large files or the unwanted data to delete the files. Disk cleanup tool plays a vital role in increasing the Disk space. And you can use this utility to safely remove Windows update files after the windows update. You can open Disk Cleanup using the Run command, Open run command by pressing Windows + R and type cleanmgr, and hit enter. This command will open the Disk Cleanup. There are many ways to open the Disk Cleanup. In this article, we’ll see how to Add Disk Cleanup to right-click Context menu.
Read: How to Increase Disk Space by Deleting Crash Dump Files?
Add Disk Cleanup to right-click Context menu:
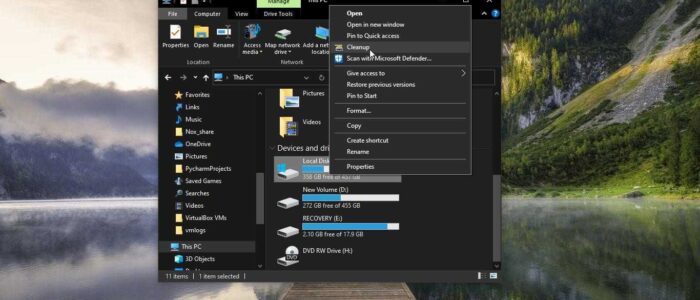
Adding Disk Cleanup to the right-click context menu will give easy access, and also you can right-click on any partition drive and choose Disk Cleanup to perform the scan. Follow the below-mentioned steps to Add Disk Cleanup to Right-click context menu.
Note: Modifying the Registry is risky, and it causes irreversible damage to your OS Installation Follow the steps correctly. Friendly advice Before Modifying Registry Creating Restore Point is recommended.
Open the Run command by pressing Windows + R and type Regedit and hit enter. This command will open the Registry Editor Console.
Now Navigate to the following path.
HKEY_CLASSES_ROOT\Drive\shell
From the left-hand side, right-click on the Shell registry key and choose New > Key and name it as Windows.CleanUp.

Next Right-click on Windows.CleanUp and choose New > String Value and name it as CommandStateSync.

Again, Right-click on the Windows.CleanUp and choose New > String value and name it as ExplorerCommandHandler.
Next Double click on the ExplorerCommandHandler String value and set the Value data as {9cca66bb-9c78-4e59-a76f-a5e9990b8aa0} and click on OK.

Now we need to create an icon for Disk cleanup, right-click on an empty area and choose New > String value and name it as icon. Double click on the icon string value and set the following path in the value data.
%SystemRoot%\System32\cleanmgr.exe,-104
Next, create a new DWORD and name it as ImpliedSelectionModel, and set the Value data as 1 click on Ok.

Close the Registry Editor and restart the system once, After the restart right-click on any drive partition, you can see the Disk CleanUp tool in the right-click context menu.
If you want to remove just follow the same steps above and delete the Windows.CleanUp registry key. That’s it.
Read: Fix Check Bluetooth Radio Status Not Fixed in Windows 10