Windows included many optional features, which you can enable or disable based on your requirements. These features are known as optional features. Most of these features are intended for business networks and servers, enabling all the features will take up more space on your hard drive. And most of the windows features are disabled by default. For example, Hyper V is a windows optional feature which is disabled by default. And based on your requirement you can enable this feature. Enabling all the features will slower your system performance. To Turn on or off any windows features you can navigate to Programs and Features and from the left-hand side choose Turn on or off Windows Features. This will take you to the Windows Optional features page. Click on the Optional feature which you want to remove. In Windows 11 you can add or remove optional features using different methods. This article will guide you to Add or Remove Optional Features using Windows PowerShell and other methods.
Add or Remove Optional Feature:
Method 1: Add or Remove Optional Feature using Windows Settings:
Open Windows Settings by pressing Windows + I and from the left-hand side click on Apps and from the right-hand pane click on Optional Features.

Under Optional Features, scroll down and click on the Optional feature which you want to remove.
Click on Uninstall to remove the Optional feature.

To Add Optional Feature:
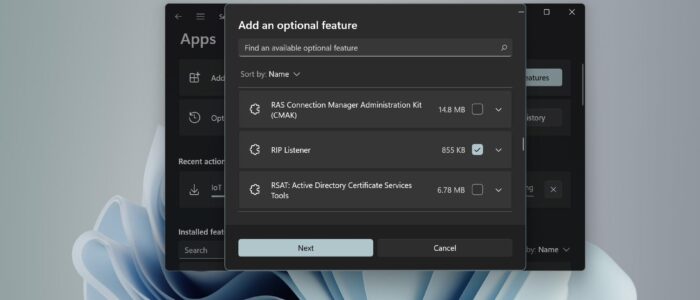
Open Windows Settings by pressing Windows + I and from the left-hand side click on Apps and from the right-hand pane click on Optional Features.
Under Optional Features, click on Add an optional feature, Choose the optional feature which you want to add, check the feature and click on Next > Install.


Method 2: Using Control Panel:
Open Run command by pressing Windows + R and type appwiz.cpl and hit enter, this command will open the Programs and features.

From the left-hand pane click on Turn Windows features on or off, Under Windows features, uncheck the feature which you want to remove.

Uncheck the feature and click on OK.
To add optional features using the control panel, check the feature which you want to Add and click on OK.
Method 3: Add or Remove Optional Features Using PowerShell:
Open PowerShell in elevated mode.
Now first before proceeding you need to know the list of Windows Features Names, to know that type the following command.
Get-WindowsOptionalFeature –Online
This command will list all the available Windows Features name and their state.

If you want to get information about any specific windows features, then type the following command.
Get-WindowsOptionalFeature -Online -FeatureName *Type feature name*
If you know the feature name then replace it in the command while executing.
To Enable:
Type the following command to enable any Windows Optional Feature.
Enable-WindowsOptionalFeature -Online -FeatureName “Feature name” –all
Replace the actual feature name in the command.
Example: Enable-WindowsOptionalFeature -Online -FeatureName “TelnetClient” –all

To Disable:
Type the following command to Disable any Windows Optional Feature.
Disable-WindowsOptionalFeature -Online -FeatureName “Feature name”
Replace the actual feature name in the command.
Method 4: Add or Remove Optional Features Using Command Prompt:
Launch Command Prompt in elevated mode. Search for the command prompt, right-click on it, and choose Run as administrator.
Type the following command to list out all the Optional features available on your PC.

Scroll down and note down the feature name (Capability Identity name) which you want to remove.
To remove, type the following command and replace the Capability Identity name.
DISM /Online /Remove-Capability /CapabilityName:<Name>
Eg: DISM /Online /Remove-Capability /CapabilityName:Microsoft.Windows.IoTDeviceUpdateCenter~~~~0.0.1.0

To add, type the following command and replace the capability name with the actual feature name which you want to add.
DISM /Online /Add-Capability /CapabilityName:<Name>

This command will download and install an optional feature.
Read Also: How to Install OpenSSH server in Windows 10/11?