In Windows 10 File Explorer Properties gives you information about that particular files, such as the date you created, the name of the file size, and more stuff. This Properties window explored in multiple tabs. General Tab, Security Tab, Details, and Previous Versions. In this article, we are going to see about Security tab. Security tab control permissions, which are rules determining who can access the file and what they can do with it. You provide access to any user or Group to that particular folder. Also, you can change the permissions to the user. If you are looking for a way to Disable the security tab for security reasons, then this article will help you to disable it using the following methods.
Disable Security Tab from File Explorer
You can also use the following methods if the security tab is missing from the file explorer. You can use these methods in two ways either to disable or enable the security tab from the file explorer.
Disable Security Tab using Group Policy Editor:
Use this method if you are using Windows 10 Pro, Education, Or Enterprise Edition. If you are using windows 10 Home edition then use the second method.
Open the Run command by pressing Windows + R and type gpedit.msc and hit enter. This command will open the Group Policy Editor.
Now Navigate to the following path.
User Configuration > Administrative Templates > Windows Components > File Explorer
From the right-hand side click on the File Explorer, and from the right-hand side look for Remove Security tab.
Double click on the Remove Security tab to open policy settings. Select Enabled and click on Apply and OK.
Restart the system once and check. If your security tab is already missing then follow the above steps and choose Not configured. This will bring back the security tab.
Using Registry Editor:
If you are using Windows Home edition then use this method.
Note: Modifying the Registry is risky, and it causes irreversible damage to your OS Installation Follow the steps correctly. Friendly advice Before Modifying Registry Creating Restore Point is recommended.
Open the Run command by pressing Windows + R and type Regedit and hit enter. This will open the Registry Editor.
Now navigate to the following path.
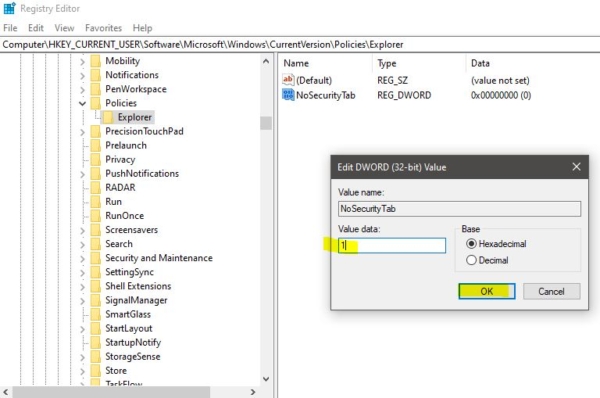
Computer\HKEY_CURRENT_USER\Software\Microsoft\Windows\CurrentVersion\Policies\Explorer
From the left-hand side click on the Explorer and from the right-hand side right-click on the empty area and choose New > DWORD (32-bit) Value.

Name the DWORD as NoSecurityTab. Double click on the NoSecurityTab and modify the value to 1 and click on OK.

This will remove the security tab from the File Explorer. If you want to enable it back the follow the same steps above and set the value 0. Or Delete the NoSecurityTab DWORD.
Read Also:
How to Disable Data Execution Prevention (DEP) in Windows 11?
How to Enable Power Management tab in Device Manager?


