In windows 10, High CPU and Disk usage are common things nowadays this will slow down your system to the maximum level. Even though you installed 8 GB or 16 GB RAM You can’t even open an explorer tab or in the worse case, you can’t reach a task manager. There are so many possible reasons for this slowness issue but here I have shown only about WIA (Windows Image Acquisition) and why WIA is causing this issue.
What is WIA?
Windows Image Acquisition (WIA) is a device driver interface and an API that is used for acquiring digital images from devices that are used primarily in still image captures, such as scanners and digital cameras and transferring those images to the user computer. It was introduced in Windows ME and Windows XP edition. The WIA platform enables imaging/graphics applications to interact with imaging hardware and standardizes the interaction between different applications and scanners. This allows those different applications to talk to and interact with those different scanners without requiring the application writers and scanner manufacturers to customize their application or drivers for each application-device combination. In windows 10 for some reason, this may cause high CPU and disk utilization. If you notice any slowness on your windows 10 machine you can check for this service and disable it. This post explains what the root cause for this issue and methods to resolve it.
How to check the DISK or CPU utilization is High?
- If your system is slow you just press CTRL + ALT + DELETE this will open the security options menu. Select task manager.
- Expand the options in the task manager and check if the disk utilization is high.
So why we have to WIA in this case. Most of the time the process occupying the major chunk of disk utilization is windows Image Acquisition (WIA).
What causing this issue?
The main reason for this issue is the WIA service not running properly
- Due to some Virus or malware in the system.
- Due to unsupported hardware and drivers.
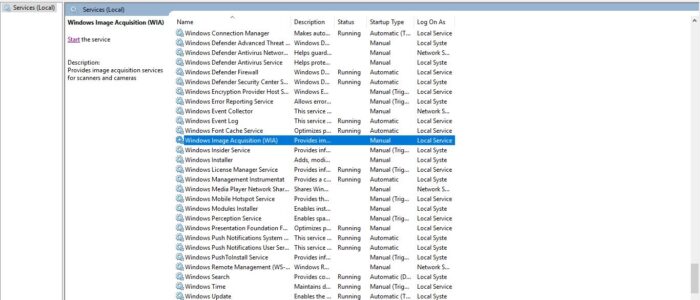
Solution 1: Restart the Windows Image Acquisition service
- Open run command by pressing Windows + R and type services.msc hit enter.
- Now locate Windows Image Acquisition Service. And restart the WIA service.

- If the WIA service is already running stop it and start it again. If the WIA is not started start it and check mostly restarting this service will fix the issue. Stopping this service will cause some hardware dependencies, this would disallow you from using imaging hardware that depends on graphics.
Solution 2: Update recent Windows Patches
You all know the importance of the windows update, the main reasons for the updates are the new updates discovered holes and security issues in the current update and adds malware definitions to its Windows Defender and Security Essentials utilities, bolsters Office security, and so on. Recently many users reported after updating to the current version of windows updates some system face dead slowness, these types of issues are caused by the Improper installation of the current update, So to overcome this issue the system needs to be updated to the latest version.
Steps to remediate High CPU and DISK utilization by updating windows.
- Open Run command and type services.msc, and check for windows update service is enabled or not. If not enable the windows update.
- And check for windows Installer services is enabled and running. If not enable the service. This service will help to install all the pending windows updates.
- Open software Distribution system. By accessing this path C:\Windows\SoftwareDistribution
- Delete all the data from the software Distribution folder.
- Now press Windows + I and click on Update and security and under the windows update click on check for update now. This will check for the pending update and install it automatically.
- After the Update check the issue is Fixed or not.
If your windows update is not working Properly. Run Built-in & Guided Walk through Windows Update troubleshooter Built-in :
Windows Key+X > Click Settings > Click Update & security > Click Troubleshoot > Click Windows Update > Click Run the Troubleshooter
Solution 3: Update Latest Graphics Drivers.
Always we must keep our system device driver Up to date for better performance and for bug fix. Check here how to update your system driver automatically.
- Press Windows + R and type devmgmt.msc, this command will open device manager.
- Check for Display adapters and right-click on it and update the driver.

Solution 4: System repair and SFC scan.
Running the SFC scan would be the possible way to fix this issue, SFC is also known as the System File Checker utility in Microsoft Windows that allows users to scan and restore corruptions in Windows system files. Check here all about SFC scan here.
Solution 5: Recheck all Imaging hardware connected to PC
After updating the graphics driver check all the imaging or printing devices connected to your PC, these devices uses graphics driver intensively. Try to disconnect all the imaging devices and check the CPU and DISK utilization. Or Try to connect these devices to some other PC and check for Utilization.
Solution 6: Restart BITS service
BITS transfers files in the background using idle network bandwidth. If the service is disabled, then any applications that depend on BITS, such as Windows Update or MSN Explorer, will be unable to automatically download programs and other information. Windows Update uses the Background Intelligent Transfer Service (BITS) technology which downloads updates using idle bandwidth. This technology ensures that Windows Update downloads only when no other active download is in progress on the computer. This allows you to smoothly carry on day-to-day activities even while updates are being downloaded in the background. It is not recommended to disable this service. But for checking the process and disk utilization we can disable and check the BITS service.
- Open Run command and type services.msc
- And search for Background Intelligent Transfer Service
- In Left-hand side panel if the service is not started click on start and if the service is started click on restart the service once and check.