In Windows 11, you can change the Network Profile type using the following methods, This article will guide you to change the Network Profile type using PowerShell as well as using settings and registry methods. Network profile type is a categorization of a network based on its security level and trustworthiness. It helps determine the network settings and permissions applied to a device when you connected to a specific network. In Windows 11 there are three common network profile types are used to differentiate between different types of networks.
Public: This network profile is used for public or untrusted networks such as those found in coffee shops, airports, or public Wi-Fi hotspots. When you connect to a network marked as Public, Windows 11 applies the most restrictive settings to protect your device, and certain network features may be limited or disabled.
Private: This network profile is used for trusted networks such as your home or office network. When you connect to a network marked as Private, Windows 11 allows more relaxed settings and enables features like network discovery, file and printer sharing, and homegroup connections.
Domain: This network profile applies when your Windows 11 device is connected to a business or enterprise environment domain network. Network administrators typically manage domain networks and have specific security policies and settings configured by the organization’s IT department.
This Windows guide will show you to change the network profile type using different methods.
Change network profile type using Windows Settings:
Open Windows Settings by pressing Windows + I and from the left-hand side click on Network & Internet.
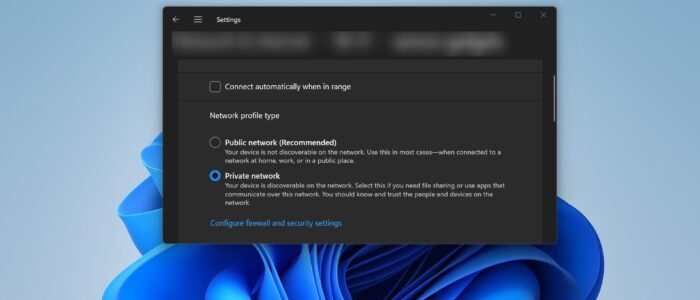
And from the right-hand side click on the Ethernet option, Under Network profile type, select the profile type you want.

Public network: Your device is not discoverable on the network. Use this in most cases when connected to a network at home, work, or in a public place.
Private network: Your device is discoverable on the network. Select this if you need file sharing or use apps that communicate over this network you should know and trust the people and devices on the network.

To Change the Profile type on Wi-Fi, go to Network & Internet> Wi-Fi > click on the Connected Wi-Fi Properties and choose the Network profile type.
Change the Network Profile type using PowerShell:
Open PowerShell in elevated mode, click on the start menu and search for PowerShell, right-click on PowerShell, and choose Run as administrator.
Type the following command to change the current network profile and hit enter.
Get-NetConnectionProfileYou can see and confirm the current network profile’s type in the NetworkCatagory field.
Type the following command to change the network profile type in Windows 11 and hit enter.
Set-NetConnectionProfile -Name "NETWORK-NAME" -NetworkCategory TYPEExample:
Set-NetConnectionProfile -Name "premnash" -NetworkCategory Private

Here you have to replace the “NETWORK-NAME” and the type, choose Private or public, and replace it with TYPE. This setting will apply immediately to the connection and firewall settings.
Using Registry:
Open Run command by pressing Windows + R and type regedit and hit enter, this command will open the Registry Editor.
Navigate to the following path:
HKEY_LOCAL_MACHINE\SOFTWARE\Microsoft\Windows NT\CurrentVersion\NetworkList\Profiles
From the left-hand side expand the profiles registry key and under the Profiles registry key, you can see the network connections.
Click on the Network connection you want to modify the network type.
Double-click on the Category DWORD from the right-hand side and set the value as mentioned below.
Public – 0
Private – 1
Domain -2

Next, click on OK and restart your system once to make the changes effective.
Read Also:
Remove Map Network Drive from Context menu in Windows 11
How to Disable Network icon on Login Screen in Windows 11?
How to Disable Password Protected Sharing in Windows 11/10?
How to use Multiple Internet connections at same time in Windows 11/10?
How to Reset Network using cmd in Windows 11?