In Windows by default, if you open File Explorer it will show the Quick access folder that shows you the most recent files or folders. This Folder is known as the Default folder and you can change this behavior by modifying the system settings, you can change the Default folder to This PC or any other folder by following the below-mentioned methods. Using this method you can set your favorite folder as a Default Folder, by changing the default file explorer location.
Change Default Folder in File Explorer:
Windows allows you to change the Default folder location to This PC, by selecting This PC as the Default folder view in Folder Option. If you want to set some other folder location, then it will be a little tricky, just follow the Method 2 steps to achieve this.
Method 1: Change Default Folder to This PC:
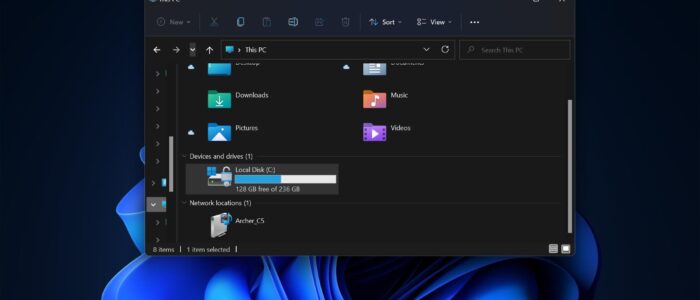
Open File Explorer by pressing Windows + E, or you can press the folder icon on the Taskbar.
Click on the three dots from the top middle of File explorer and choose Options.

This will open the Folder Options, click on the General tab.
Click on the Drop-down menu next to “Open File Explorer to” and choose This PC and click on OK.

That’s it This PC has been set as a Default folder view. To change back to Quick access, follow the above-mentioned steps.
Method 2: Change Default Folder to Any folder:
Windows don’t have a direct option to set any other folder as a default folder in file explorer. But there is a workaround for that, using this method you can change the location of the File Explorer, so whenever you open file explorer it will open the particular folder that you set. Follow the steps below to change the default folder to any folder.
First, we need to create a File Explorer shortcut, right-click on your desktop and choose New > Shortcut.

Under Type the location of the item, copy-paste the following location C:\Windows\explorer.exe and click on Next.

Change the name if you want, type the name and click on Finish.
Next, right-click on the shortcut you just created and choose Properties.
Click on the Shortcut tab and under the Target field type the following path.
C:\Windows\explorer.exe /n, /e, <Location>
Here you need to replace the <Location> with the actual folder path. For example,
C:\Windows\explorer.exe /n, /e, C:\Output folder

Click on Apply and Ok, this will set the Output folder as a file explorer default folder.
Change the Folder icon if you want, follow the steps from the link to Change the folder icon in Windows 11.
Read Also:
Fix Location Tab Missing in folder properties on Windows 11/10
Fix Windows 11 File Explorer not responding or Slow
How to Disable Tabs in Windows 11 File Explorer?
How to use File Explorer size filter in Windows 11?