Wi-Fi is a wireless networking technology that allows devices such as laptops, desktops, mobile devices, and other wi-fi-enabled devices to connect with the Internet. Nowadays many users are using Wi-Fi to connect to the Internet. Internet connectivity occurs through a Wireless router, when you connect to Wi-Fi from your device, you are actually connecting to a Wireless router. The router allows you to connect with the Internet. In Windows 10 when you connect to the Wi-Fi, that is newly detected or for the first time, windows will automatically create a Wi-Fi network profile for your convenience. Wi-Fi compatibility devices have an inbuilt Wi-Fi module in it. You can enable or disable this Wi-Fi adapter in many ways. This article will guide you to Disable Wi-Fi Using PowerShell or Command Prompt in Windows 10.
Disable Wi-Fi Using PowerShell:
You can use PowerShell or Windows Terminal to execute the following commands to disable the Wi-Fi Adapter.
Open PowerShell or Windows Terminal in elevated mode and type the following command.
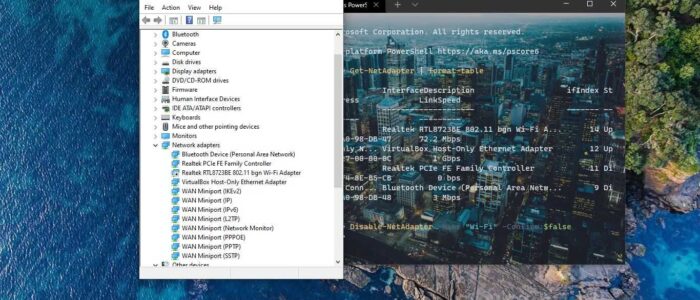
Get-NetAdapter | format-table
This Command will list out the number of Network adapter present on your computer/Laptop.
Note the Wi-Fi adapter interface name and replace it in the Next following command.
Disable-NetAdapter -Name "Adapter-Name" -Confirm:$false

Replace the “Adapter-Name” with the actual interface name. Mostly the Wireless interface name would be “Wi-Fi”. Next hit Enter. This command will immediately disable the Wi-Fi adapter.
To Enable the Wi-Fi adapter back, type the following command.
Enable-NetAdapter -Name "Adapter-Name" -Confirm:$false
This command will Enable the Wi-Fi adapter back in Windows 10.
Using Command Prompt:
To Disable the Wi-Fi using Command Prompt use the following commands.
Open Command Prompt in Elevated mode and type the following command first.
netsh wlan show interfaces
This command will list out the number of Wireless network interfaces present on your computer/Laptop.
Now, type the following command to disable the Wi-Fi adapter using command Prompt.
netsh interface set interface name="Interface-Name" admin=DISABLED

Replace the Wireless Interface-Name, Usually Wi-Fi, and hit enter. This command will disable the Wireless Network Interface.
To enable it back type the following command.
netsh interface set interface name="Interface-Name" admin=ENABLED
This will enable the Wireless Network Interface.
Read Also:
How to List out Current Logon Sessions in Windows?
How to Export all Saved Wi-Fi Passwords in Windows 11?
How to Troubleshoot and Fix Wi-Fi Not Connecting Automatically?