Maven is a powerful project management open-source build tool that is based on POM (Project object model). Maven is developed by the Apache Group, and it is used to build, publish and deploy several projects at once for better project management. This tool allows developers to build and document the lifecycle framework. Maven is written in Java, and it is used to build projects written in C#, Scala, Ruby, etc. it is mainly focused on the simplification and standardization of the building process. Maven has a lot of benefits like using maven you can easily build a project, we can add jars and other dependencies of the project, it provides project information and etc. In this guide, we are going to see how to Install Maven for Java in Windows 11.
Install Maven for Java in Windows 11:
There is no direct installation for Maven, you need to extract and add the maven path to the local System environment variable. Follow the below-mentioned steps to Install Maven for Java.
First Download the Maven Zip file from the Official Maven download page. You can access the earlier versions of maven from the archives link in the Previous Releases Section.
Once you downloaded the required version zip file, just extract the zip file and copy the extracted folder to the C Drive > Program files Create a folder named Maven, and Copy the extracted folder to the following path.
C:\Program Files\Maven
Create System Variable:
Open the run command by pressing Windows + R and type sysdm.cpl and hit enter, this command will open the System Properties Window.
Under System Properties, click on the Advanced tab, and click on Environment Variables.

Under System Variables, click on New, and enter the Variable name and Variable value as mentioned below.
Variable name: MAVEN_HOME
Variable value: Maven extracted path <C:\Program Files\Maven\apache-maven-3.8.6>

Click on OK, Next click on Path under the System variable, and choose Edit.

Click on New and enter the following variable and click on OK.
%MAVEN_HOME%\bin

Next Click on Apply and Ok and close the System Properties window.
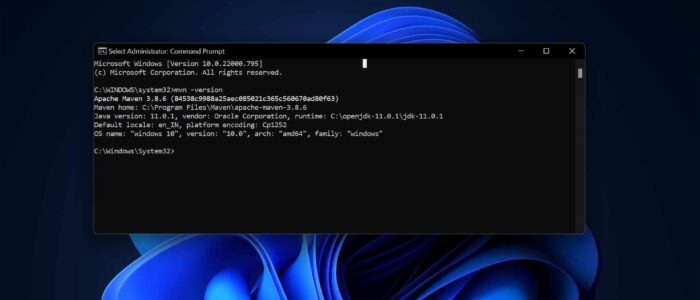
Verify Maven Installation:
Open the Command Prompt and run the following command to check the current version of Maven.
mvn -version
I hope this helps.
Read Also:
How to install Open JDK in Windows 11/10?
Fix Java Error Code 1618 in Windows 10