Nowadays most laptops comes with an inbuilt webcam, and we also used to buy an external webcam for computers. Webcams become an essential part of laptops and computers, and nowadays the utilization of webcams is more due to the work-from-home scenario. Many users use webcams to attend meetings from different apps like Teams, Skype, and other video conferencing apps. By default all the laptops come with the built-in webcams LED indicator, this LED indicators let you know whether the camera is functioning or not, and it indicates whether the camera is turned on or off. You can find small LED light next to the inbuilt webcam if the LED is turned on then the camera is ON, if the light is off then the camera is in OFF state. It will improve privacy, in some laptops, you can’t find the LED camera privacy indicator, if you want to improve security without the LED privacy indicator, then you can use the feature called Hidden camera privacy indicator in Windows. This feature is only available on Windows, this feature allows users to physically see if their webcam is currently in use. This can be in the form of a light or icon on the device that indicates when the camera is on or off. This feature is intended to give users more control and awareness over the use of their webcam, and to help prevent unauthorized access to the camera. This article will guide you to enable Hidden Camera Privacy indicator in Windows 11.
Enable Hidden Camera Privacy indicator in Windows 11:
By default, the Hidden Camera Privacy indicator is disabled in Windows operating system, and there is no straightforward way to enable this option. Here we are going to use the registry editor to enable this feature.
Note: Modifying the Registry is risky, and it causes irreversible damage to your OS Installation Follow the steps correctly. Friendly advice Before Modifying Registry Creating Restore Point is recommended.
Open Run command by pressing Windows + R and type Regedit and hit enter, this command will open the Registry Editor console.
Now navigate to the following registry path.
Computer\HKEY_LOCAL_MACHINE\SOFTWARE\Microsoft\OEM\Device\CaptureFrom the left-hand side click on the Capture registry key and from the right-hand side look for the DWORD named “NoPhysicalCameraLED”.
If you are unable to find the DWORD, then right-click on the Capture registry key and choose New > DWORD (32-bit) Value, and name the DWORD as “NoPhysicalCameraLED”.
Double-click on “NoPhysicalCameraLED” DWORD and set the value as 1 and click on OK.

Close the Registry Editor and restart your system once.
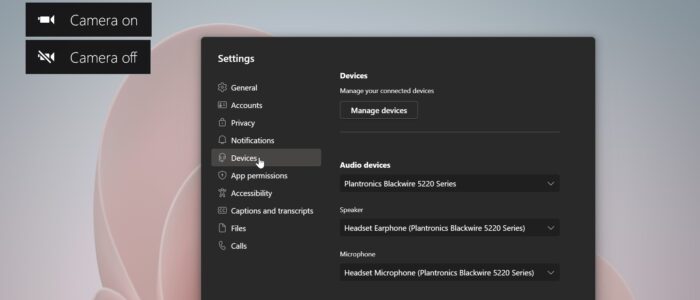
After the restart, Open the camera and check, you’ll get a small pop-up from the left-hand side indicating the camera ON and Camera OFF. To revert the changes, just use the same steps and just modify the “NoPhysicalCameraLED” DWORD to 0 and click on OK. This will disable the hidden camera privacy indicator.
Read Also:
How fix Can’t start your camera error in Windows 11?
Fix Camera Reserved by another app error 0xA00F4243 in Windows 11/10
How to Adjust Teams Camera Settings in Windows 11/10?
Disable/Enable Camera On/Off On screen Display Notification