Windows 11 comes with a lot of new features and the immersive cool User Interface, it has a new start menu, Centered taskbar, rounded corners, cool animation, and new wallpapers. And another noticeable feature of Windows 11 is the new boot logo and start menu logo. Many users Switched to Windows 11 and Microsoft released a Stable Windows 11 update and migrating users from Windows 10 to Windows 11. The most obvious new feature in Windows 11 is the floating and centered Start Menu and the Centered Taskbar. This redesigned Taskbar and the Start Menu is a completely new interface for most of the users. And users clearly not ready to adapt to this completely new interface, many users are well familiar with the old Windows 10 start menu. And users can’t adapt to the sudden change in the new start menu interface. If you are using Windows 11 and miss the old Start menu style, you can restore the classic Start menu in Windows 11. This article will guide you to Restore Classic Windows 10 start menu in Windows 11.
Restore Classic Windows 10 start menu in Windows 11:
Note: Previously We posted an article about the same topic to Restore Classic Windows 10 Start menu in Windows 11, in that post I have shown a method to restore the classic Windows 10 start menu using the Registry editor, but that method is no longer working, in this post, I have shown a new method to restore classic Windows 10 start menu in Windows 11.
In this method we are going to use a free open-source software called Explorer Patcher, it’s a free utility that gives you a lot of control over the taskbar, system tray, file explorer, start menu, and others.
First Download the Explorer Patcher from the GitHub page. Click on the latest release and expand the Assets section and download the ep_setup.exe file.

Now right-click on the exe file and choose Run as Administrator and install the software, once you install the Explorer patcher, it will automatically restore the entire taskbar and start menu to Windows 10 style.
If you want the same style then leave the settings as it is, if you want to modify or revert back to Windows 11 start menu.
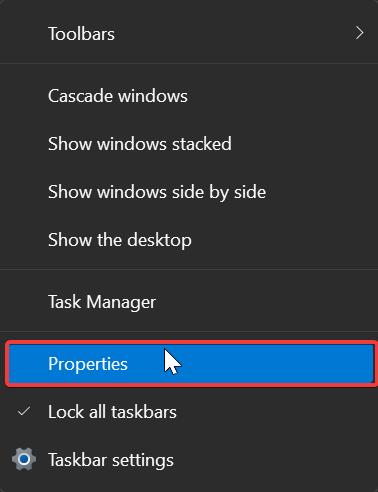
Right-click on an empty area on the Taskbar and select the Properties option from the Context menu.
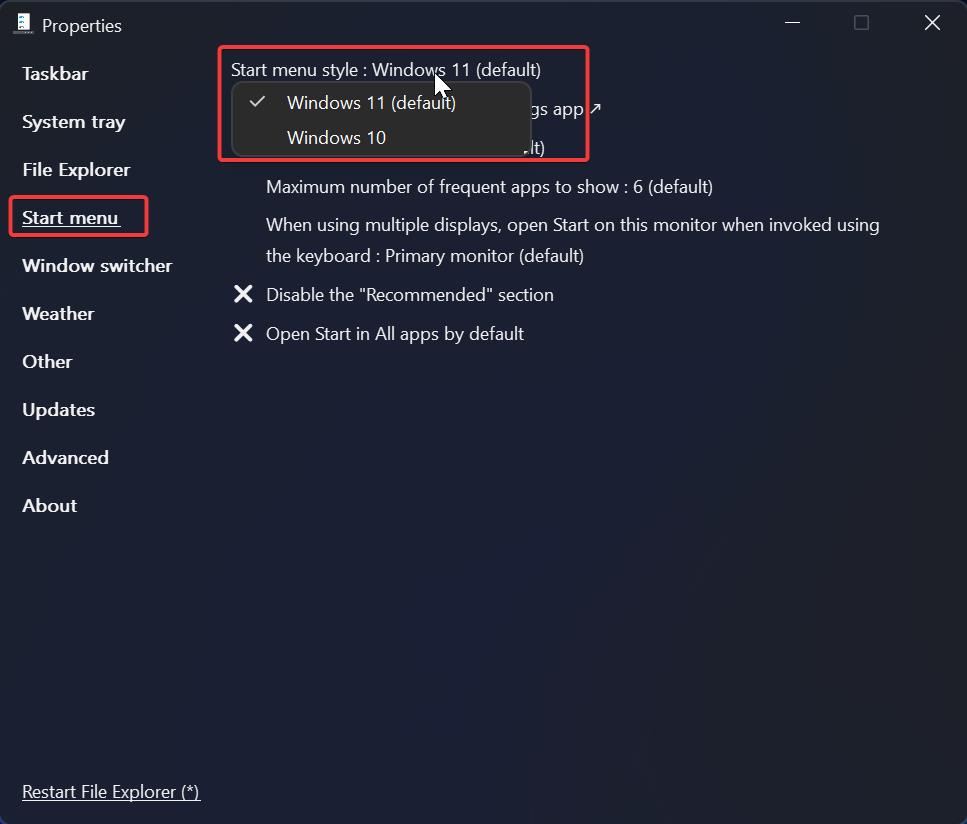
Under Properties click on the Start menu section and change the Start menu style to Windows 10 or Windows 11 (default) based on your requirements.
Also, click on the Taskbar and change the Taskbar style to Windows 11 (default). Then click on Restart File Explorer, That’s it now you can see the Windows 11 start menu and Taskbar.
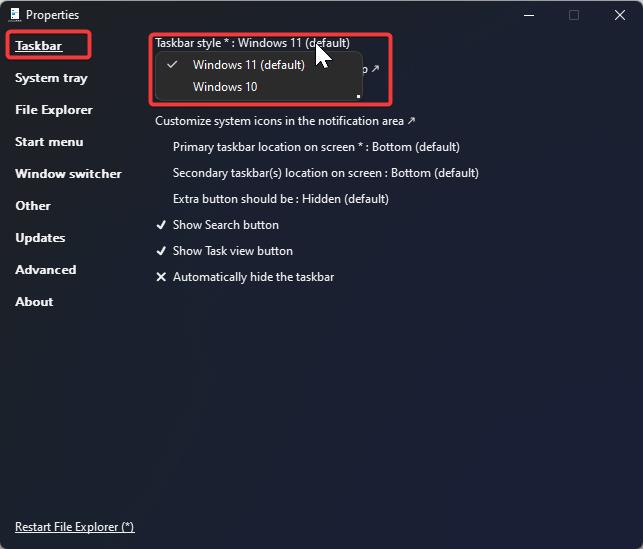
You can also modify other settings for Taskbar, System tray, File Explorer, Start Menu, and others.
Taskbar Position: You can move the Start menu to the left side or keep it centered, To get the classic windows 10 start menu, move the start menu to the left side.
Corner preference: This option allows you to choose the rounded or not rounded corners of Start menu, you can also change the floated or docked style start menu.
Disable Search button: Under the Taskbar option you can find the option to enable or disable the Search button.
Disable Task view button: You can enable or disable the Task view button from the taskbar.
Other: There are other fine-tune options available under the Other option, like Remember last used section in this Window, Open Clock flyout, Show separators between taskbar toolbars, add shortcut to programs settings in Win + X menu, Disable Office hotkeys, Disable Rounder corners for application Windows and other settings.
This tool is very useful and has a very straightforward process to modify many Windows settings.
Read Also:
How to Disable Windows 11 New Right-click context menu?
How to Block Ads in Windows 11 File Explorer?
Enable or Disable Right-Click Context menu in Windows 11/10?
How to Get New Task Manager on Windows 11?
Disable Show more options from Right-click context menu in Windows 11


